Copyright © 2005, 2006, 2009 Joseph Mack
20090716, released under GPL v3
Abstract
How to construct an analemma in the privacy of your own home. Fun for you and your family, using only tools known to the ancient Greeks (a stick, some paint, a year or so of spare time) and a WWVB controlled atomic clock. What happens when you try to do it at your kid's school.
Table of Contents
The sun crosses the sky at a lower elevation in winter than in summer. If you were to take the position of the sun at a fixed (clock) time of the day (say clock noon) throughout the year, you might guess that the sun's path would be a straight line between its low position in winter and high position in summer, and that the sun would retrace the same path on its return in winter. In fact the path is not a straight line, but a figure "8" called an analemma. (http://www.analemma.de/, see defn 2). Here's Dennis DiCicco's famous photo of an analemma (http://www.analemma.de/images/articles/dicicco.jpg) the first analemma photo I know about.
The analemma shape of the sun's path is caused by the earth's orbit being elliptical, rather than circular. The ellipticity of the earth's orbit
- causes the sun to spend a longer time in the northern hemisphere (188 days) compared to the southern hemisphere (178 days)
- causes the sunrise and sunset to not occur at 6am and 6pm (local time) on the equinoxes
causes the latest/earliest sunrise/sunsets to not occur on the solstices.
At 40°N, the earliest sunset is 7 Dec and the latest sunrise is 5 Jan, the earliest sunrise occurs around 14 June and the latest sunset around 28 June (see The Dark Days of Winter http://aa.usno.navy.mil/faq/docs/dark_days). Here's the sunrise/set time through the year for Rockland ME (lat 44.1°N, near enough to 40°N) as taken from Weather Underground (http://www.wunderground.com/US/ME/Rockland.html).
- is incorporated into globes of the earth, where the analemma is drawn in the south Pacific Ocean.
All this information was available to me as a high school student, reading the newspaper at breakfast each day looking for the time of set/rise for the sun and planets. Most of this information was also known by the ancient Greeks, who also knew the correct size and shape of the earth and moon. The ancient Greeks used nested epicycles to approximate the planet's and the moon's orbits. That the shape of the orbits were in fact ellipses, was determined by Kepler, using Tycho Brahe's meticulously collected data.
Using the geocentric view of the sun's daily position, the sun is closest to the earth (perihelion) about 5th Jan and so whizzes past us more quickly. By 6 July, the sun is further away and moves more slowly against the fixed stars (and looks a little smaller). Because of the different speed of the sun against the fixed stars during the year, if you look up at the same time (say noon), some days the sun will be fast (by 17 mins in November) and be slow (by 14 mins in February) (see Sundials on the Internet http://www.sundials.co.uk/equation.htm). The difference between true time (as measured by a clock) and the apparent time (as measured by the position of the sun) is called the "equation of time" and is found on a sundial to enable you to calculate clock time from the sun's position.
An article in Sky and Telescope ("The Analemmas of the Planets", David A. Harvey, Flandrau Planetarium, Sky and Telescope, March 1982, p 237-9) showed the analemmas and the calculations for the other planets. Since the mid '90's, you've been able to draw analemmas on your azimuthal equidistant projection maps (http://www.wm7d.net/az_proj/az_html/az_help.shtml#analemma). Now everyone is doing it e.g. Astrophotography by Anthony Ayiomamitis (http://www.perseus.gr/Astro-Solar-Analemma.htm) and there is hardly a place on earth that hasn't been analemmaed.
The analemma is the path that the sun would take through the sky if the earth rotated about its axis only once a year (i.e. kept the same side pointed towards the sun). Because the earth rotates every 24hrs, rather than once a year, to see the analemma, we have to look at the sun at the same time every day. Because the moon keeps the same face to the earth, astronauts on the moon looking up at the earth would see it move through an analemma shaped path every month.
In the times not so long past, an understanding of the analemma was so basic that they were drawn on globes of the earth. The analemma rated up with the equator and the poles. By the time I entered grade school, the dark ages of education were upon us, and teachers mumbled incoherently when asked to explain the analemma. The embarrassement of the teacher's on discovering their ignorance of the motion of the sun, at the level understood by the ancient Greeks, was handled deftly by globemakers who, anxious to retain their customers, removed the analemma from globes [1]. We are now in an era where graduates of the education system leave with a view of the solar system that predates the ancient Greeks. This is a fitting educational outcome in a country where both major political parties agree that our best exports are jobs, subsidised agricultural goods and promisory notes payable by our children.
Growing up in the southern hemisphere and being being subject to the Euro/American northern hemispherism of our education system, gave us plenty of opportunity for testing our knowledge. To navigate by the stars, you look for Polaris, which as everyone (well the Scout manuals) knows is directly north [2] . The books talked about 4 seasons: summer, winter, spring and fall - if you can believe that. Unbeknown to the small fraction of the world's population in USA and Europe, most of the world has wet and dry, or dry and dry, or wet and wet. Where I grew up, the climate was dominated by the southern oscillations: we had dry and occasionally wet and when it was wet, there was lots of it, but only once every 10-20 yrs. Sure, sometimes wet comes with cold and sometimes it comes with hot, but plants and animals breed and grow on water, not temperature. An agriculture, based on crops and animals that couldn't survive 20yrs of drought, was doomed from the start. It was only the willingness of the Australian taxpayer to compensate farmers for decades of "unexpected" crop losses that kept the system functioning for 200 yrs. Sundials are latitude dependant: in particular in the southern hemisphere the sun crosses the sky from the right to the left (anticlockwise, the opposite direction to the northern hemisphere). When I grew up in Australia, in the '50's and 60's, no-one would be caught dead buying anything made in Australia. The sales clerk would only have to say to my mother "but Modom, this is British" and that would settle it. The article would be snapped up, the purchase assuring the sales clerk that my mother recognised only the finer things of life. The problem with a sundial made for a latitude of 60N, sitting in a garden at 34S, was that it would give a time in the morning when it was the afternoon. Parks and gardens were filled with transplanted sundials, installed by credulous burghers wishing to simultaneously declare their love of art and pay homage to the scientific accomplishments of the ancients. Running the gauntlet of the Australian education system was a punishing proving ground for the critical thinking of a young person.
Although my azimuthal equidistant projection map generator (http://www.wm7d.net/az_proj/az_html/azproj_help.shtml#analemma) has included an analemma since the mid '90's, I didn't know about analemmic sundials. I occasionally visit my native Sydney, Australia to see friends and to walk in the Blue Mountains. On returning from one hike, I bought fish and chips in Richmond, on the banks of the Hawkesbury River. Looking for a place to eat, the proprieter gave me directions to a local park. He said it was a little difficult to find, but to not be discouraged. It wasn't far, but there were no signs to it and I had the place to myself on the banks of the river at sunset at a time when the place should have been jumping with people. Why do they have this nice park if no-one goes there? I guess Australia is such a nice place, that you don't need parks to enjoy the outdoors :-)
There to my surprise, on the edge of the river, was an analemmic sundial.

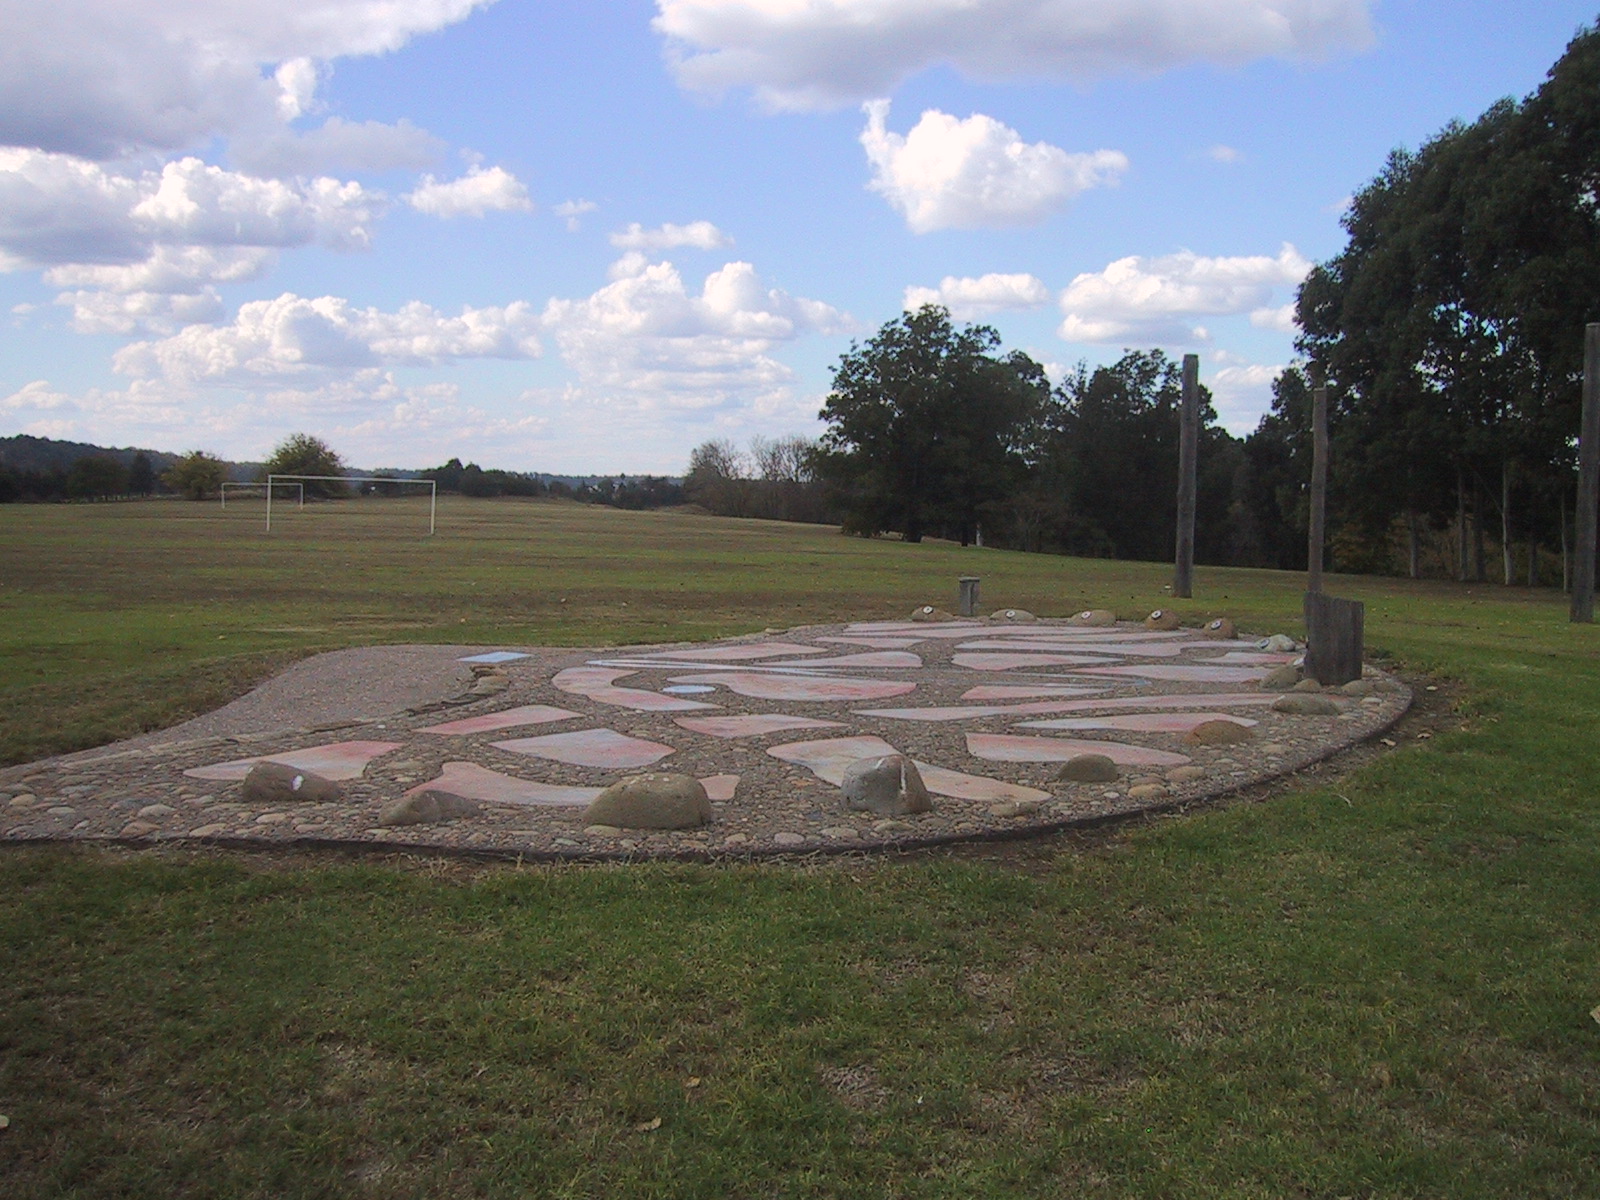
An analemma, on the ground, was marked by the date, and was surrounded by an arc of stones marking the hour. A person (of any height) stood on the analemma at the spot for the day and looked at their shadow on the arc of stones. It was apparent that the analemma automatically corrected for the equation of time. I hadn't realised this was possible. I wondered if it was an exact solution or only approximate. Did it work all day, all year? What was the shape of the arc of stones? I did some calculations on my return to USA, but wasn't convinced that I'd done them correctly.
On my next trip back to Sydney, I visited Max Hatherly, a friend's father (who lived in Stannix Park near the park with the analemmic sundial) and mentioned the analemmic sundial, how pleased I was to find it, and that I was amazed such a thing existed. He grinned and said "I designed that sundial" and pulled out the local phone book from a few years before.
Figure 4. Phonebook celebrating the start of work on the Richmond Analemma - photo courtesy Janelle Hatherly
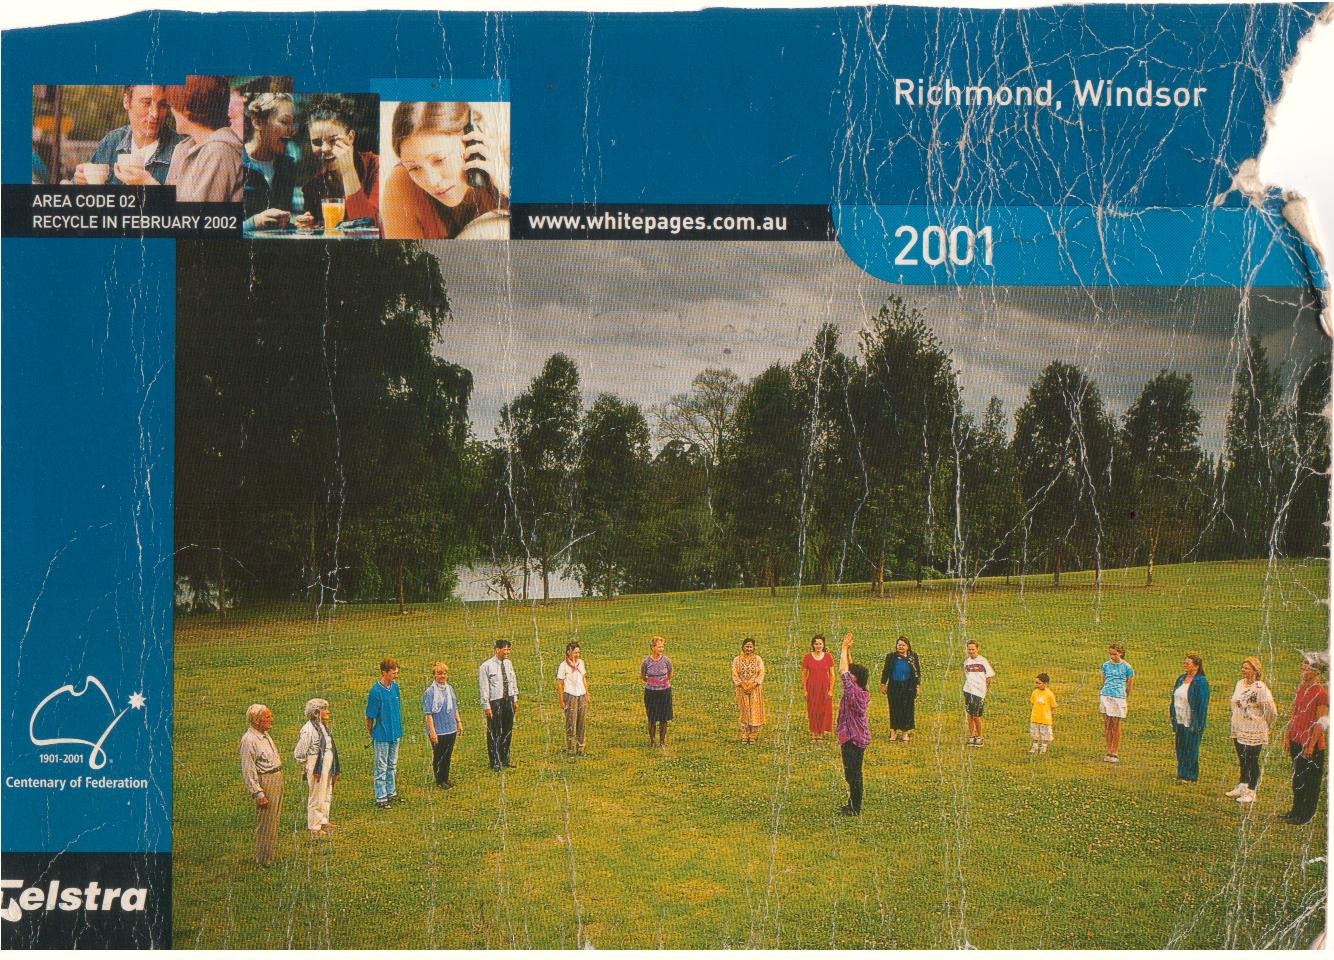 |
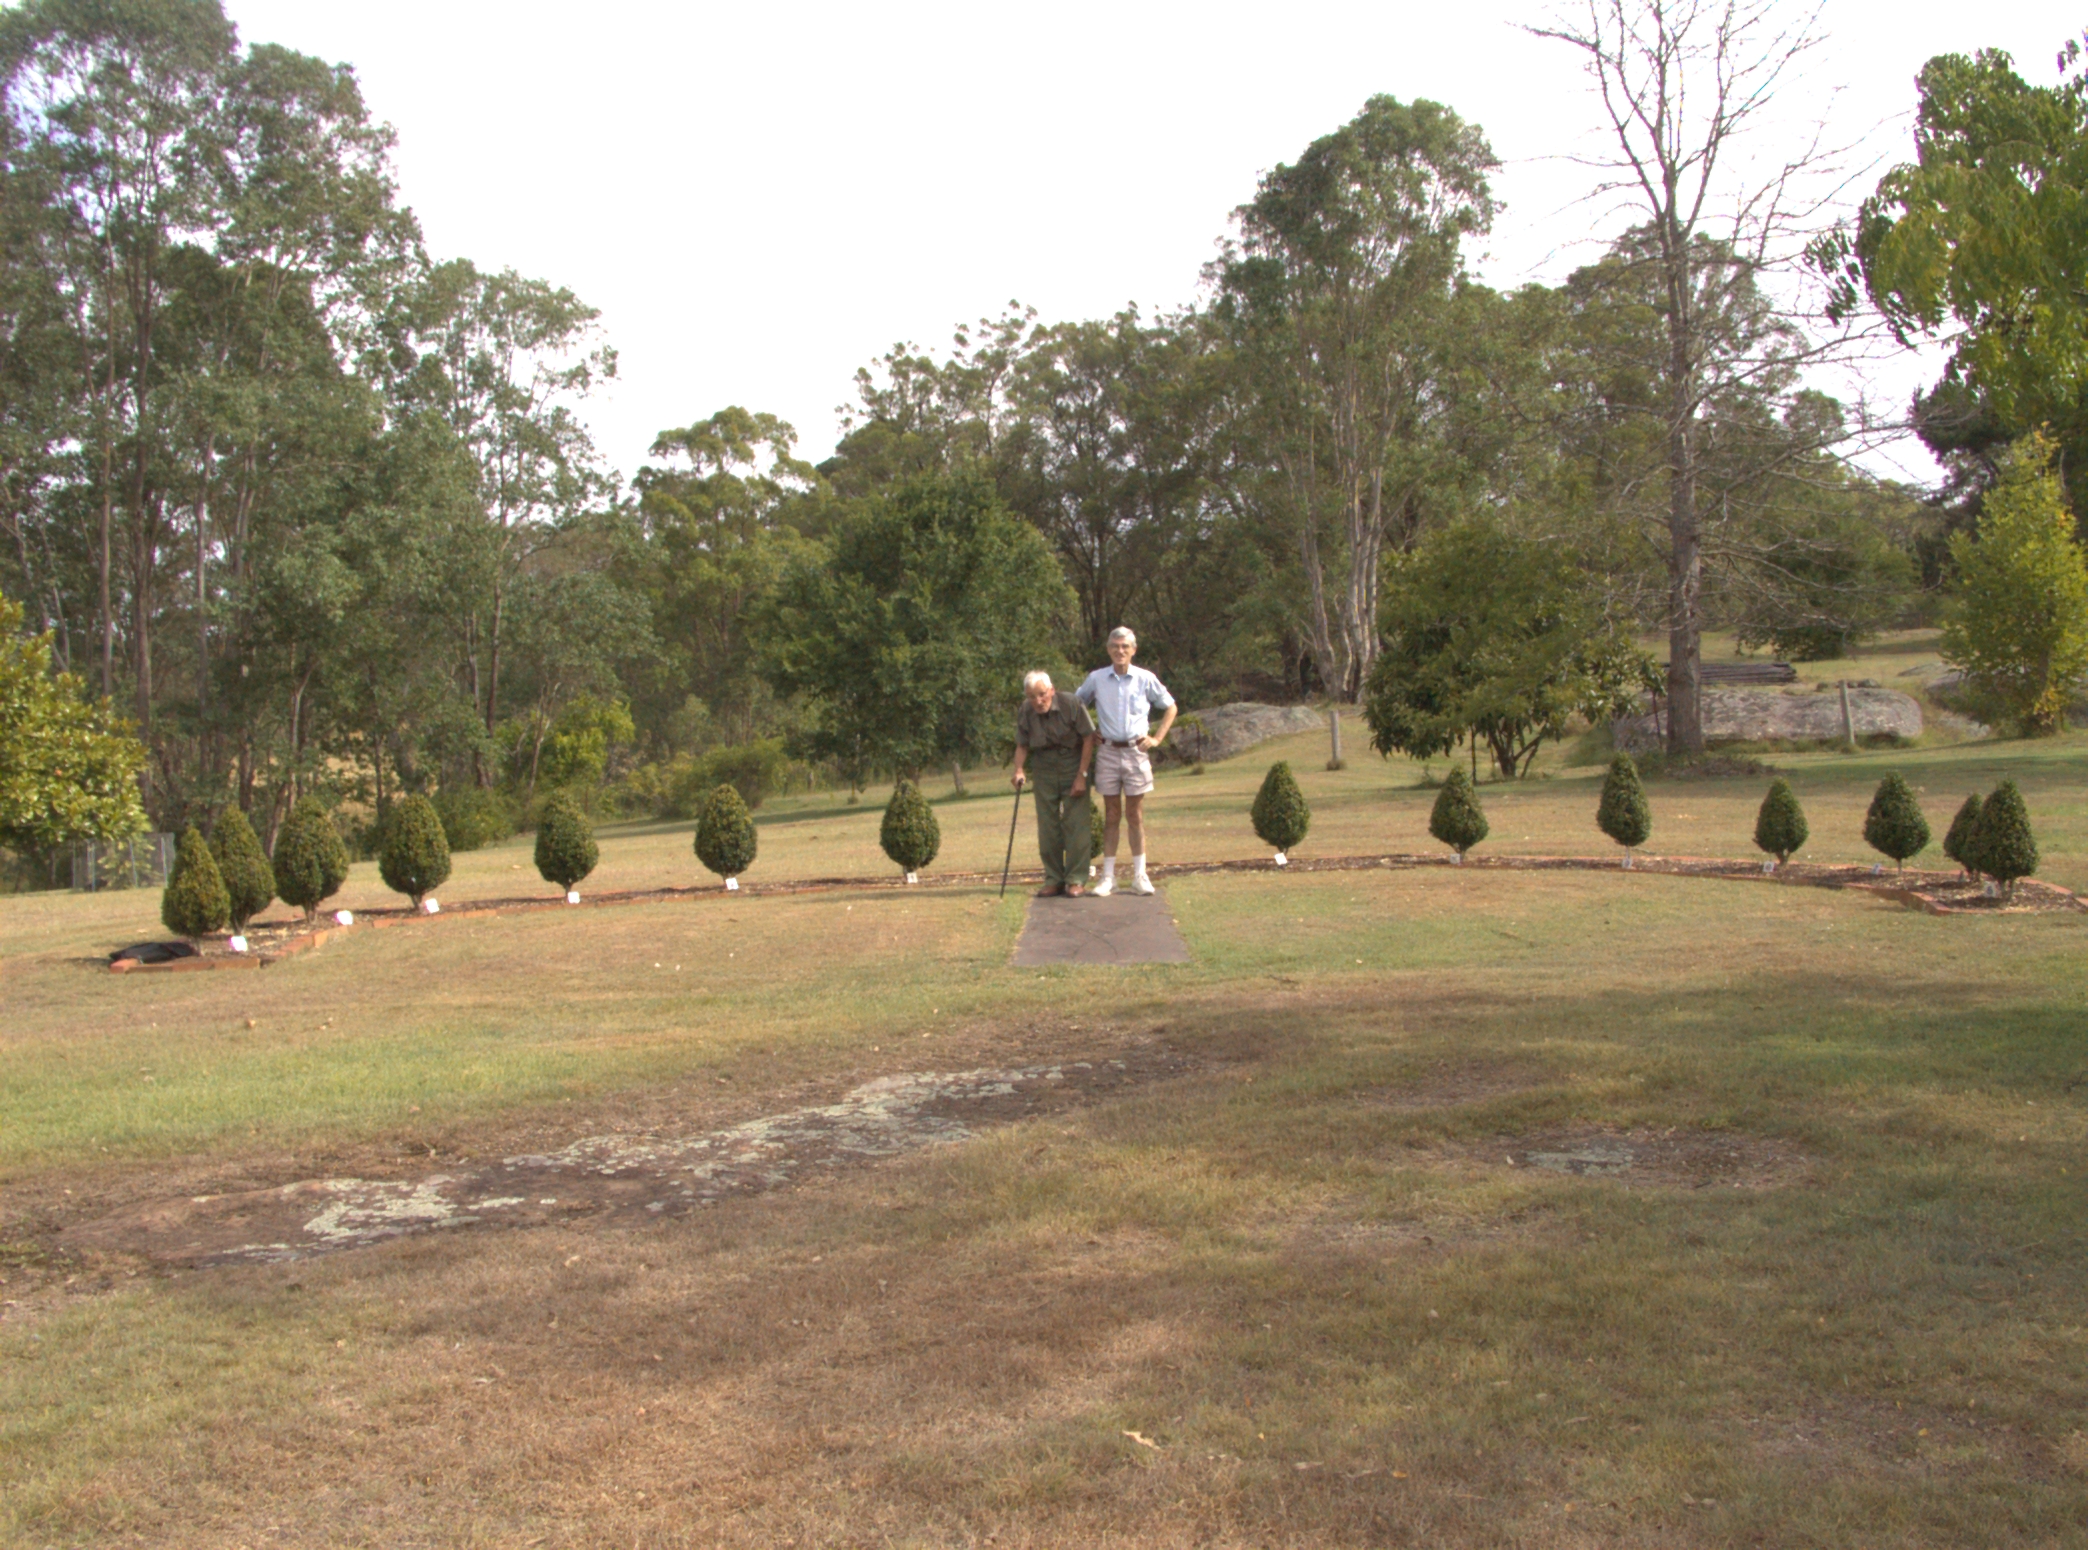
The front cover showed Max (on the left) and the team that build the analemmic sundial, with each person standing behind one of the hour marker stones. Max then took me to his garden to see his personal analemmic sundial.

 | Note |
|---|---|
Note that the summer lobe of the southern hemisphere analemma (where Max is standing) is the larger. Compare this lobe with the small summer lobe of the North Carolina (northern hemisphere) analemma (see taking a reading). The relative size of the two lobes depends on the plane in which the analemma is projected. While the summer lobe (closest to the gnomon) of the NC analemma projected on the ground is the smaller, the summer lobe (the upper lobe) of the NC analemma projected onto the vertical glass door is the larger (see front door analemma from outside). The door in NC, being vertical, would be in the horizontal plane if moved to 90-38=52°S i.e. the door analemma in NC looks like a ground analemma in the southern hemisphere. The spacing of consecutive dots in the summer lobe projected on the ground is small, while the spacing of consecutive dots of the summer lobe projected on the vertical glass door is large. | |
I gathered that Max had done more than just design the park's sundial; he may have proposed and helped raise the funds too.
Many months later, after my return to USA, I remembered that on a previous trip, I'd told Max I was going to visit the Mt Annan Botanic Garden (http://www.rbgsys.gov.au/mount_annan_botanic_garden/). He'd smiled and said "make sure you look at the analemmic sundial". Back then, I didn't think it anything special - it was just another sundial. I'd missed the point.
If you can watch the analemma from all of the ancient temples in Greece, then it could be done from the driveway of my house in Durham, North Carolina, USA. What school nowadays can be without an analemmic sundial? The science teacher at my son's school was interested, so we looked for ways to put an analemma in the school too.
a gnomon and a surface to project the shadow: "gnomon" is the greek word for a stick that casts a shadow. The surface is usually flat and horizontal but it can be curved and/or vertical. It just must be illuminated all year at the time of day that you're going to mark the analemma.
At my son's school I picked open ground in the middle of a circular driveway infront of the school, using a streetlight as a gnomon and marked the spots by pushing coloured golf tees into the ground. I hoped that no-one would notice the golf tees and pull them up (or worse - move them). The ground wasn't flat or level, but it was available.
Our flat but sloping northern hemisphere driveway faced the south and was illuminated most of the day. I marked the shadow spots with spray paint using a piece of cardboard as a mask.
A portable flagpole was made from a 10' long section of EMT (tubing for 120V house wiring) readily available from hardware stores (you check they're straight, by rolling them on the floor before you buy, but all the tubes were straight). The length of the pole was about the largest that would fit the shadow of the sun on the driveway in winter. This is called the Mk1 gnomon.
Note The latitude here is 39°N. At the winter solstice, the sun's elevation at noon is 90-39-23.5=27.5°. The shadow of a 10' pole at the winter solstice would be 23' from the base of the gnomon. Because of the sloping ground, my analemma is only 16' to the winter solstice point. To figure out where to put the gnomon in the driveway (so that the shadow would always be on the cement and not in the lawn) I calculated the maximum length of the shadow (i.e. at the winter solstice) using the length of the pole and the sun's angle below the zenith (my latitude of 38degN plus 23.5deg) and added a few feet for good measure. I found the north-south line by looking at the sun at noon and located a piece of driveway that would hold the vector and wouldn't be under the parked cars. I then spray painted a spot on the driveway to place the gnomon. Since the driveway was bumpy (gravel in the cement) and sloping, the pole needed a rounded and large radius end to sit reproducably on the ground. I also needed a large blob at the top to cast a shadow. I cut a hole in two tennis balls and glued one on each end of the pole. If I accidentally bent this tube, I could easily make another one of identical dimensions. To position the pole vertically for the measurement, I initially used the surveyor's method of balancing it between my closed thumb/forefinger. If the gnomon wasn't exactly vertical, it would start to fall one way or another. This method didn't work on a breezy day, so I glued a 3-axis bubble level (also from the hardware store, these are designed for setting up fence posts) to the tube (I only looked at the two horizontal axes).
a time to observe the sun:
Note all times given are in standard (daylight wasting, not daylight saving) time format. At home I chose local mean noon. Since our longitude (-79deg) is 4 deg west of the standard meridian, local mean noon is 12:16pm. At my son's school, the science teacher and I decided to mark the ground at 16mins past any hour we happened to be around. The local mean noon was marked with red golf tees, +/- 1hr with orange golf tees and +/- 2hrs with yellow golf tees (rainbow order) producing 5 sets of analemmas at 1 hr intervals. We hoped, that just by doing it when we could, that by the end of a year, we'd get enough coverage to see the analemmas at various times of the day. At home I was going to do it each week on saturday (or sunday if bad weather). Most times I got one reading in the weekend. I co-opted the family to stand in when I wasn't home (most of soccer season). At convenient intervals, the sun's shadow was marked through the day (at home at 30min intervals at solstices and equinoxes, at school, near the 22nd of the month, at 10min intervals) to show the path of the sun through a particular day.
a clock:
For the first year, I used a quartz clock, set to within 15secs of the correct time with ntp (http://www.ntp.org/). The most accurate clock in the house (less than 15secs drift/week) was a really cheap digital clock won as a prize at a fair. The smoothness of the analemma turned out to be much worse than my estimate of 15secs error. There were problems with this clock. It didn't have a second hand and I had to watch it the whole minute to get the time right. I also had to bring up my dial-up internet connection each week to reset the clock. This was a time consuming nuisance. About the same time I discovered cheap ($10) WWVB controlled clocks (http://en.wikipedia.org/wiki/WWVB) courtesy of my newly arrived Celestaire 2006 catalogue (http://celestaire.com) [3]. Most areas of the world (except Australia ;-\ ), have similar transmitters to control household clocks to within 1sec.
Celestaire was selling a LaCrosse Technology WWVB controlled clock. I wanted an alarm clock with a back-lit screen and time in 24hr format and this wasn't it, so I went to the LaCrosse web site and found a contender, but no instructions on turning off the back-light. The battery wouldn't last real long if the back-light was on all the time. (How hard is it to put complete documentation on the website?) I called LaCrosse (no 800 number) to be shunted to a computer answering machine, which assured me that my phone call was very important and they were busy helping other customers and they'd answer as soon as they could and to hang on. After about 5 minutes they cheerfully told me to leave a message and they'd call back just as soon as they could (no option to stay on the line). I left my question expecting a reply in time to order that day. Nope, so about 6 hrs later I called again and got the same treatement. They did reply two days later: I should call back again or send my question by e-mail. It would have been simpler to just answer my question. After the 2nd phone call I realised that LaCrosse was only marketing to people with a high tolerance for bad service. I didn't qualify. Two days before LaCrosse returned my call, I'd already been to Walmart (not my favorite store, for its treatment of its workers, but their service is better than LaCrosse's) where I bought a Sharp SPC325 WWVB controlled alarm clock with 24hr format and a back-light that turns off, for half the price (about $10) of the LaCrosse device. It locked onto WWVB the first night, and I tried it on the analemma the day after that.
About a year later I dropped the Sharp onto carpet and it started drifting about 1 sec a day (wasn't locking onto WWVB). The Sharp wasn't available anymore, so I found the SkyScan 31420E on the internet and bought two. It's not particularlty good or bad, but works OK. I bought two because
I wouldn't be without a clock when I dropped the next one
I could compare the two clocks. If they were different, I could conclude that one had lost lock. What if they were giving the same time? The two clocks could be correct, or could be colluding to give me the wrong answer (e.g. neither received a synch signal from WWVB last night and both having the same hardware, drifted the same amount since then).
Note The US Space Shuttle has 4-fold duplicated computer systems. The idea is that if one system has a hardware problem, the other 3 can vote it out and shut it down. Of course, since the hardware in the 4 computers is identical, they all could fail the same way. The only sensible way to handle hardware failure is to have 4 completely different sets of hardware. Then of course the software running on the 4 computers is identical. Any flaw in the software will result in all computers agreeing. The only way to handle this is to have 4 different lots of software, written by 4 separate and independant teams of programmers. You'll probably think I'm being overly cautious here, for after all there haven't been any major problems with the Shuttle program (oh wait...). So Joe, did you get two different clocks? Nooo. Finding one that fitted my requirements was hard enough, without looking for two different clocks. I did think about getting 3 clocks (using the same principle that has safely steered the Space Shuttle program through the treacherous shoals of the past decades).
However now I'd gone from being a man with one clock, who always knew the time, to being a man with two clocks, who never knows the time. Fortunately the two clocks have remained in sync since I got them (about 3yrs ago). I reserve one to stay on the shelf and never be moved (or bumped) and the other one is taken out for shooting the sun.
To my very pleasant surprise, the chalk line produced with this clock had barely any radial jitter (less than 1/4 of the number of bad analemma points produced with the previous clock). I attribute this to being able to hold the WWVB clock next to the bubble level in the same field of view and being able to count down the seconds to the exact minute. Only then do you look up, to the location of the shadow on the ground and walk over and mark it. The previous method of looking up every few seconds (in case the next minute rolled over) was adding jitter to the shadow.
a way to show the analemma for a photograph:
Spray paint shows up well on walls and the side of trains, but didn't photograph well on the driveway. I needed something with a bit of verticality, coloured, light and cheap to mark the spots for a photograph of the whole analemma. I chose plastic drinking cups.
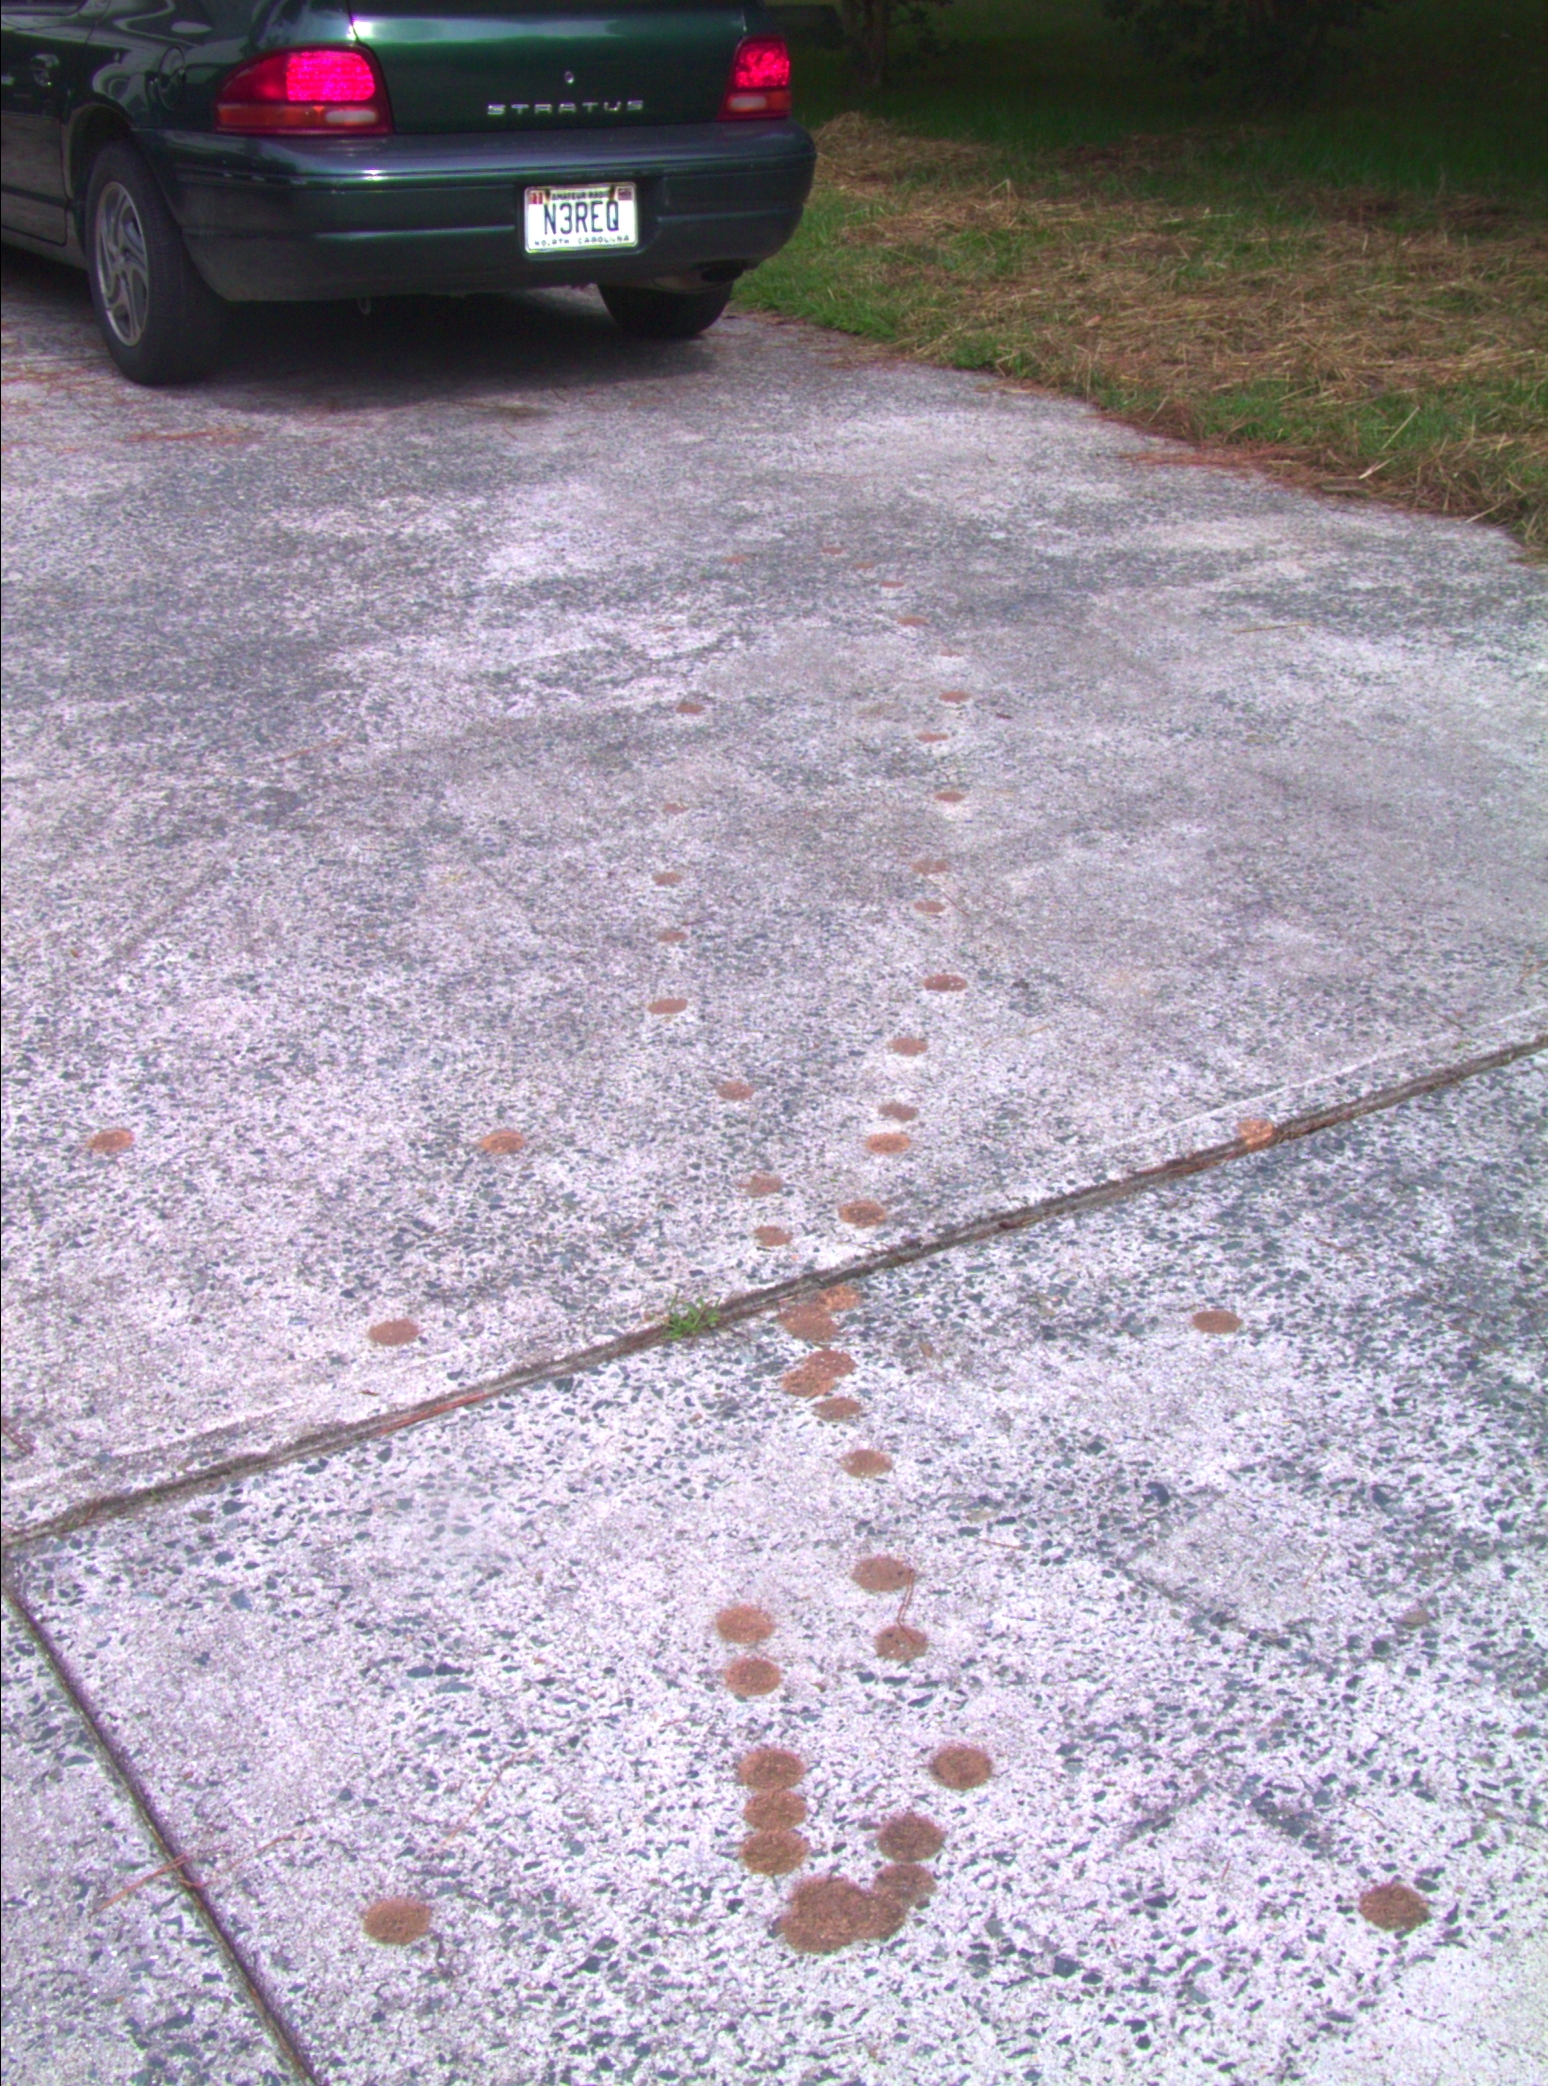
Here's the spray painted dots.
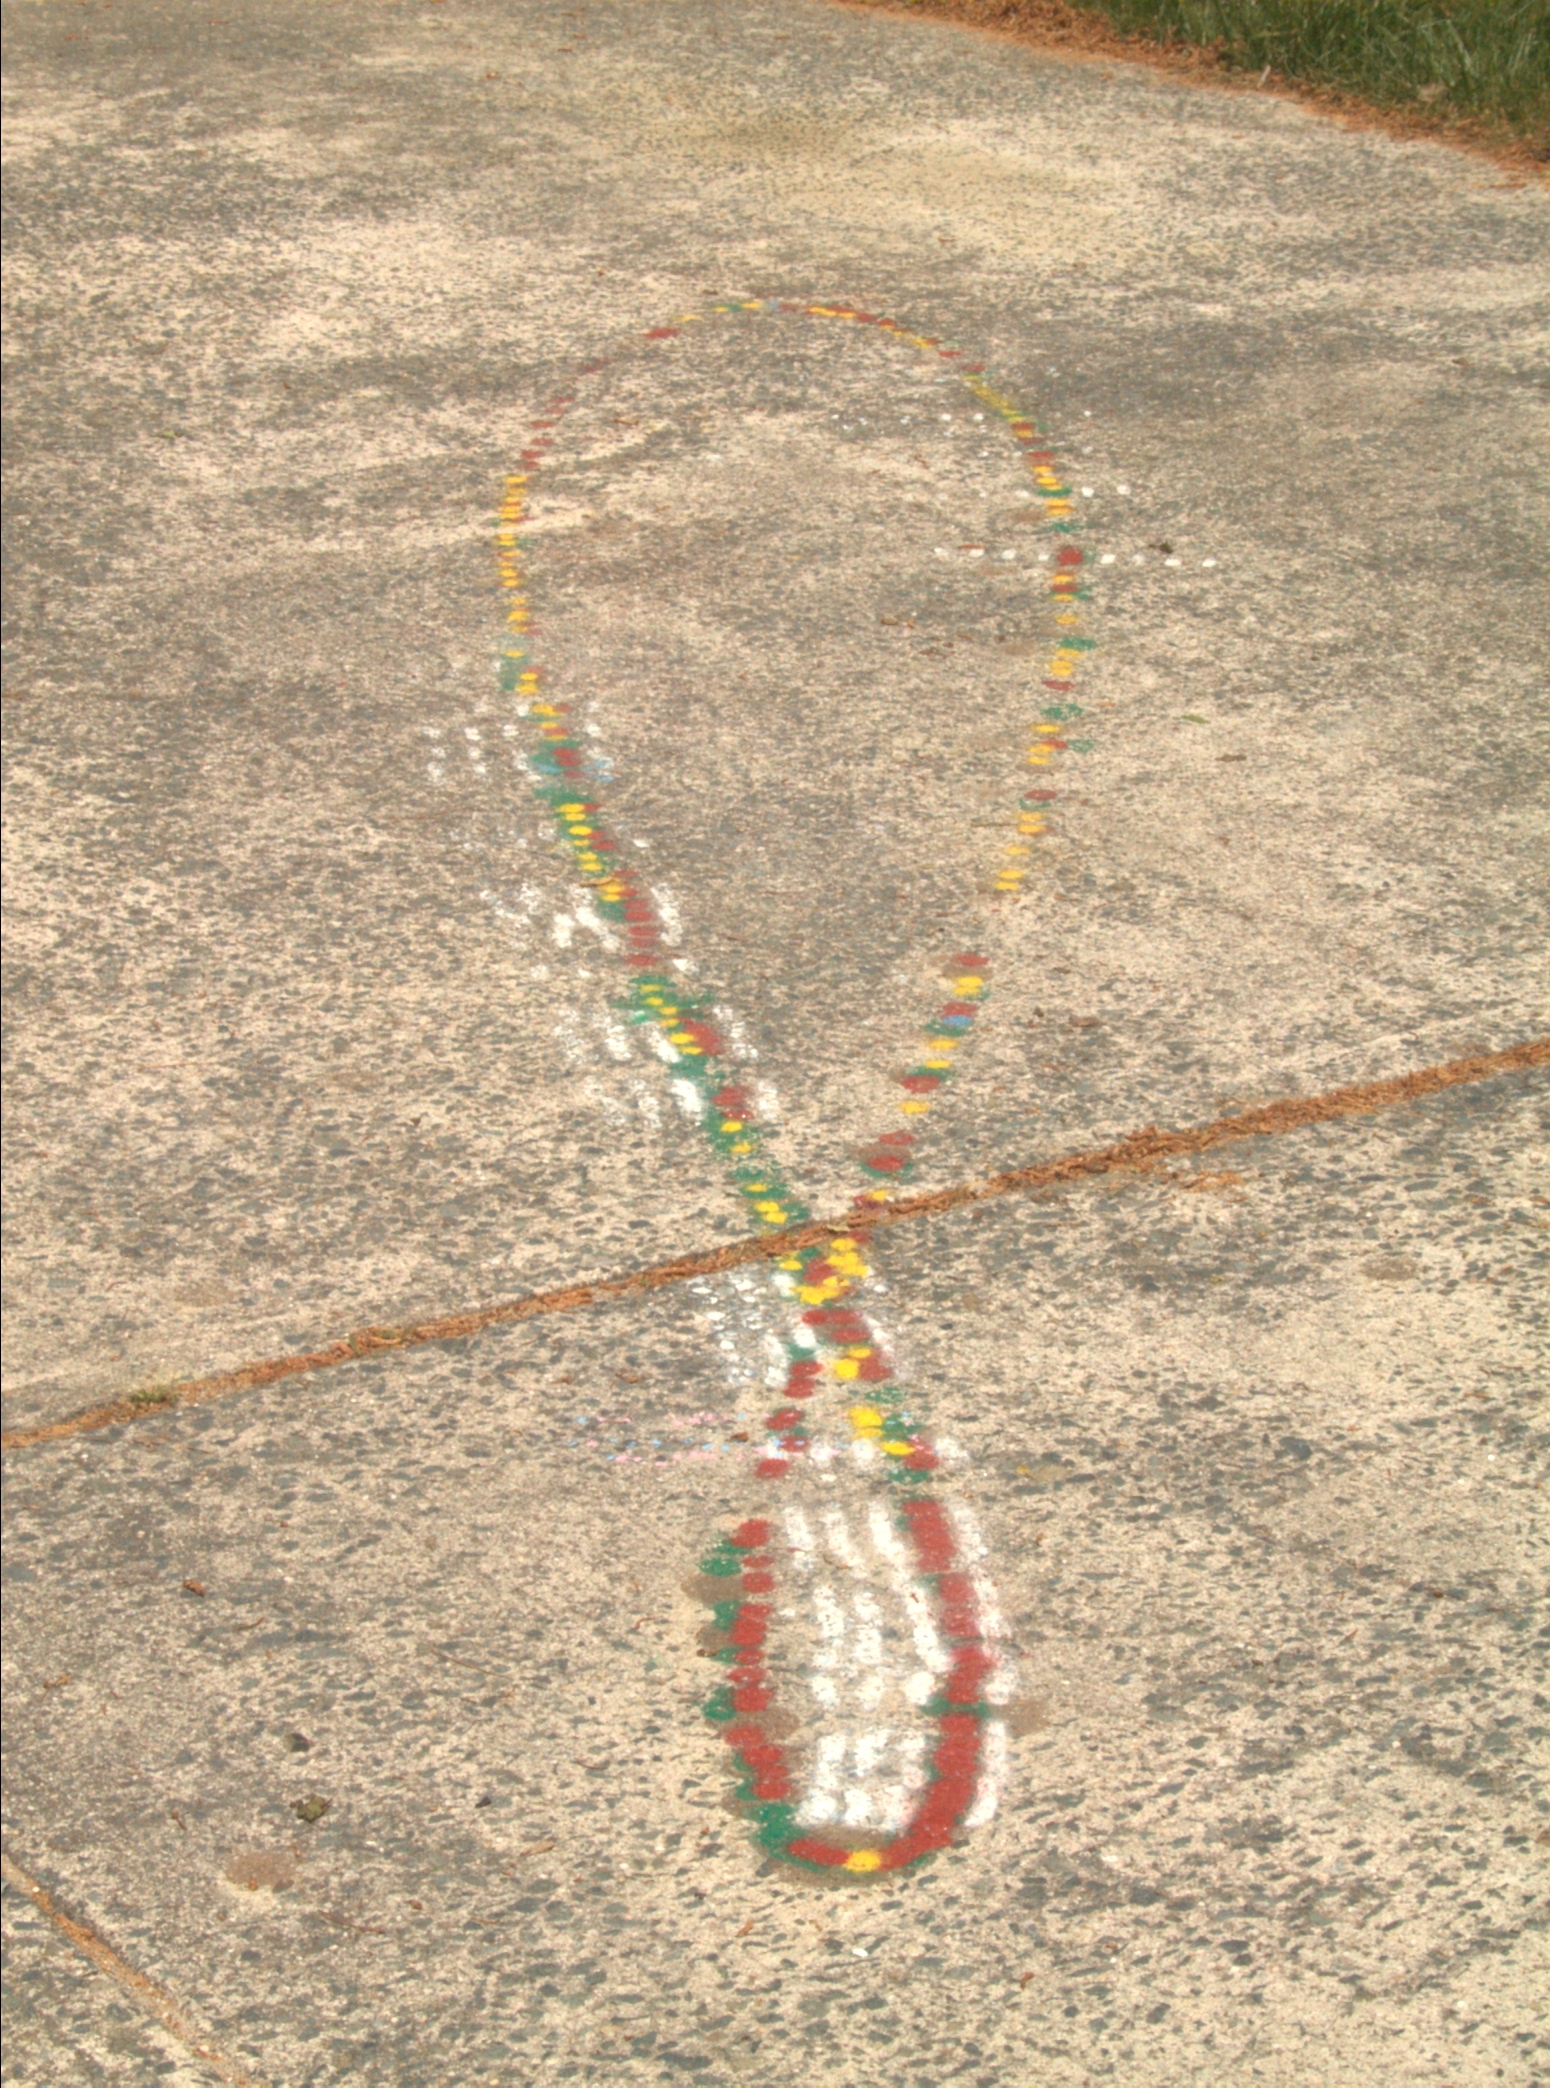
Figure 7. Analemma spray painted dots looking south.
 |
The spots closest to you were done 9 months earlier and are a bit faded.
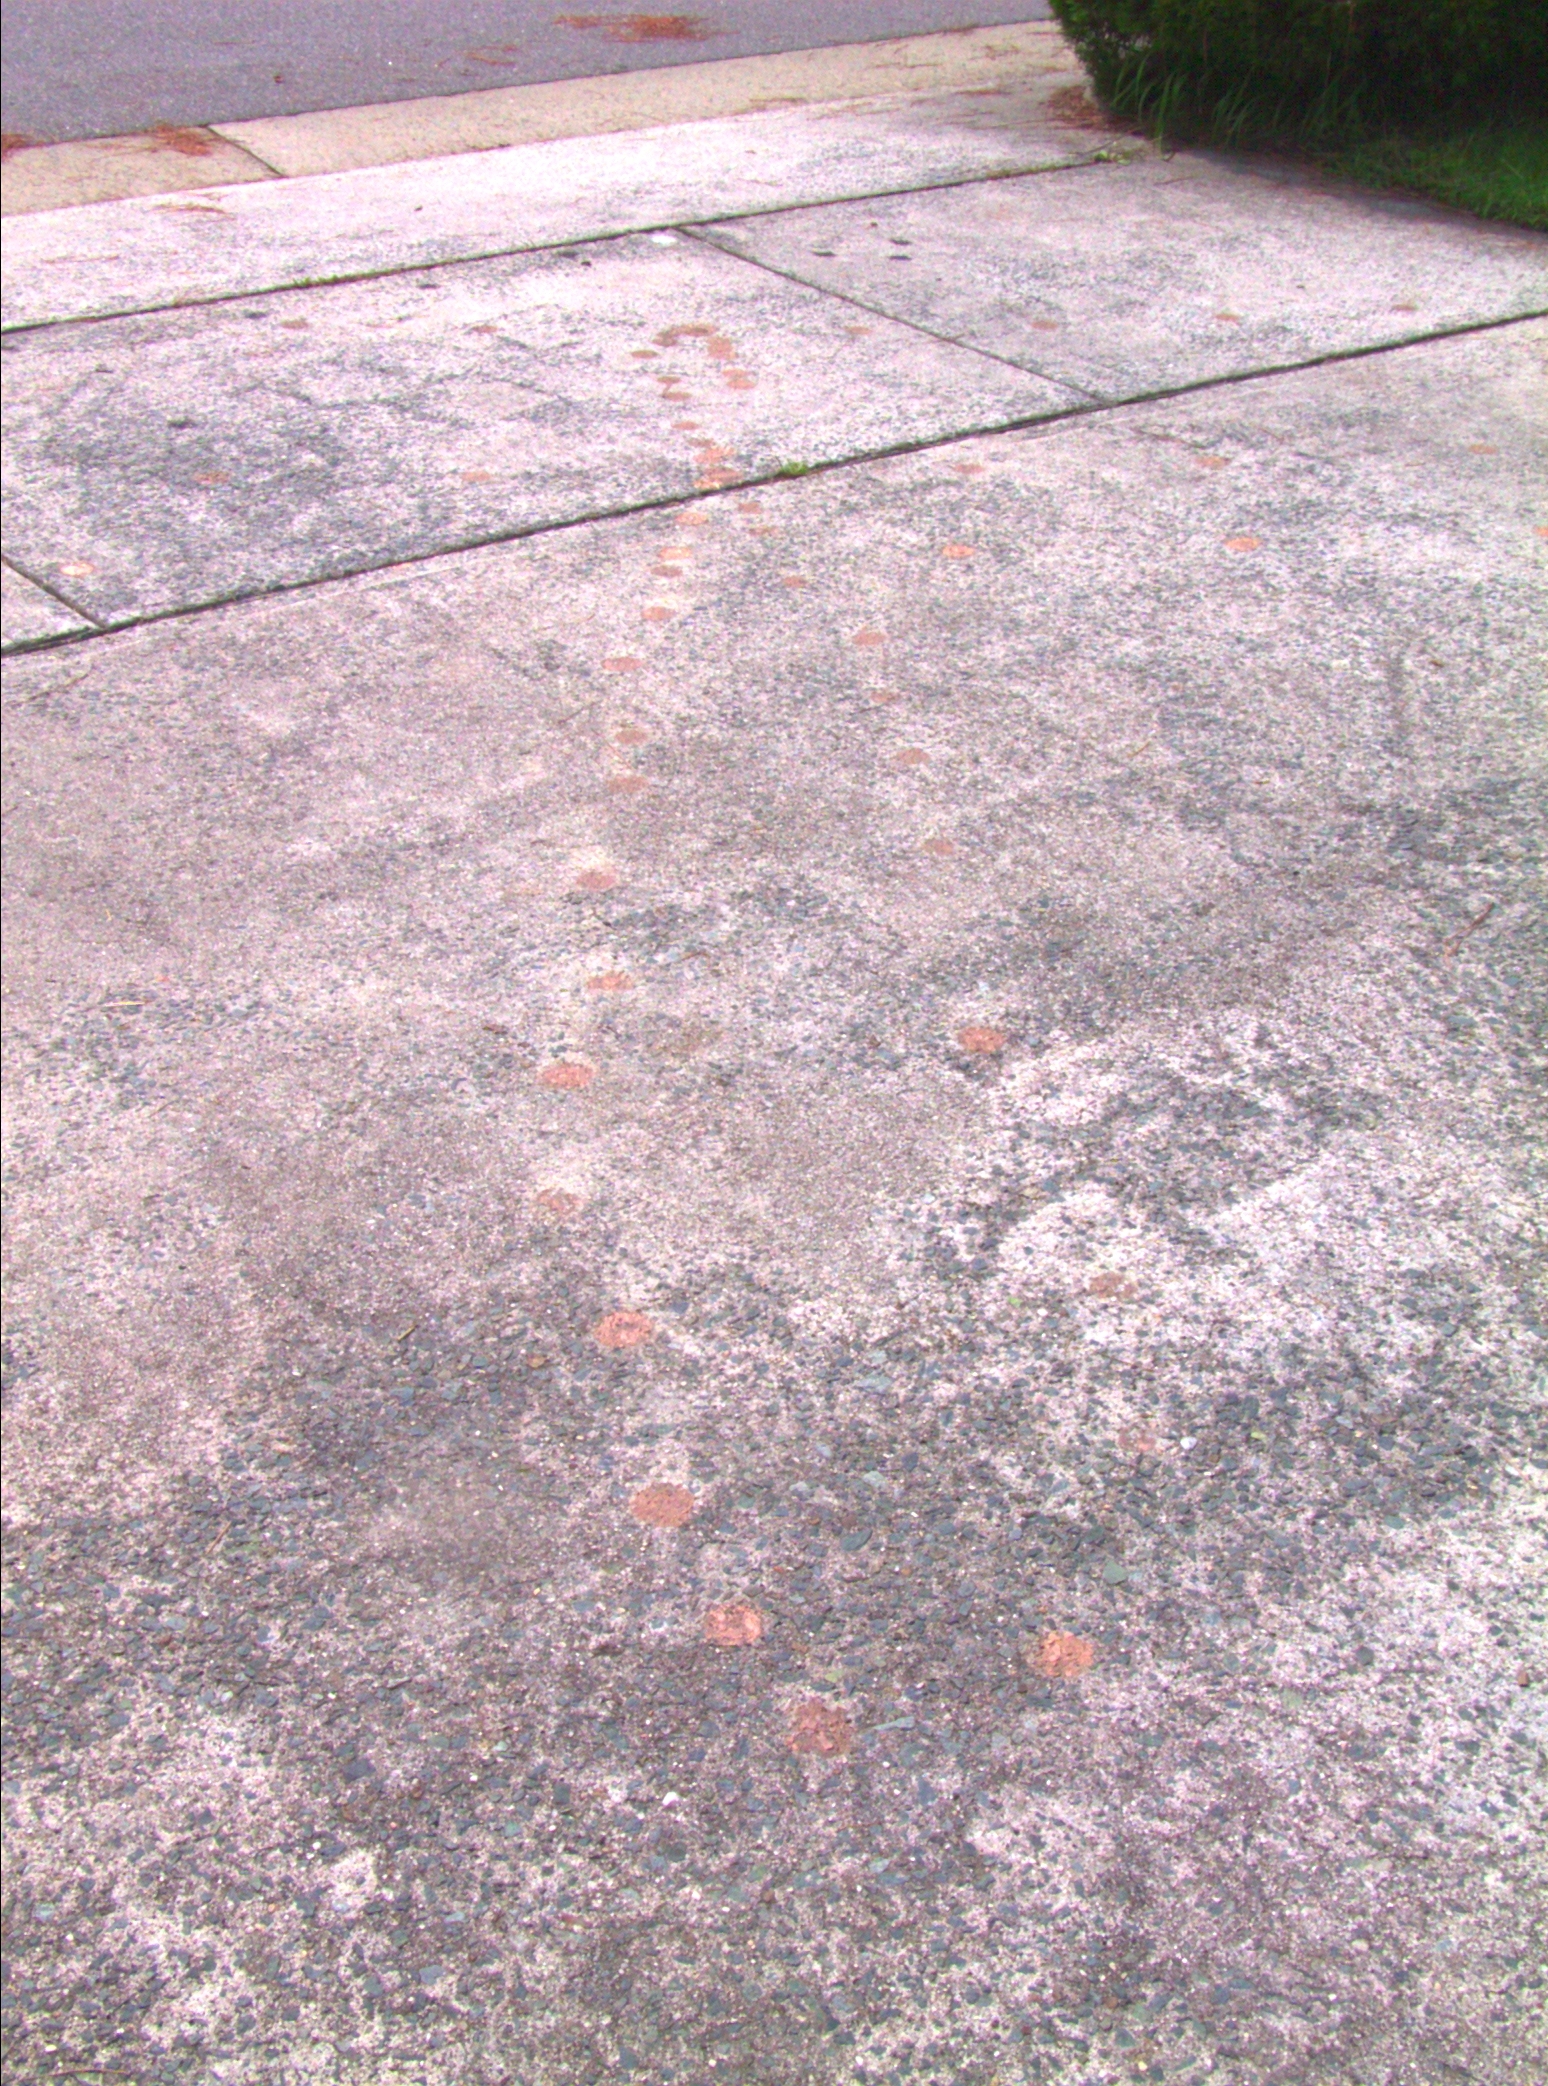
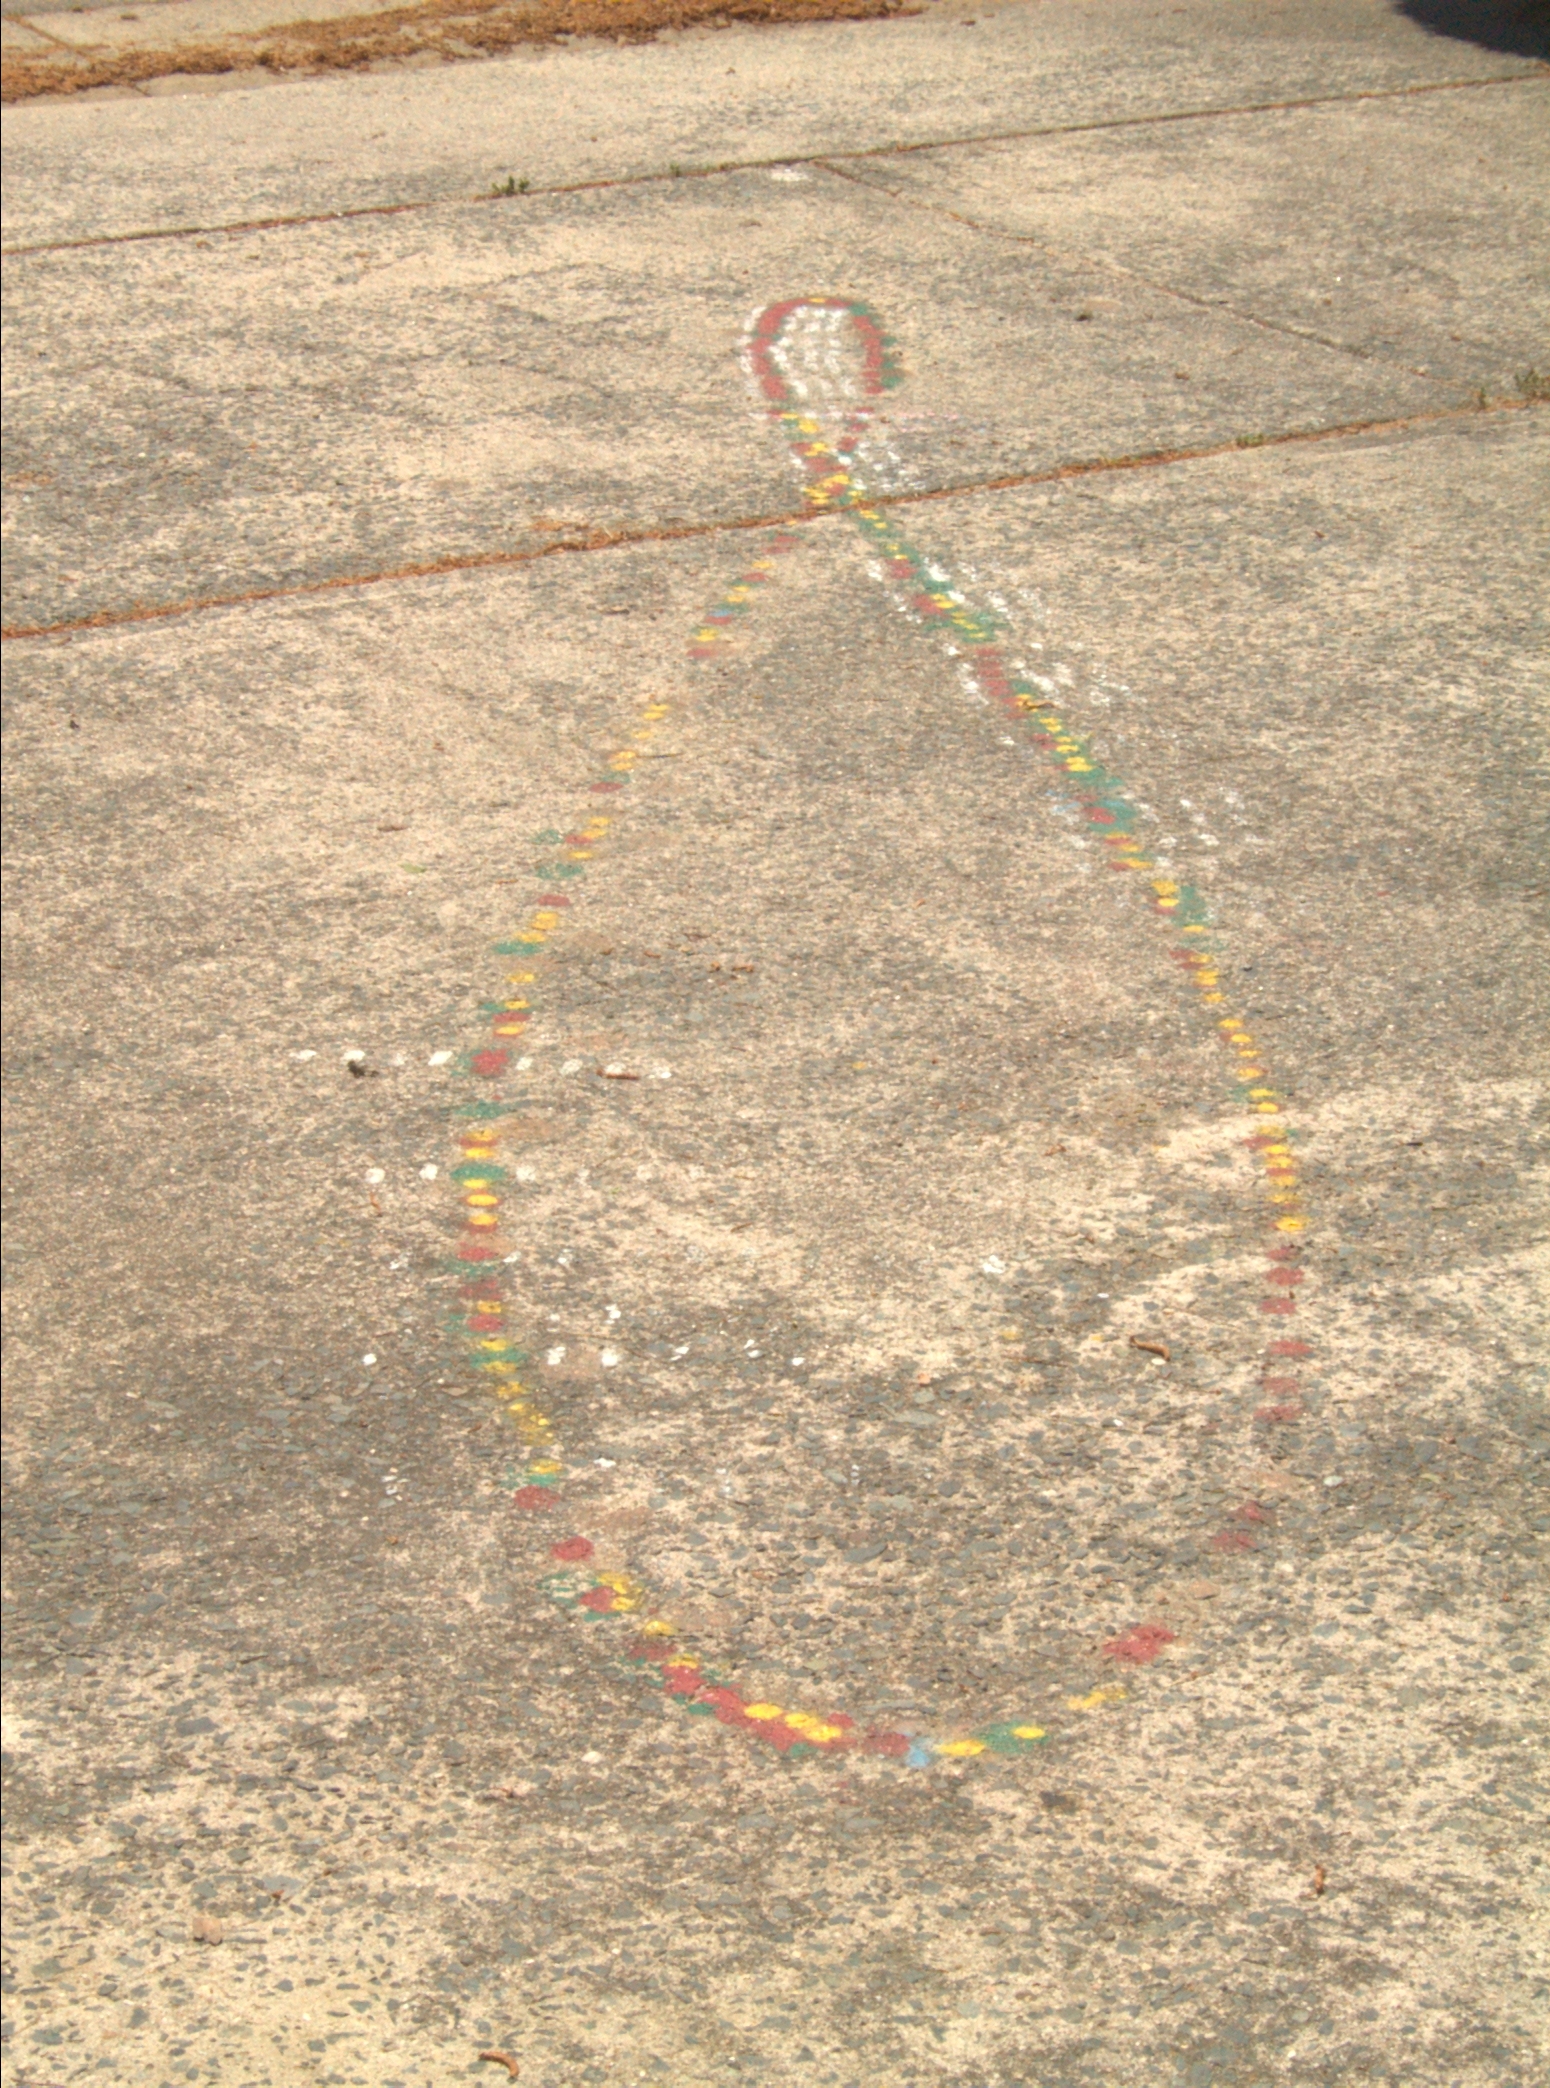
Figure 8. Analemma spray painted dots looking north.
 |
The spots closest to you were done 3 months earlier and are relatively bright.
The gap on the left side, below the cross over point, occurred during our summer vacation - we were away for 2 weekends. Note the miss-aligned point on the right side of the lower loop - I did that one myself - so I can't blame the family, I have no idea what went wrong there. There is an inflexion on the lower left side with a concave section. This shouldn't be there. In general the analemma is not as smooth as I'd hoped :-(
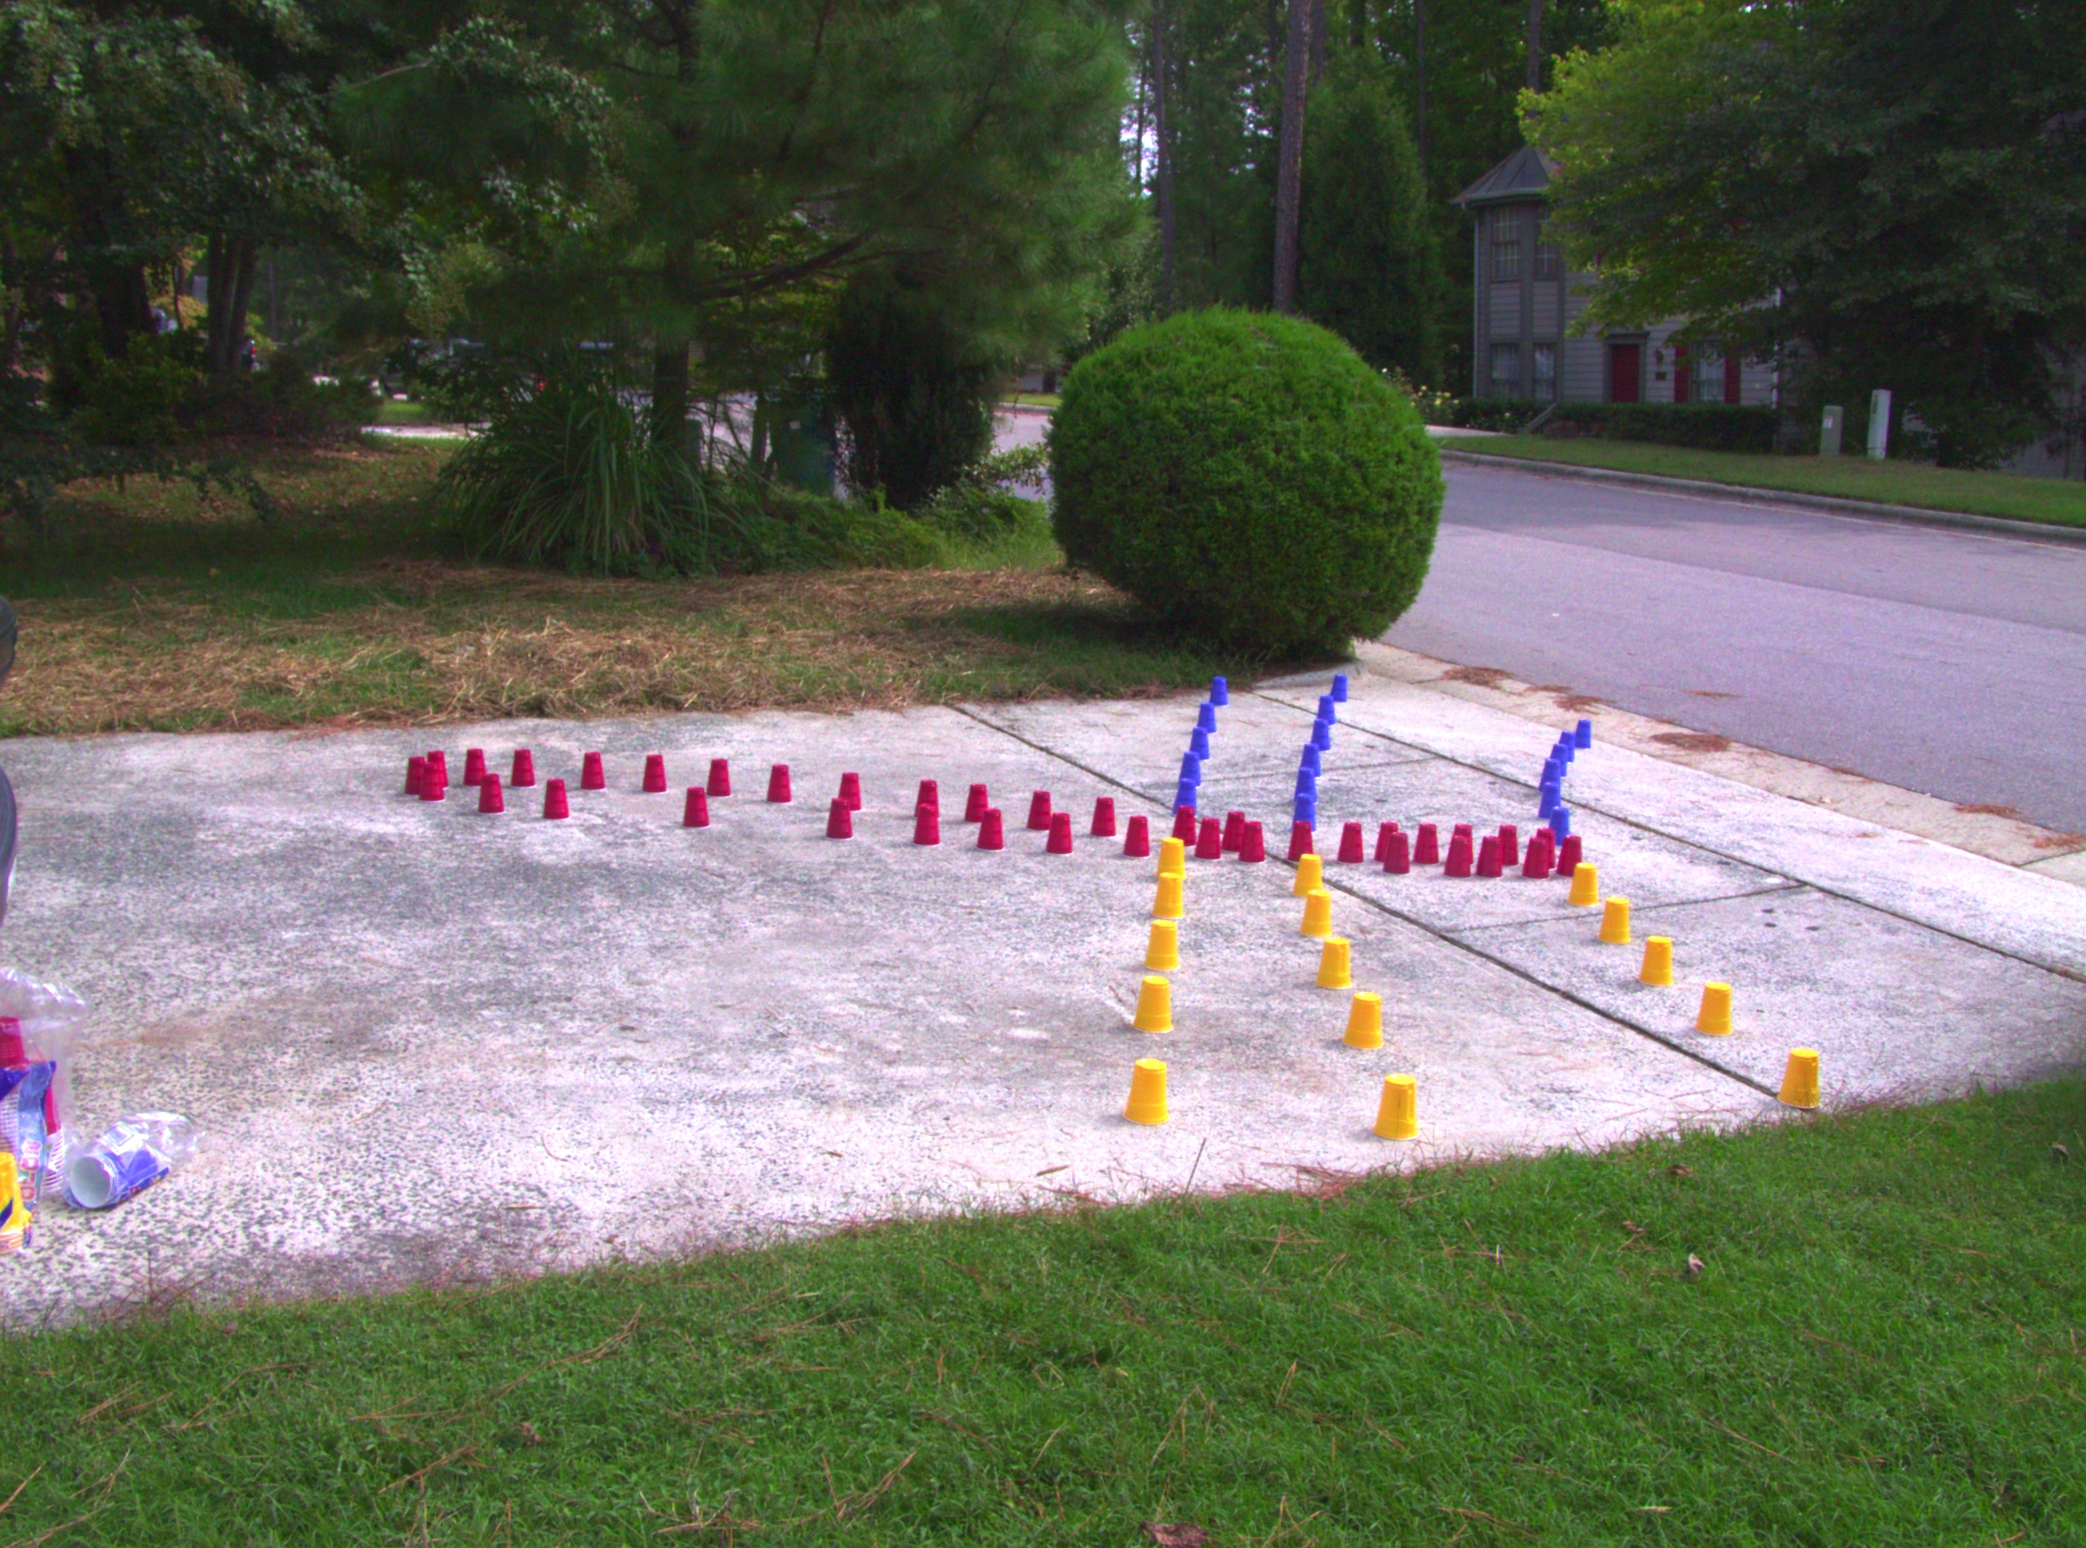
Figure 9. Taking a reading.
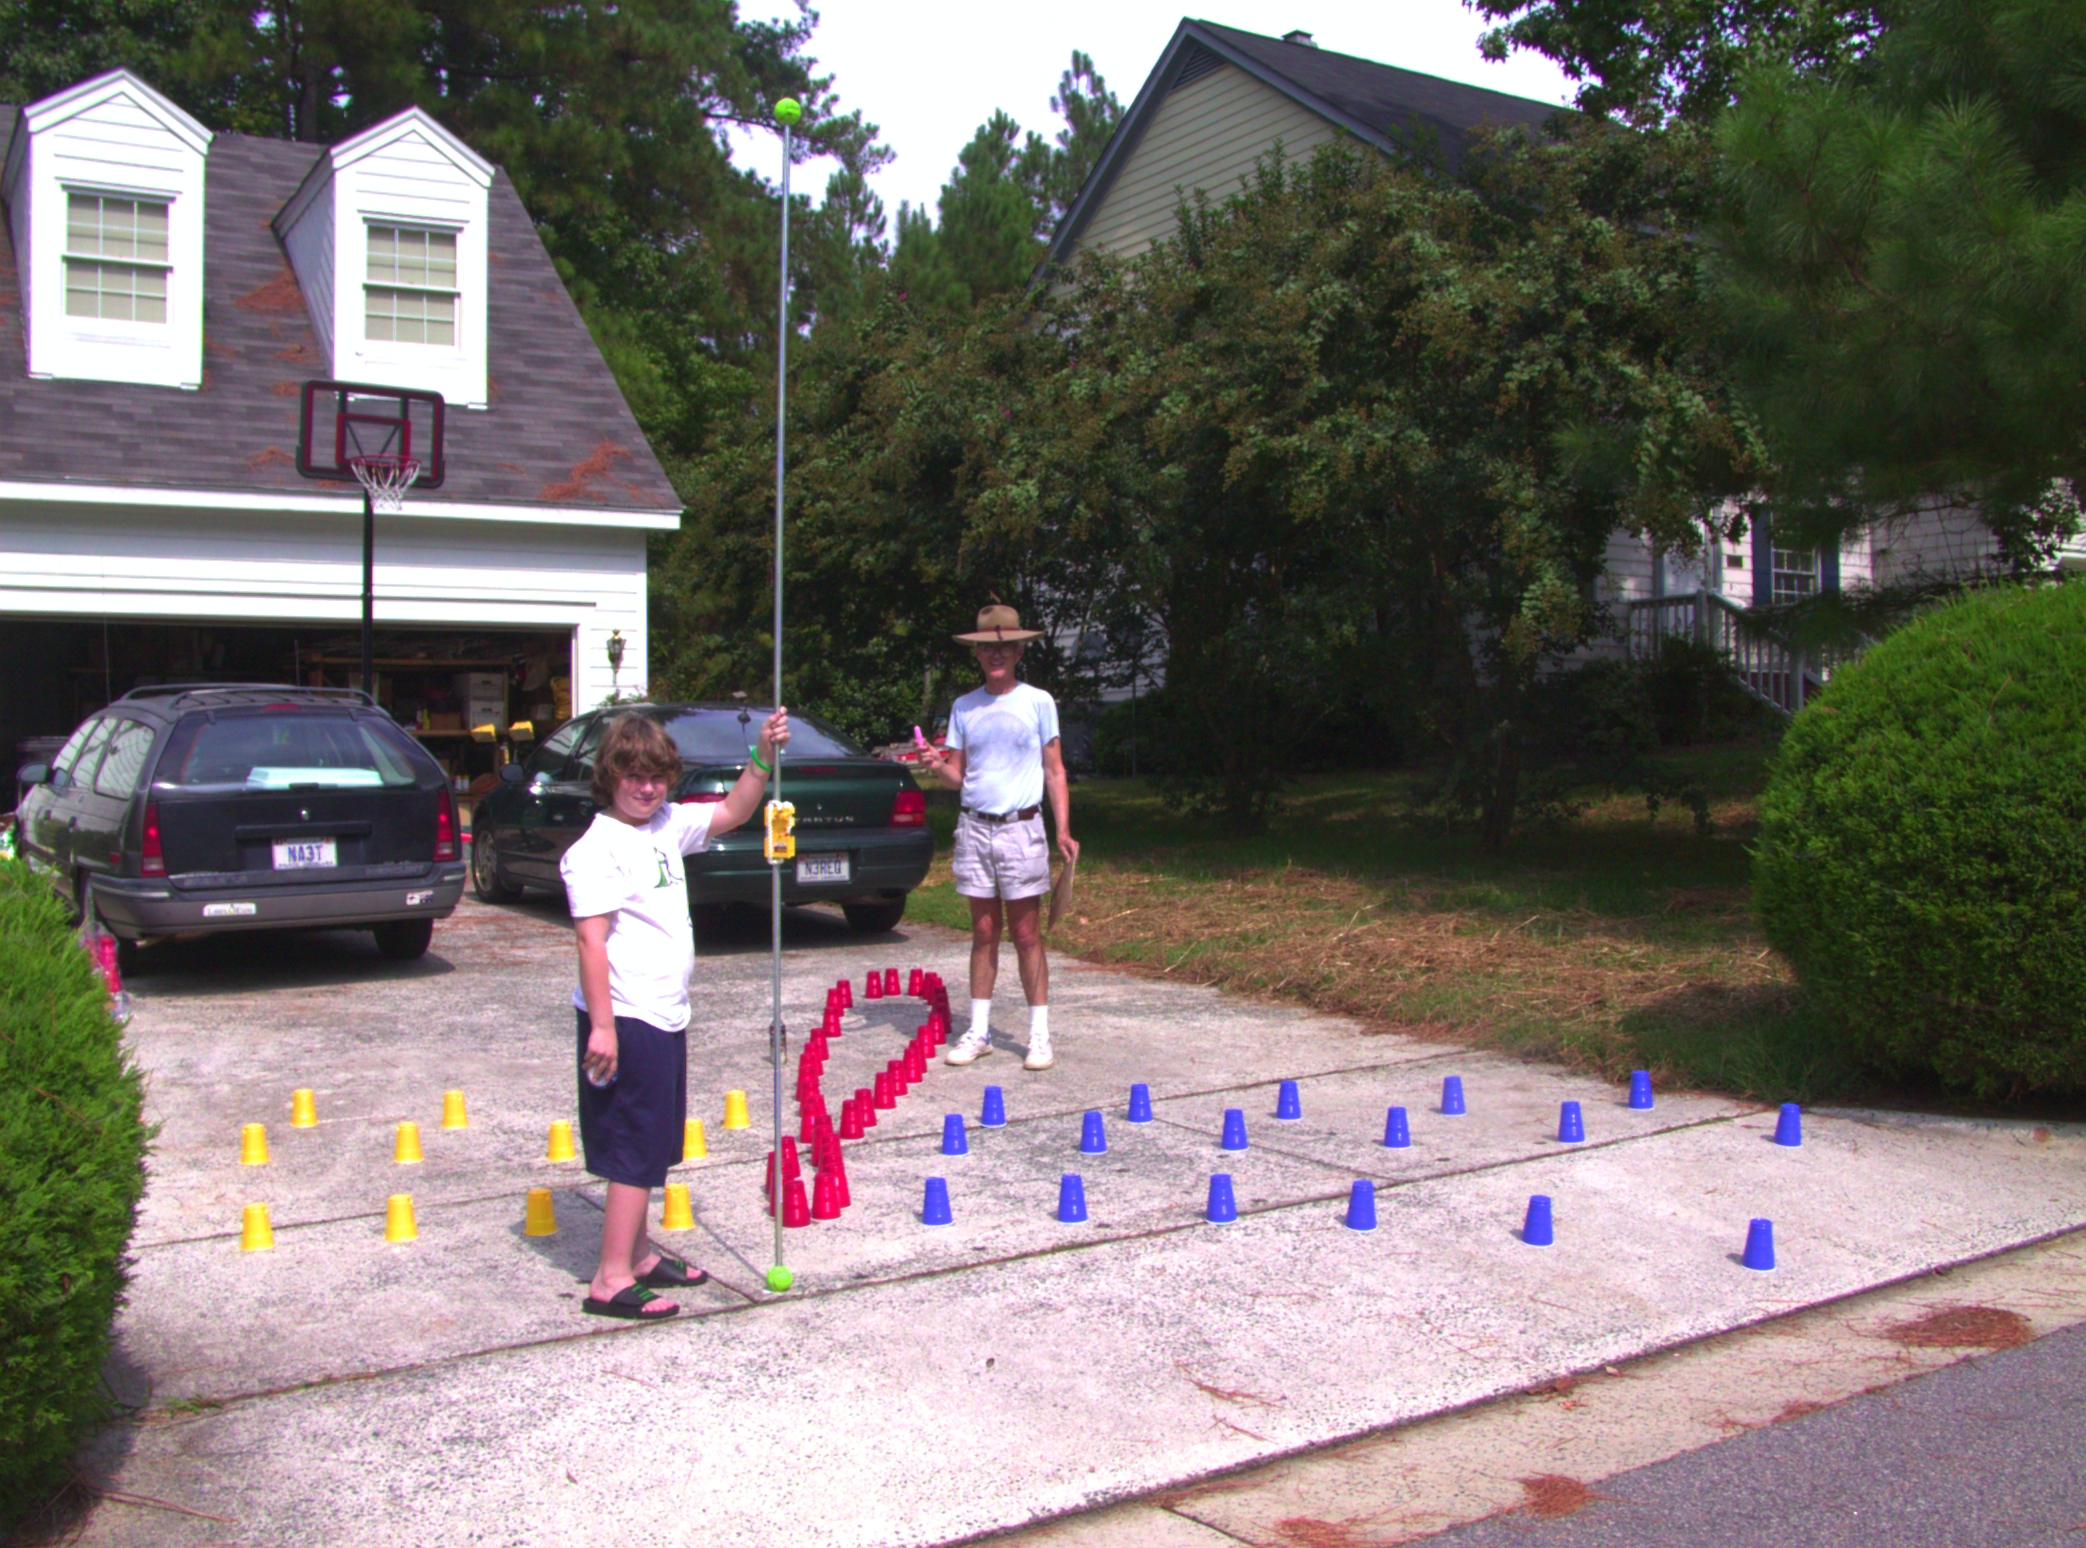 |
The cups indicate previous readings. The red cups are the noon analemma.
My son in the foreground is holding the gnomon. The 3-axis bubble level is the yellow device 1/3 the way up the gnomon. I'm in the back holding the marking chalk in my right hand. The can of spray paint is on the ground to my right, mostly occluded by the gnomon. The camera is looking north (east is to the right of the picture). The yellow cups are marks taken in the morning, the blue cups are taken in the afternoon. This photo was staged, and was taken about an hour before local mean noon (note: the shadow of the pole passes the nearest yellow cup and not the red cups as it did an hour later; and both our shadows are not parallel to the axis of the gnomon).
Note The summer lobe of the nothern hemisphere analemma (closest to my son holding the gnomon) is the smaller lobe, whereas in the southern hemisphere, the summer lobe is the larger lobe.
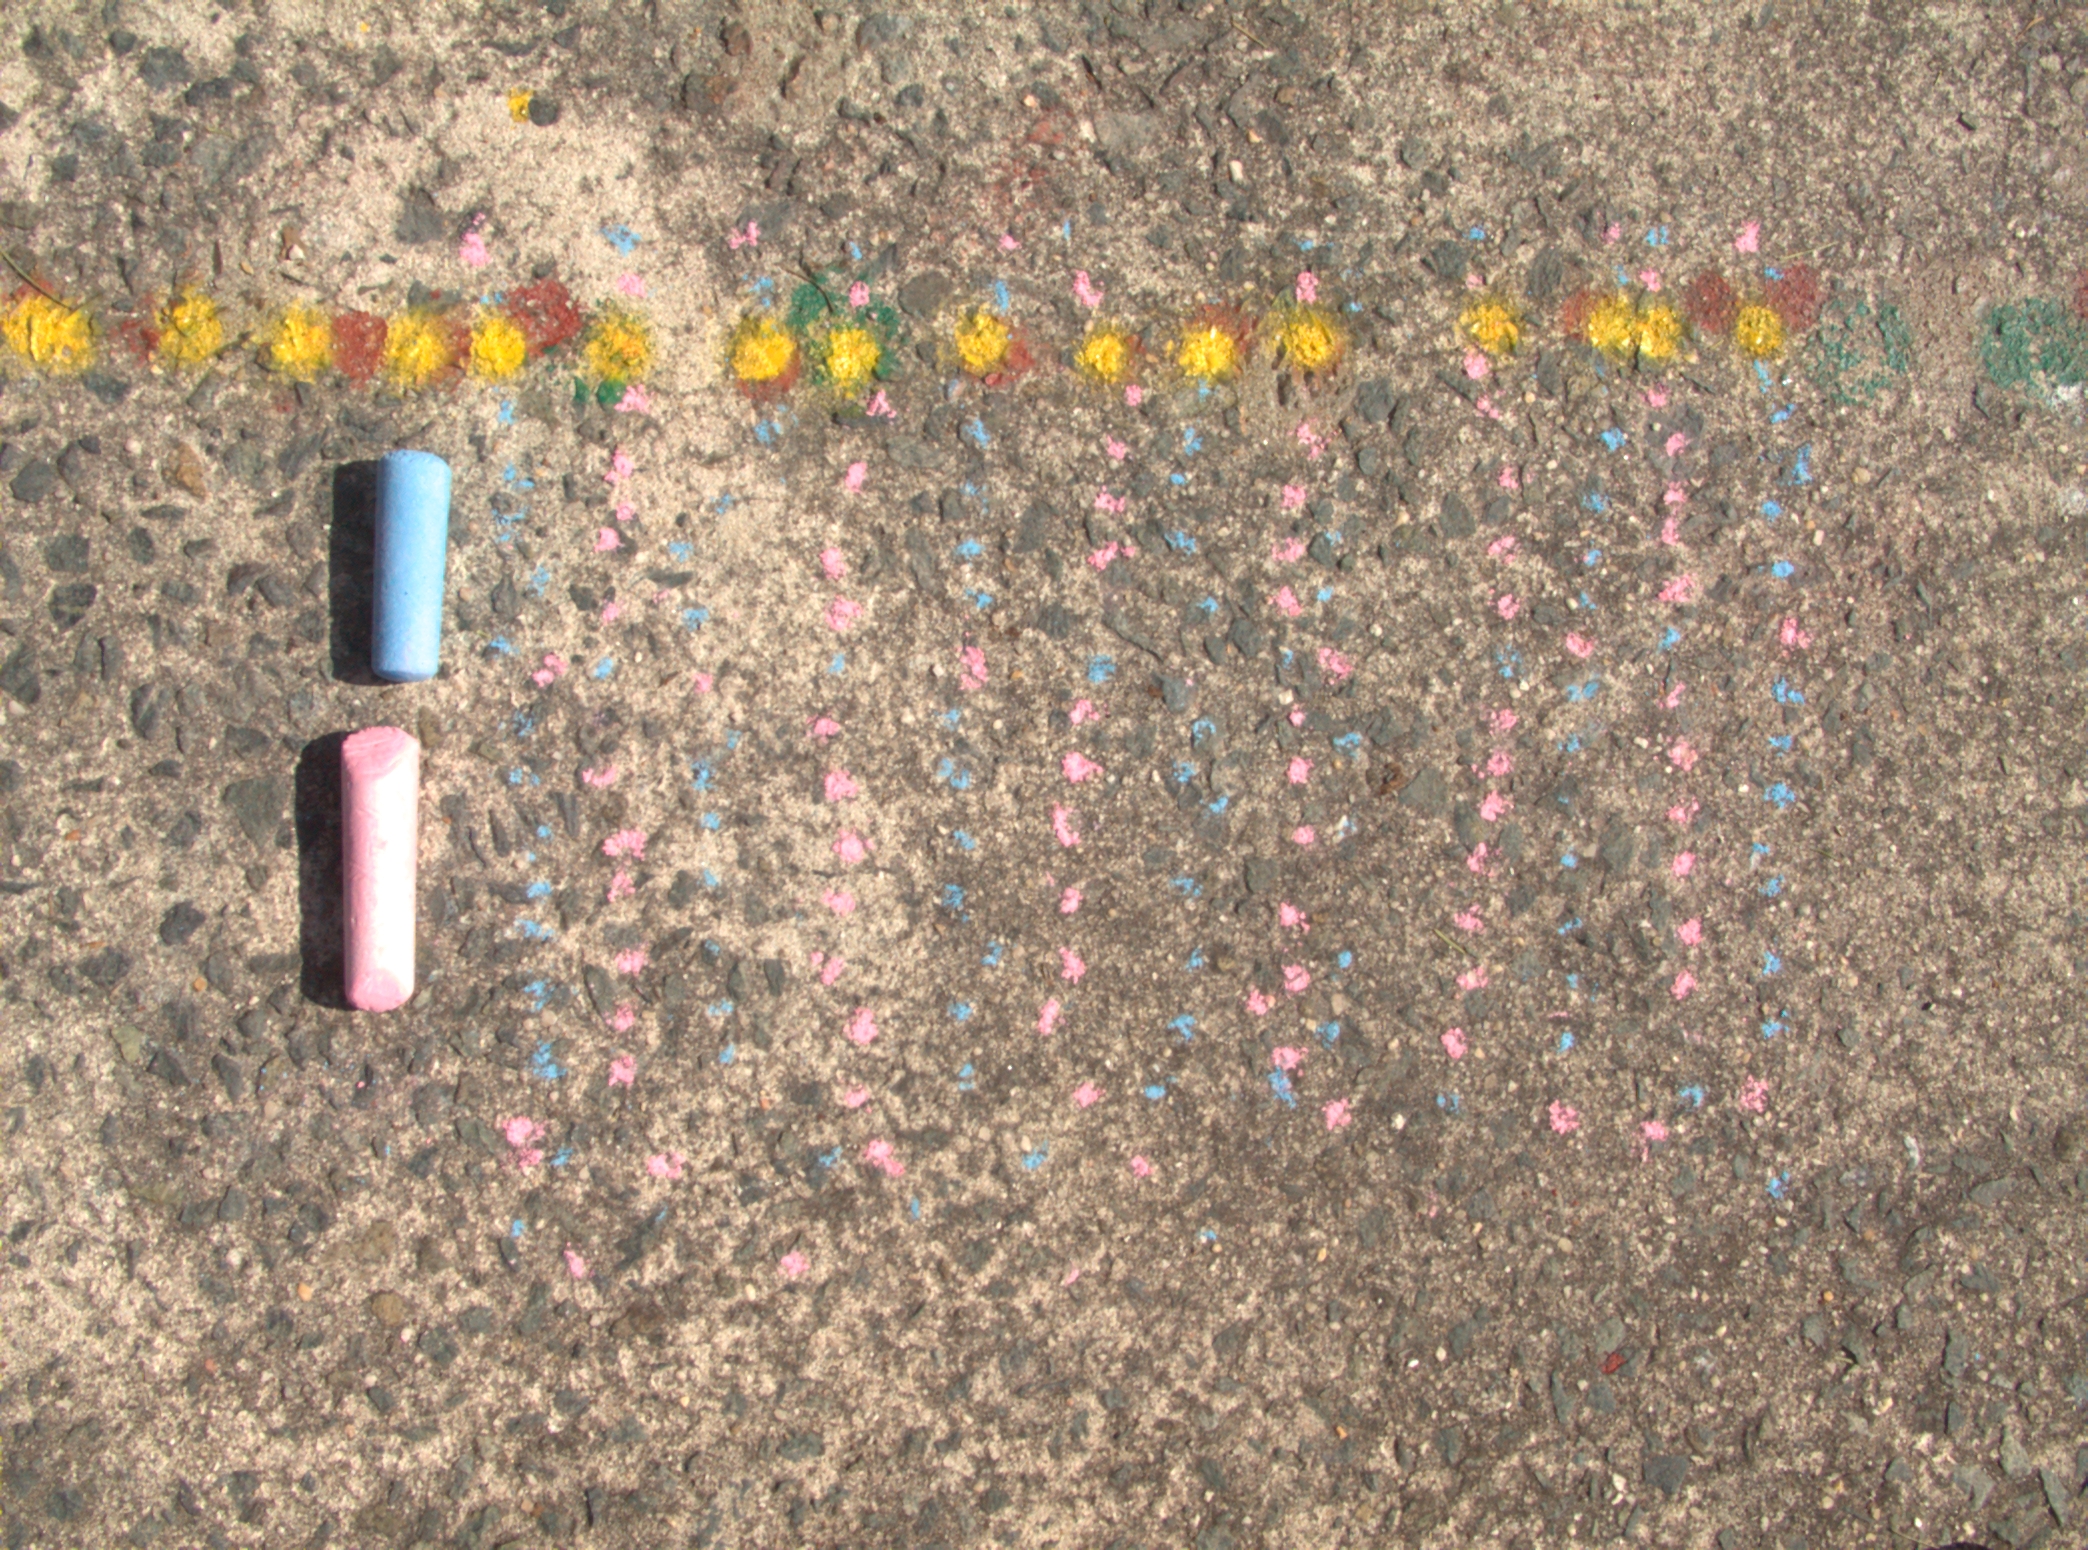
Figure 10. A reading close up:
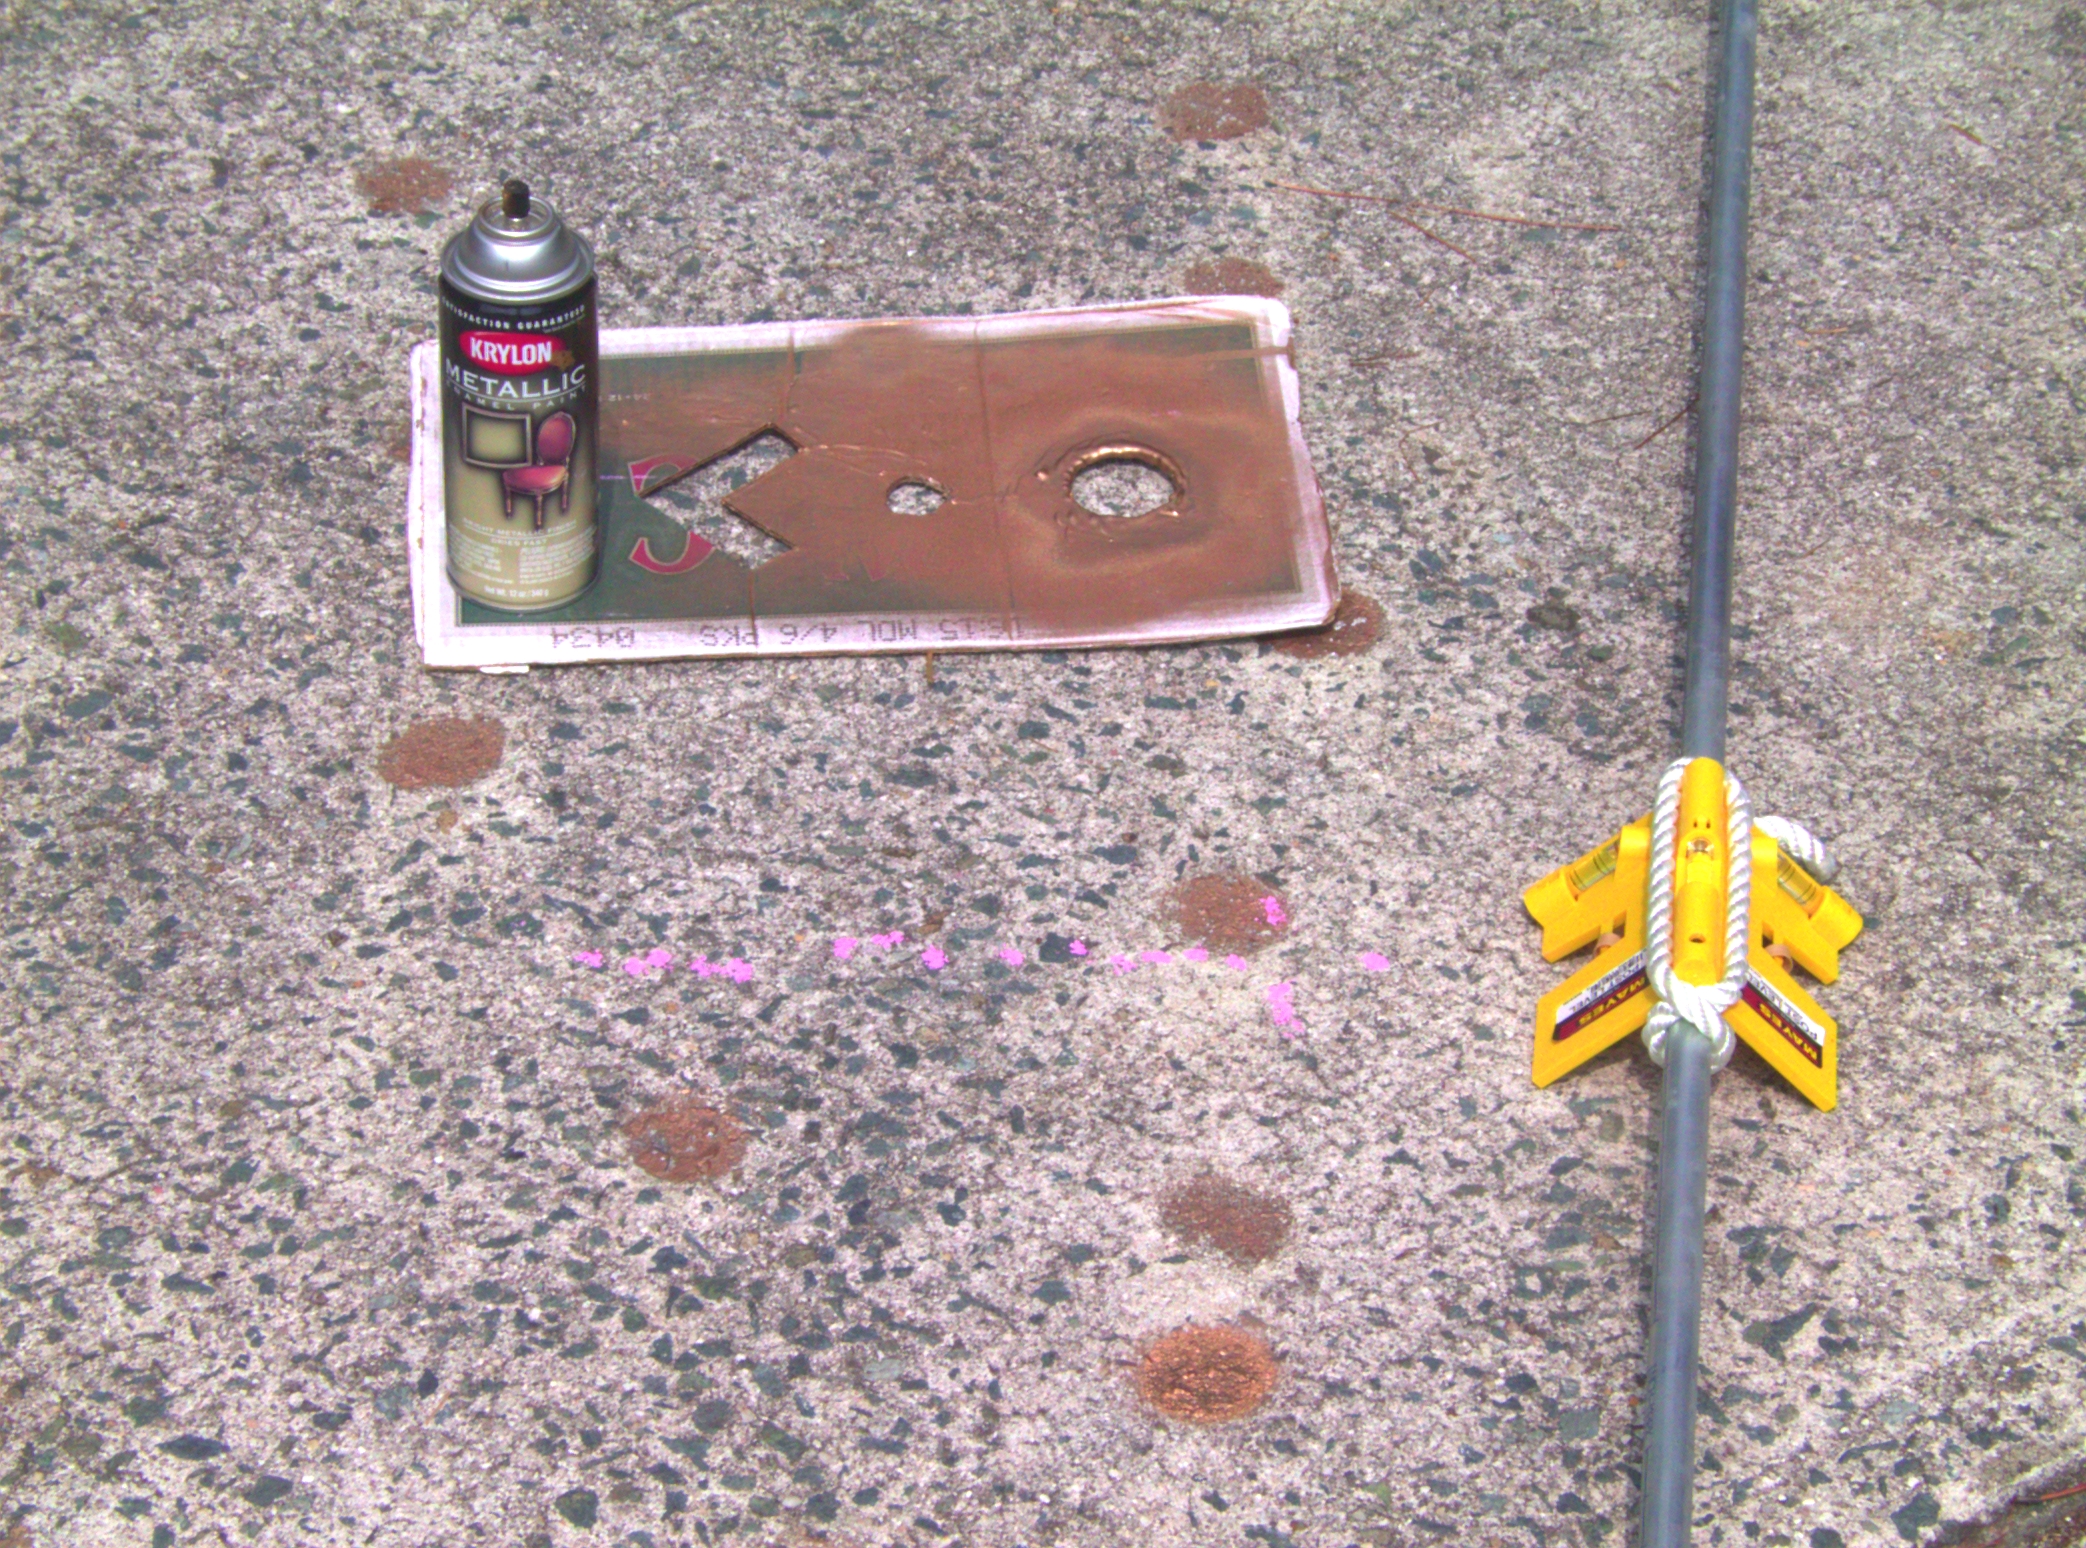 |
spray paint; the cardboard mask for spraying (initially the large hole with a diameter of about 2mins was used; later when accuracy became a goal, a much smaller hole was use); the gnomon (pole on right, laid on ground) with 3 axis bubble level (vertical bubble not used, the two horizontal ones at the top of the yellow frame are used). The bubble level is attached with silicon glue - the rope is just incase the glue comes undone. A line of pink chalk marks are across the image below the cardboard, and opposite the yellow bubble level frame. The driveway concrete is a mixture of mafic (dark) and felsic (light) material.
The photo here shows about 15mins of chalk marks (seen better in the enlarged photo). on a partially cloudy day It's Sep 24 (northern hemisphere fall), just after the sun has crossed the analemma's node. The image is looking away from the sun (north, towards the winter loop of the analemma). Local mean noon (due to daylight savings) was at 1:16pm. The data (a line of pink chalk marks across the image from left to right, towards the yellow bubble level on the gnomon) start about 1:00pm at 1 minute intervals. There is a gap a 1:07 and 1:08pm and another for 1:16 and 1:17pm, due to cloud. The position of the sun at 1:16 is interpolated from the position at 1:15 and 1:18pm. The calculated position at 1:16 is marked by pink chalk lines above and below the calculated position. The radial jitter in the line corresponds to about 15secs of time error (my initial reproducability estimate). This position of the mark differs from last year's by by about 1/2 a shadow diameter (if they were both good readings, they'd be on the same line). Presumably the mark I collected last year (at the beginning of the project) was not a good one. The new point, with 15mins of pre-data, fits the overall curve better than last year's point.
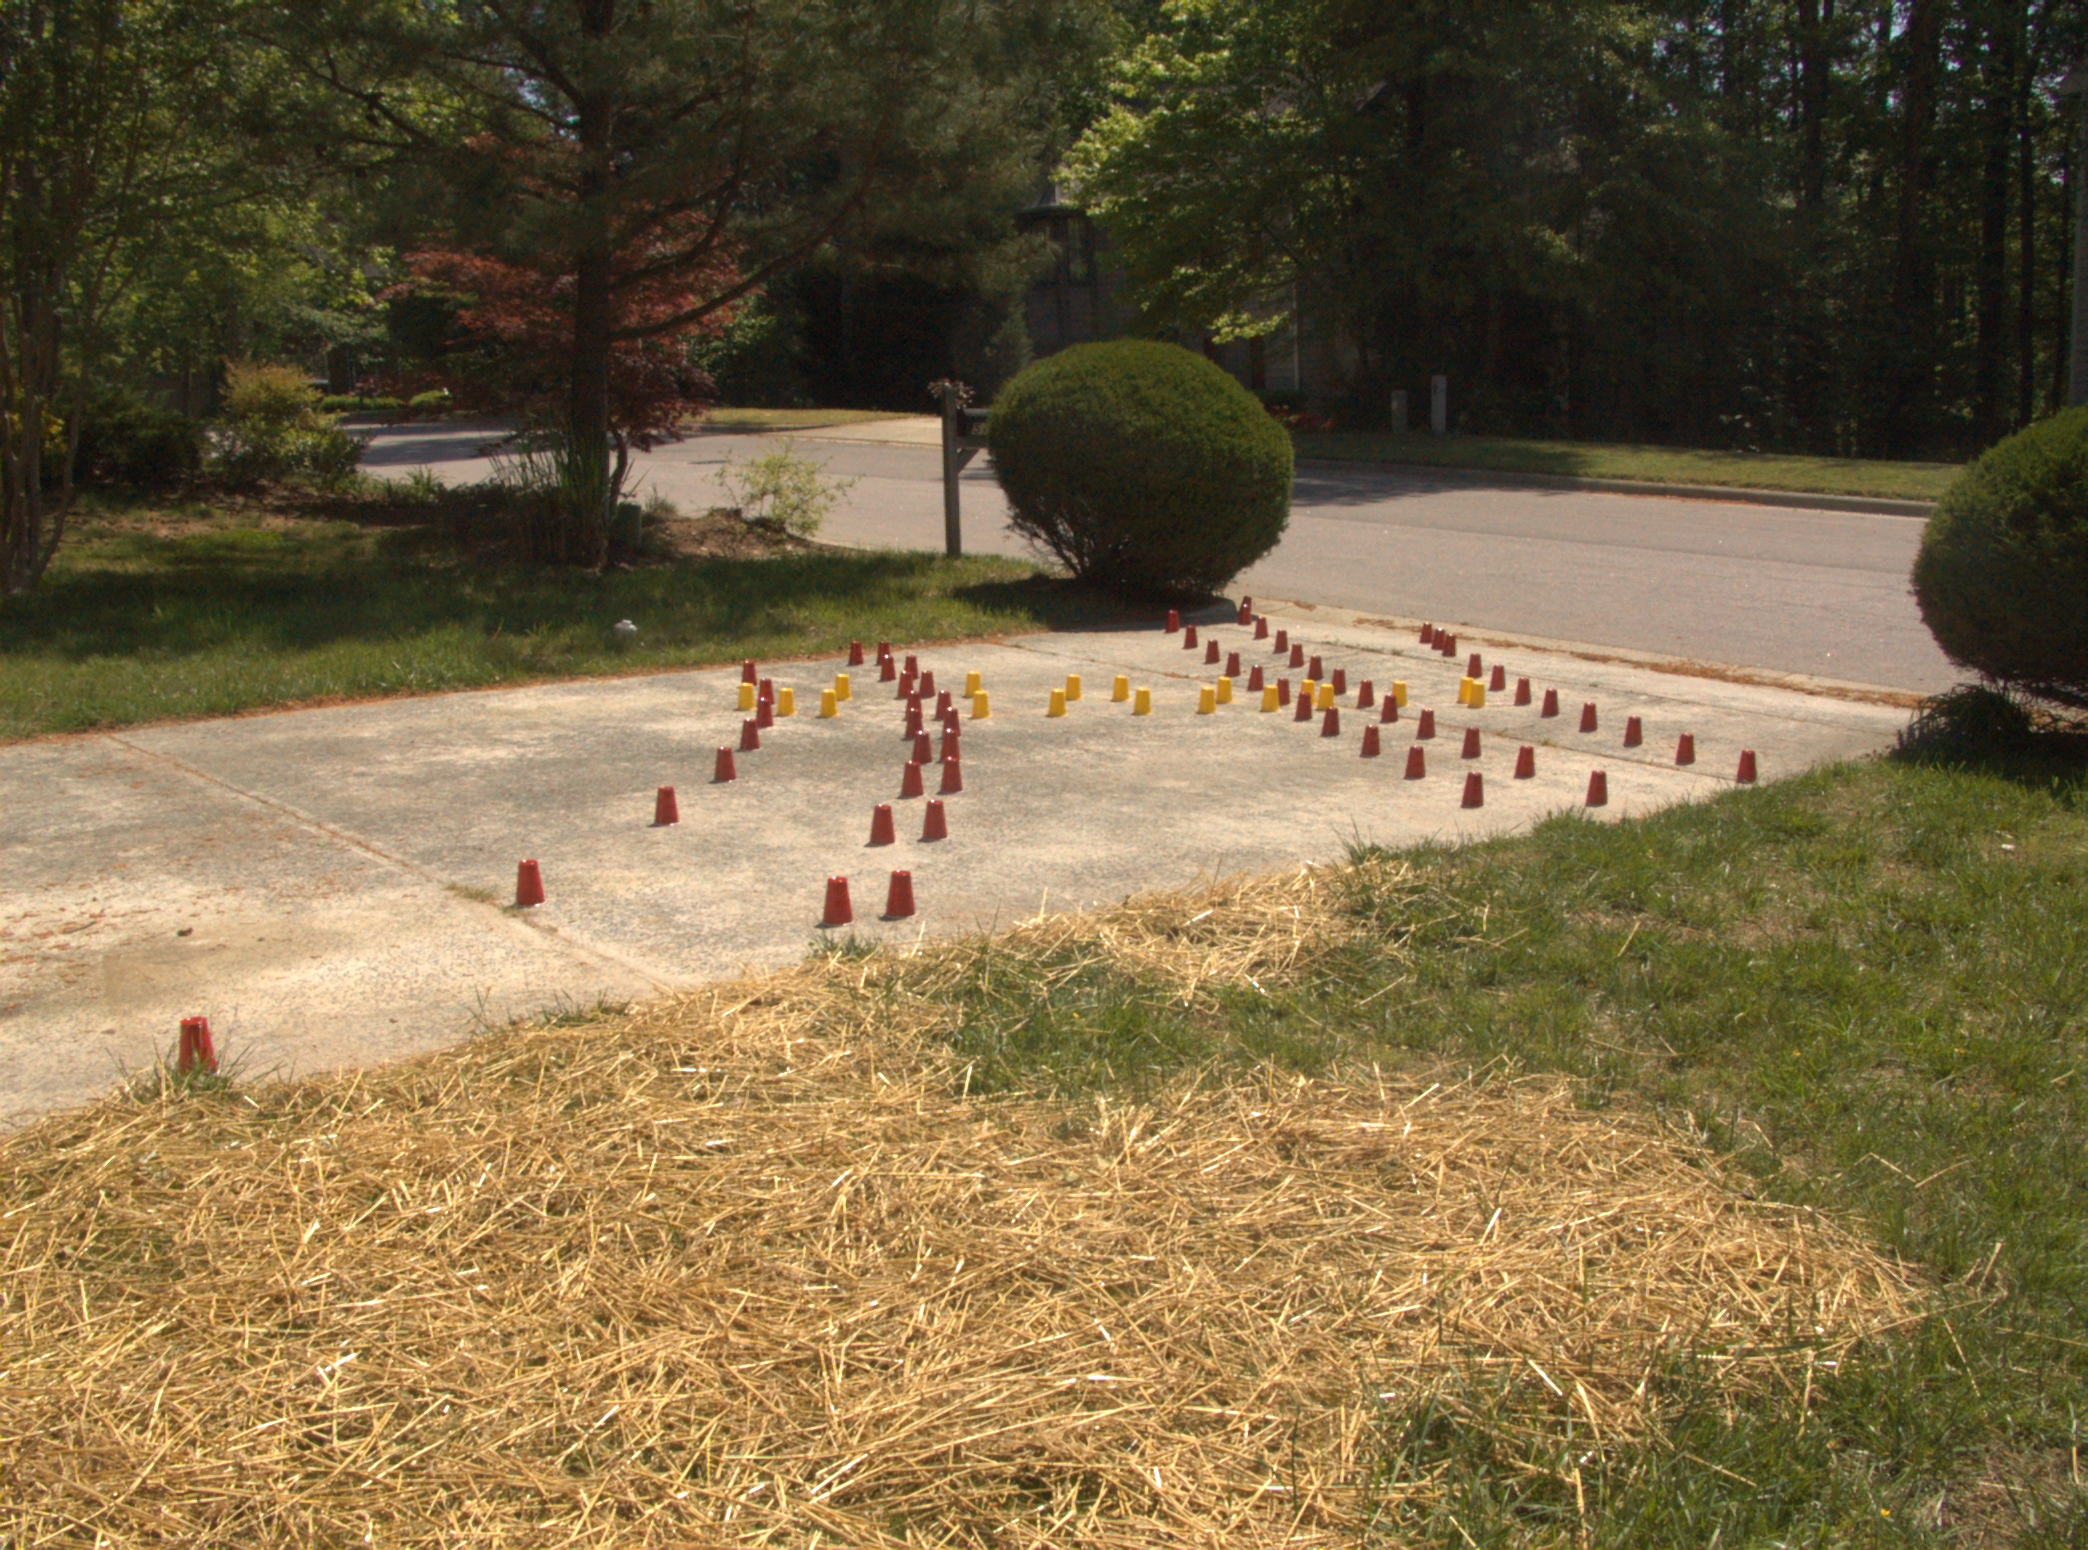
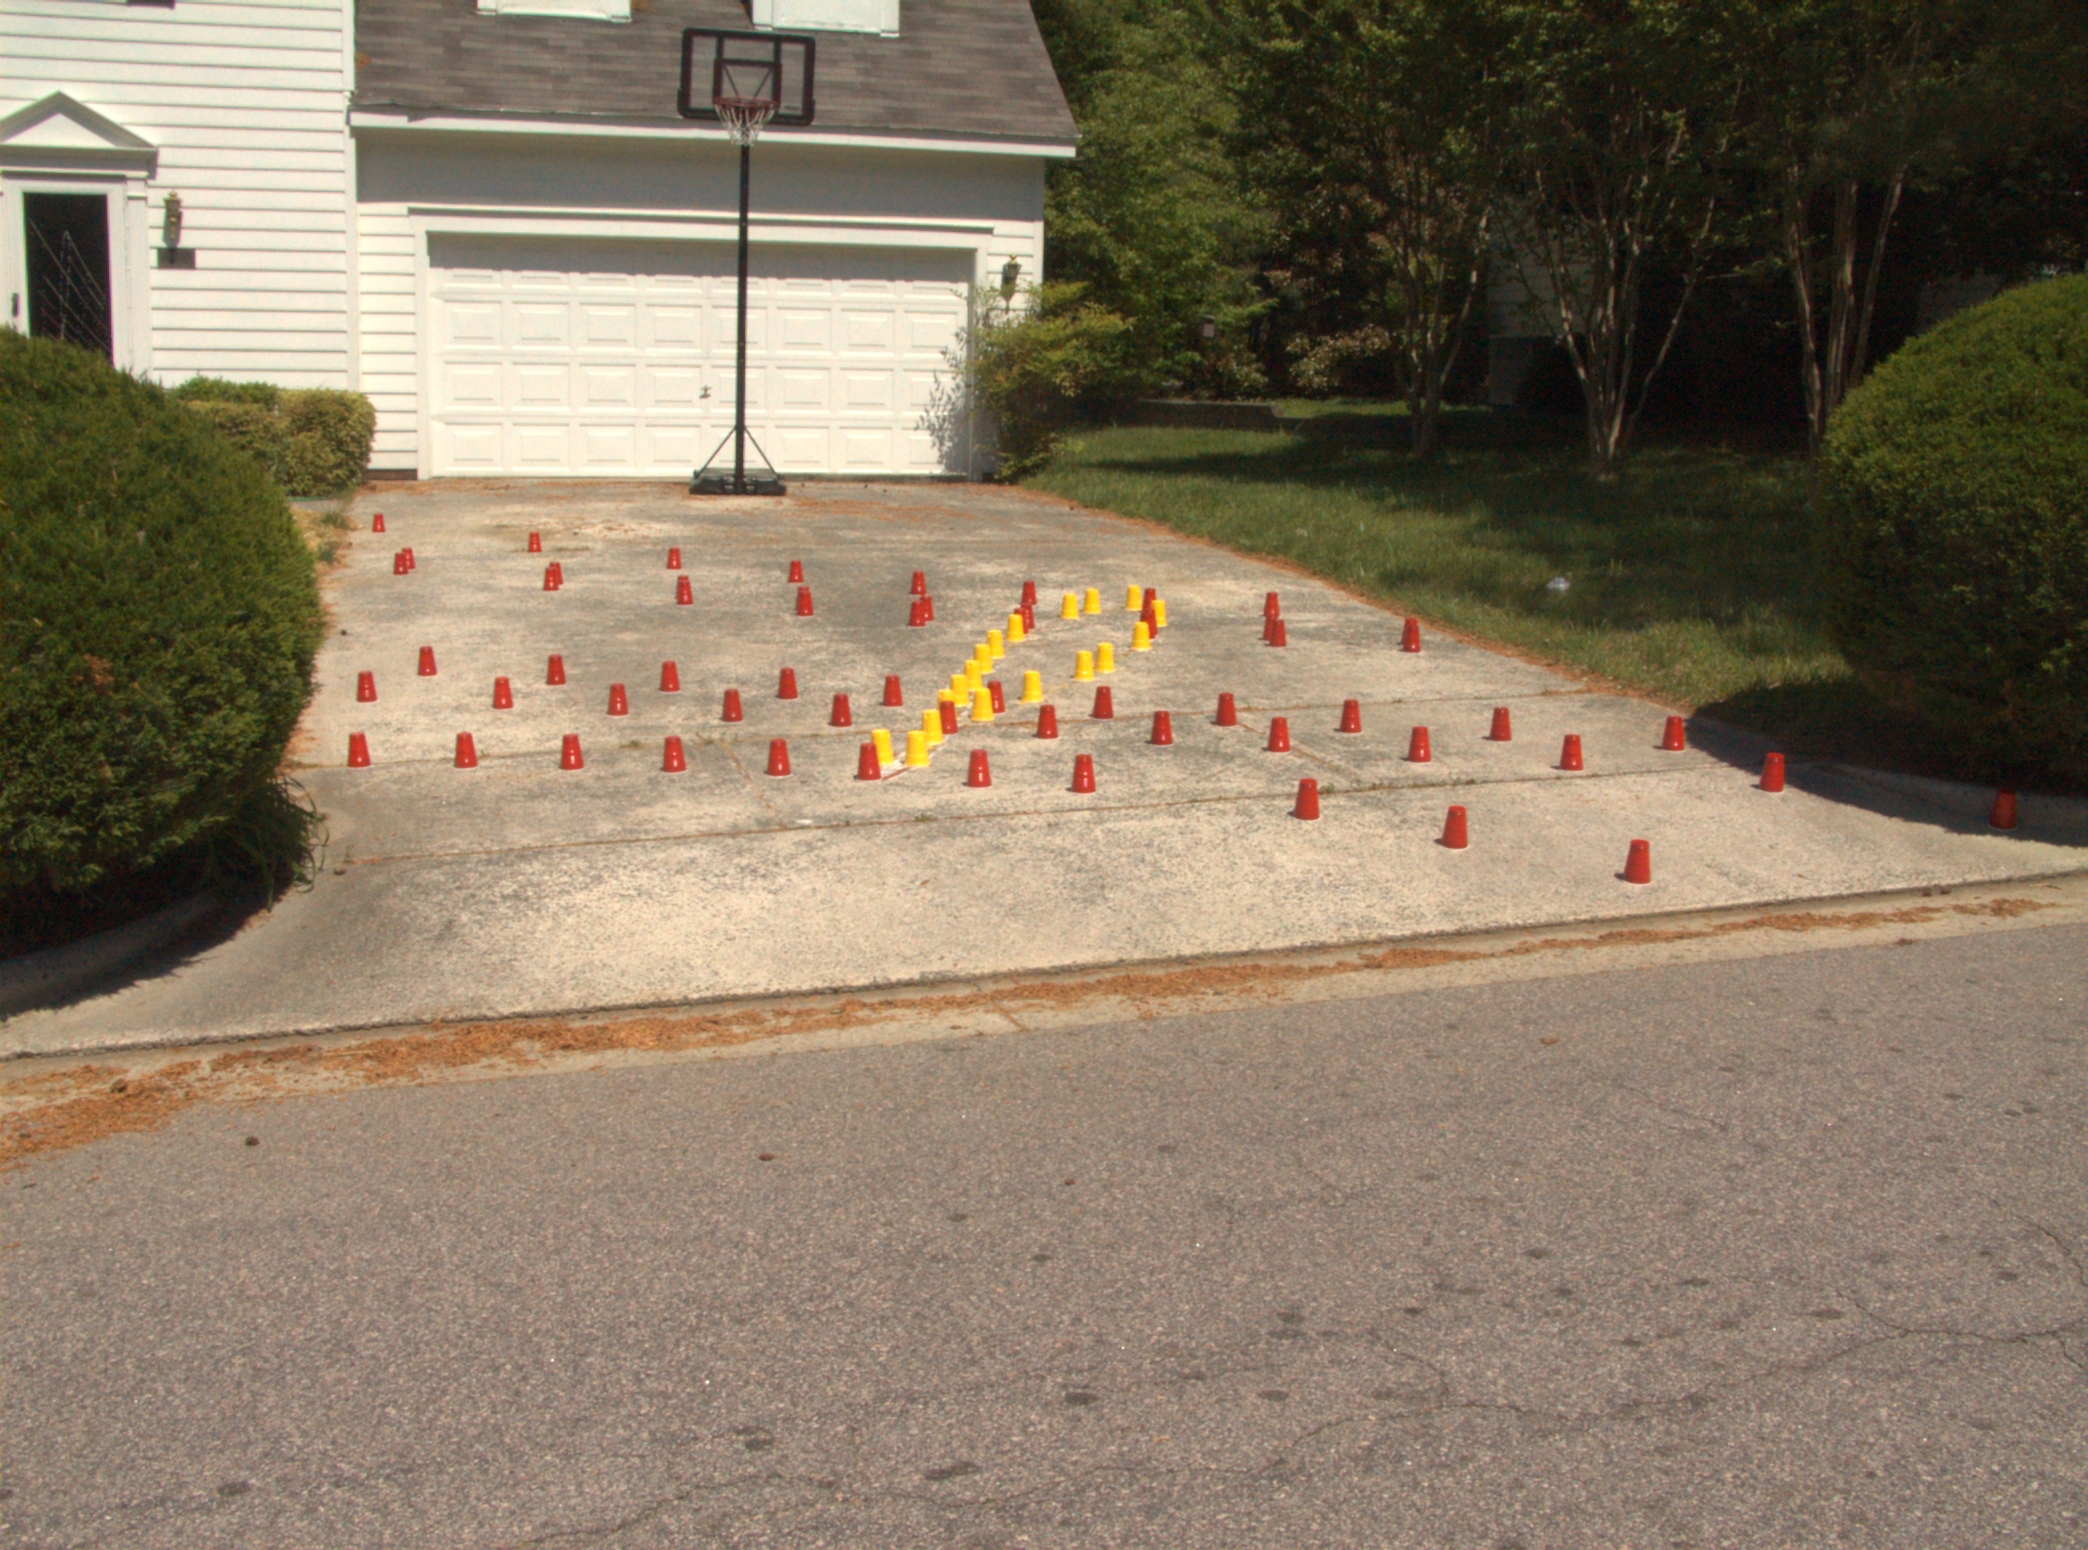
Figure 11. Looking east.
 |
The E-W arcs of cups are the shadows at 30min intervals during the day. The yellow cups are the marks taken before noon, the blue cups are the marks taken after noon. The red cups are the noon analemma.
The analemma was started in Sep 2004 after returning from our summer vacation. It didn't occur to me till May 2005 to take marks at any other time than noon. This was about the time when the sun is at the analemma's node. The three E-W arcs are taken (L-to-R) about 3 days before the fall solstice (Sep 2005), the (May 2005) analemma node and the summer solstice (Jun 2005). Note that the equinox line is (almost) straight, while the other two lines are increasingly hyperbolic.
Although I didn't do this, it should be possible to determine the day when the locus of the sun's shadow is a straight line (occurs at the equinox). I got within a day of the date of the equinox with the door analemma (see the equinox as seen by the door analemma).
I did 3 more arcs (hyperbolas) on the winter side, one in the late fall, one at the winter soltice and one in the early spring, when the sun was about the same elevation as in the fall.
 |
Misconception: local noon is not the same as local mean noon
I'm embarrassed to say that even though I know the definition of these two terms, when it came to applying them, I got it wrong.
local noon:
(see Noon http://en.wikipedia.org/wiki/Noon). Meridians are imaginary lines in the sky joining the north pole of the sky with the south pole of the sky. The zenith is the point directly overhead (if you held a plumb bob on a string, the string would point to the zenith). The meridian line that passes through the zenith is officially called the "Celestial Meridian", but usually just called "the meridian" (see The Celestial Meridian and Zenith http://www.herongyang.com/astrology_horoscope/Astronomy_The_Celestial_Meridian_and_Zenith.html). When the sun reaches the meridian, it's (local or solar) noon. Shadows are shortest; the elevation of the sun is maximum.
If you don't know about watches or time, local noon is a simple concept: you look up in the sky - if the sun is at it's highest elevation, then it's (local) noon.
Since the earth's orbit is almost circular and the line of apsides (see Apsis http://en.wikipedia.org/wiki/Apsis) (the line joining the perihelion point to the aphelion point) is almost colinear with the line joining the solstices, the concept of solar time being constant (regular) works quite well.
local mean noon:
If you measure time by a clock, then because the earth's orbit is elliptical, the length of the days (local noon to local noon) is different each day. Some days are 30secs longer than the average, some 30secs shorter than average. These differences accumulate and consequently local noon does not occur at the same clock time each day, varying by 14+17=31 mins through the year.
For convenience, we define clock time in terms of the rotation of the earth with respect to fixed stars (stars that are so far away that they don't move) and not with respect to the sun. The local mean noon then is the average of the noons over all the year (I can be more exact about this, but it would take a lot of words).
Note For convenience, all people in the same time zone set their watches to the time at the standard meridian in that timezone (usually a multiple of 15° from the Prime Meridian). So when it's noon on your watch, it's local mean noon at the standard meridian. Pretty simple huh? OK quiz time:
- If you marked the shadow of a gnomon at local noon each day, what shape would you see on the ground?
- What would you see if you did it at local mean noon?
- On what line(s) lies the maxima/minima of the hyperbolas? (the hyperbolas being the locus of the shadow of the sun's path through a particular day)
(answer: [4] .) If you got the right answers, skip past the next part of the discussion to the following section.
I don't know what I must have been thinking, but I assumed that the bottom of the hyperbolas (seen in photo above) was on the analemma. As I found out the bottom of the analemmas is on the projection of the meridian, a straight line down the middle of the analemma. I picked dates in the spring and fall to do the hyperbolas, with the widest separation between the ascending and descending sides of the winter lobe of the analemma. I thought that the different locations of the minima of the two hyperbolas would be clearest at these two points. As I found on the day, the two hyperbolas were parallel the whole way. The stationary point on the hyperbolas (when the shadows are shortest) occurs at local noon. I was mortified to realise my misunderstanding.
Although teachers are glad of interested parents, I found the administration less welcoming. I had previously tried to introduce the National Archery in the Schools program into the school, for those kids who didn't want the standard sports. This is competitive archery using Olympic competition rules. I'd arranged for the equipment to be sponsored (about $2,500) and for certification of myself as a coach (I'm also a professional soccer referee). Although there's never been an accident in this program, I arranged for $1,000,000 insurance for each kid. The cost to the school? - $0. All I needed was a field or gym to do it. The school wasn't interested; no explanation was given or thought neccessary. It took multiple calls to even get a reply to my proposal. I'm a member of the Carolina Geological Society. In 2008 we visited the Lee Creek phosphate mine in Aurora NC, world's best site for pliocene marine mammal fossils. There were whale parts (and shark teeth) on the ground for the taking. Outside the Aurora Fossil Museum is a large sand box of the same material, whose contents are refreshed regularly by a dump truck from the mine, for kids to riffle through. A whole bunch of kids were having a whale of time going through it the day we were there. The mine will happily transport (I believe at no cost) a dump truck of the same stuff to any interested high school. I brought back a supply of spare whale parts, shark teeth and phosphate ore from the mine for the school's science teacher. The phosphate ore has been sitting in waterlogged sand for 20My and is as insoluble as a rock could be. The teacher already knew about the dump truck offer. The school had turned her down; phosphate was a major pollutant and they weren't going to turn the school into a superfund site just for the education of students.
Collecting data for the analemma was problematic. You're on someone else's turf and obeying the rules of people, who have higher priorities than helping kids tackle large problems with simple tools. I had hoped that the analemma would be constructed dot-by-dot on the playground blacktop, where the kids would see the analemma developing and maybe ask questions about it. Having the kids mark the spots would increase their involvement, otherwise the project would just be another of the things that adults produce out of the blue to take up the kid's time. However kids aren't allowed to duck out of the classroom unsupervised - they might be abducted (or run off). I had hoped that I'd get some photos of the kids with the analemma, but I'd need a legal release from each parent and the school.
The first year, a request by the science teacher to mark the playground blacktop was greeted with "you're not to deface the school property" and "if the school board wanted you to have an analemma, you would already have one". The school doesn't have an analemma, but it does have a sundial mounted prominently above the south facing entrance. Everything in a school is for educational purposes, right? You'd be run down by a bus if you tried to view the sundial; the science teacher wasn't consulted on its purchase, so it wasn't a planned part of the curriculum; there is no correction for the equation of time. Except for October, when it gives correct time, the sundial is off by upto 30minutes. Presumably only the kids have noticed.
kid: Mommy, what's that?
Mommy: It's a sundial, one of the first scientific instruments. It's been used for thousands of years to tell the time. The daily passage of the sun through the sky, marked by the shadow of a stick on the ground, is so regular, that it was the original definition of time.
kid: so how come it's off by 30mins?
Mommy: It isn't a real sundial. It's art. It's to show you that there are more important things to learn at school than your teacher's lessons.
kid: like what?
Mommy: Like when you spend other people's money, you aren't accountable for spending it well. Watch out for the bus.
Since the school is 16 minutes offset from the standard meridian, it's likely that the sundial is displaying local time rather than standard time. This is a reasonable thing for a sundial to do, but it's one step more complicated to explain than a sundial displaying standard time. The sundial should overlook the playground, not a spot where a kid risks instant death. It's unfortunate that the administration doesn't recognise the educational value of a sundial and installed it as a non-functional piece of art. It seems that sundials continue to be a universal tool for testing a kid's critical thinking.
That was the first year.
The next year the science teacher secretly marked the driveway infront of the school, where the kids are picked up, using the school flagpole as a gnomon. Black marker pen on blacktop looked like oil drops. No-one at the school knew what was happening (even the kids), but if you knew what to look for, you could see a nice analemma developing through the year. I was reminded why secret societies and martial arts like karate (empty hand) existed: to propagate knowledge when rulers controlled the masses by keeping them ignorant and powerless. You encode your knowledge in pictures on cards and tell everyone that it's a game.
When classes started the next year and with the pattern revealed, some of the kids would start asking questions. But after a year of data collection and with a nice analemma displayed for all to see, the school repainted the driveway during the summer break, getting rid of all those nasty oil marks.
That was the 2nd year.
We've just started (at the summer solstice) on the 3rd year, I pushed golf tees into the ground on an otherwise unused piece of ground infront of the school, using streetlights as gnomons. The ground is like concrete and I use a pin-driver and hammer to knock a hole in the ground before whacking the golf tee in the last 1/4inch. The ground's people were informed of the golf tees, flush to the ground, but were concerned that they'd damage the mowers. One day I came along to find many of the tees ripped out. Then later after inserting about 100 golf tees, I came along to see that the ground had been dug up with an aerator and only a few tees were left in the ground.
I gave up. 3 years is enough.
It seems that the teachers' idea of an intersted parent and the administration's idea are quite different. The administration's idea of interest appears to be donations of money without any strings attached. If you want to know why american education is lagging, you only have to look at the treatment interested parents and enthusiastic teachers get. How much harder must it be for the students?
In my search for a better gnomon and for a solution that could possibly be used in a school room, one day I realised that the gnomon could move, while the shadow spot remained stationary. The front door on our house has a large glass pane, though which the sun shone onto a wooden floor. The floor showed enough features, that I could use one as the shadow spot, without having to mark the floor (I used masking tape to mark the spot in case I forgot).
The front door faces S.E., so the sun's path across the sky doesn't illuminate the door symmetrically with respect to noon (i.e. morning and afternoon are not the same). Since I was already busy at local mean noon (12:16pm), I marked the front door at local noon (12:00) whenever I was home. After a year or so, I decided that I'd also mark the door at 30min intervals, on the weekend (if I was at home and the weather cooperated) and I'd join the line of dots for every 4th week.
| Note |
|---|---|
| The spacing of consecutive dots in the summer lobe projected on the ground is small, while the spacing of consecutive dots of the summer lobe projected on the vertical glass door is large. | |
I initially marked the glass with marker pen, but the dots faded from the sun in a few weeks. I changed to house brand colored peel-off strips of sticky dots from the local office supply store. They only had one color, and soon I needed more colors (for weekends and different years). Looking elsewhere, I then wound up with dots that came off easily. The front door in the morning has people pushing against it with bags and gear and it wasn't long before the dots were on the floor. I then found "Maco Color Coding Labels", 1/4" diam in reals of 450 dots, numbered MR404-x where x is different for red, yellow, green and blue (from Litonlabels). These have worked just fine. Be careful; these dots come in "permanent" and "removable" adhesive varieties. Make sure you get the permanent ones (the removable ones don't stick to much of anything that I could find).
I started off a window pane analemma in the science teacher's class room, but her window is shaded most of the year, and she hasn't continued marking dots. I expect a futile year of marking the school's driveway broke her spirit.
Taking a photo of a transparent window is harder than I thought. You wind up with a photo of reflections of the neighbour's house or your living room (depending on the location of the camera). The only way out of this seems to be to take a photo at night and with the lights off. If you use a flash (and you don't have a remote flash), then you get a photo of a flash. Here's my best attempt, illuminating with incandescent lights from the side. The dots are only colored facing inside the house.
Figure 15. front door analemma from the outside
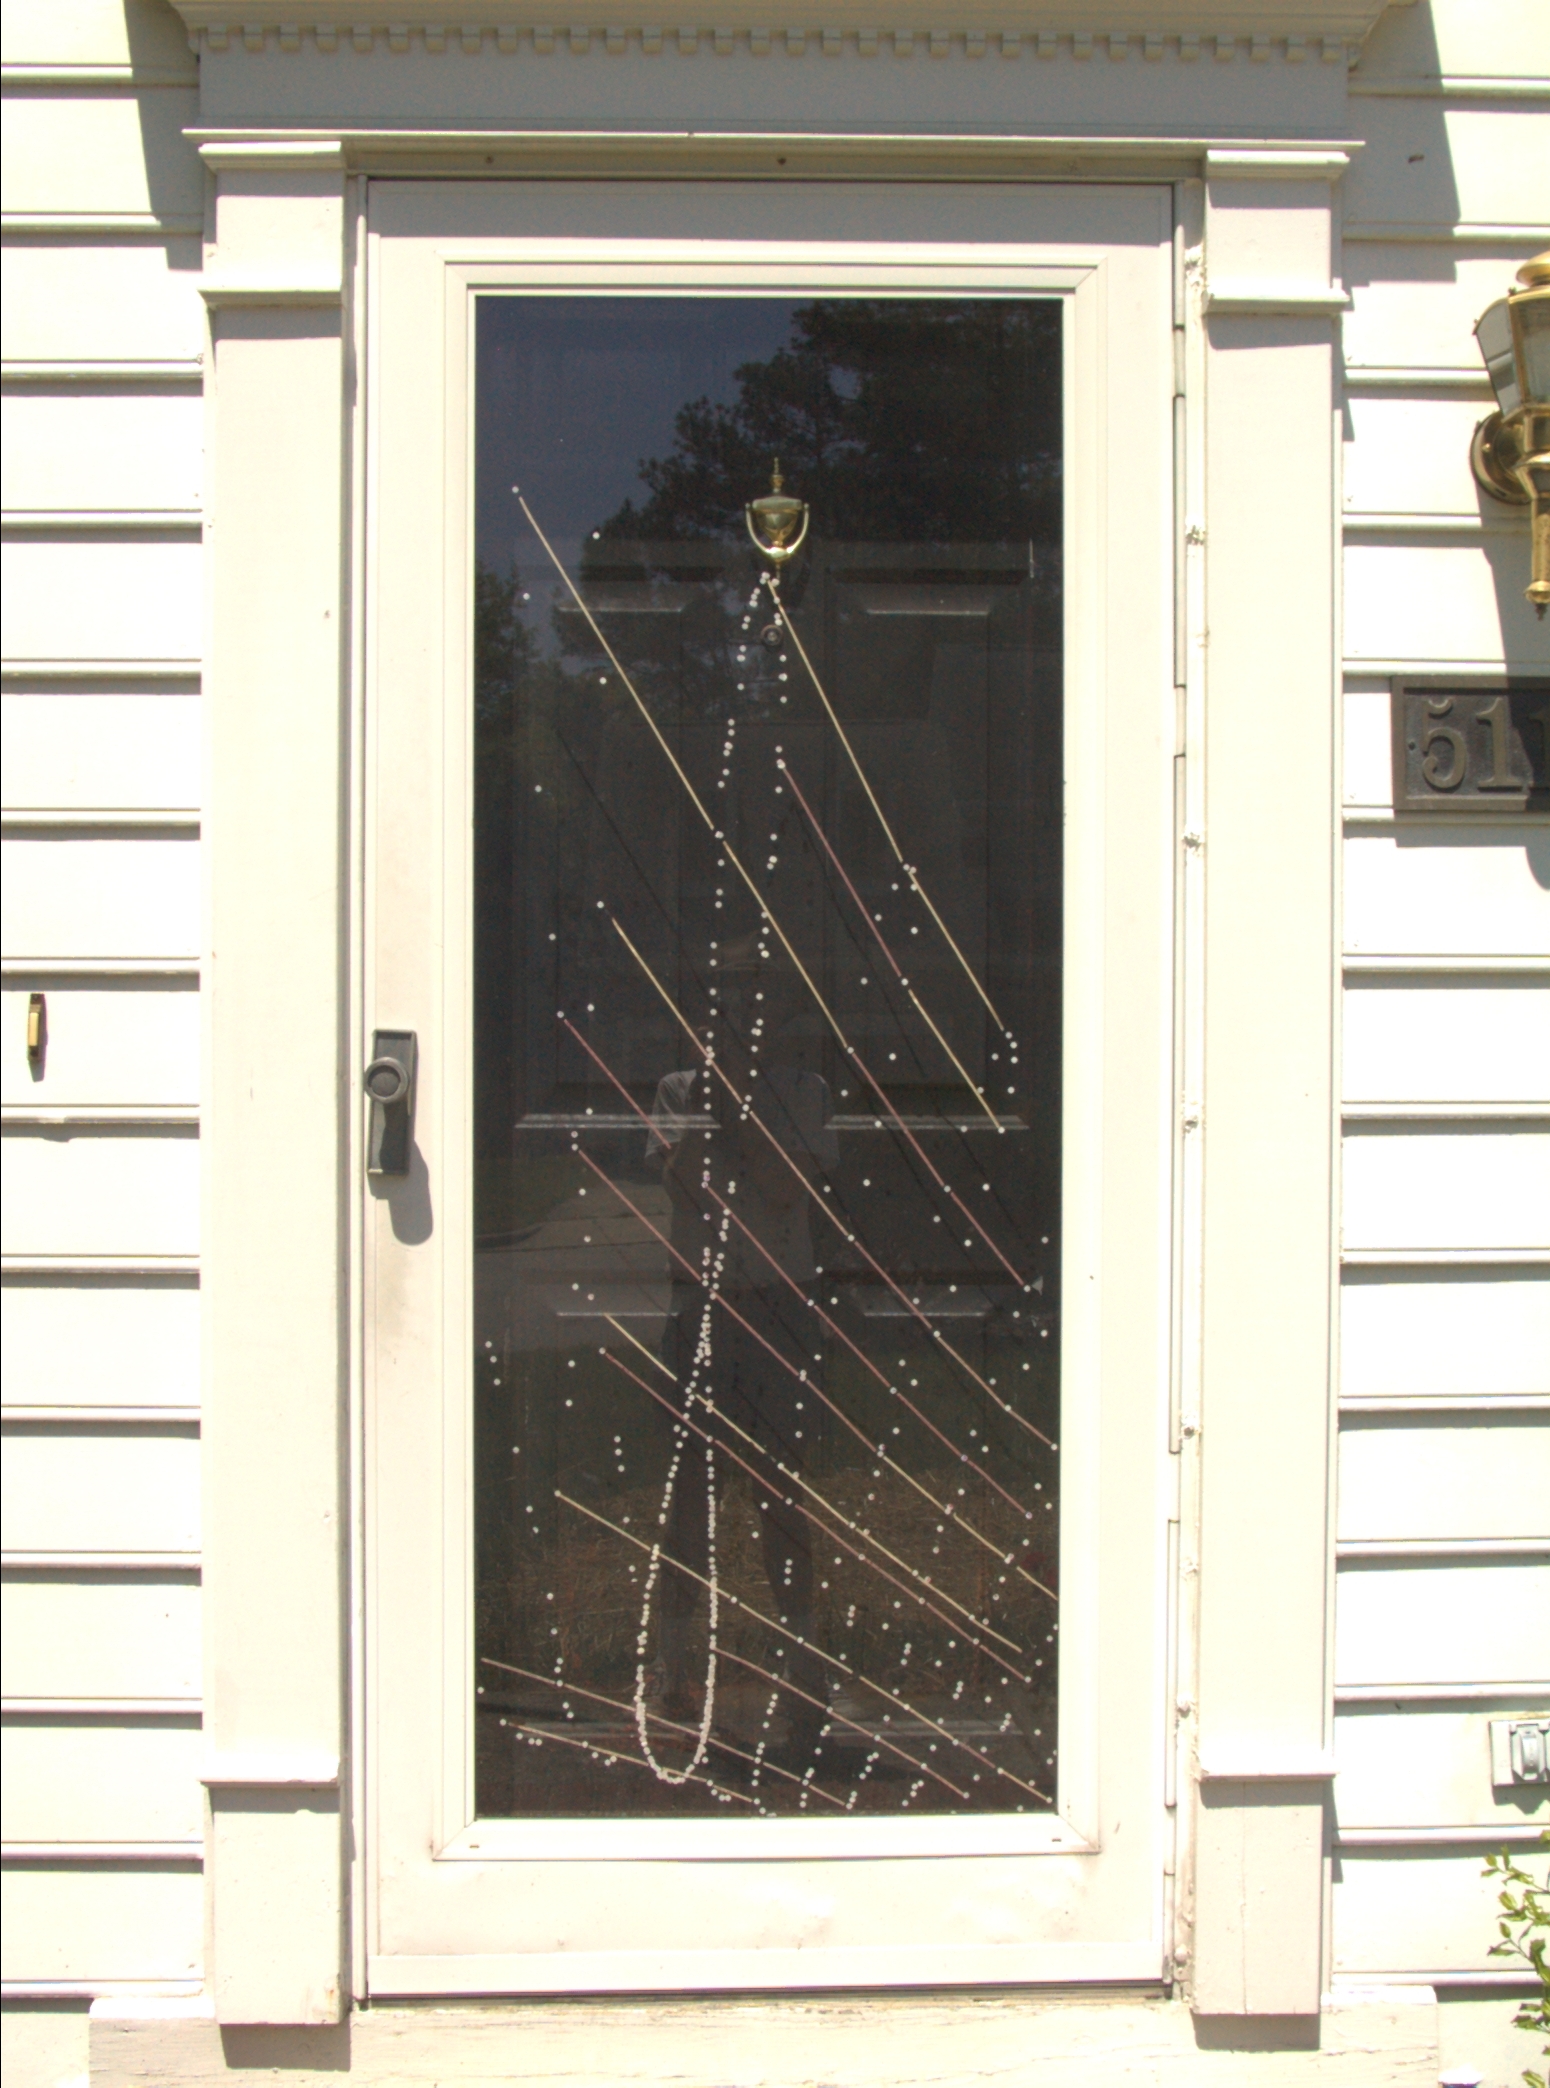 |
- Data is read on the hour and half-hour. Note that the most dense analemma (taken at local noon) is not vertical; it's taken 16 minutes before local mean noon.
- The analemmas left to right are
- 1pm (goes off the door at bottom left in summer)
- 12:30pm (top is truncated by overhanging eve in summer)
- 12:00 (leans slightly to right, is the most dense analemma)
- 11:30 and 11:00 are complete;
- Earlier times are progressively more truncated. There is only one point for 8:30am in the late winter.
- At the bottom of the door, the analemmas overlap, making disentangling the analemmas a bit hard from the outside (on the inside, the analemmas are color coded).
- The lines running top-left to bottom-right are the locus of the eclipsing point about every 4th week. Because the door faces SE, these lines are not symmetrical about a horizontal line in the middle of the door.
- The distance from the door to the mark on the floor is too small to see differences in the sun's position of less than 1 min.
Figure 16. front door analemma from the inside
 |
- Data is read on the hour and half-hour. Note that the most dense analemma (taken at local noon) is not vertical; it's taken 16 minutes before local mean noon.
- color scheme is lost in the depths of time. Most recently, yellow (in this photo seen as white) is the descending arm; red and green are ascending arm from last year and this year respectively (to differentiate the analemmas when they overlap).
- The analemmas right to left (going in the reverse order to the image from the outside so that I can use the same instructions)
- 1pm (goes off the door at bottom left in summer)
- 12:30pm (top is truncated by overhanging eve in summer)
- 12:00 (leans slightly to right, is the most dense analemma)
- 11:30 and 11:00 are complete;
- Earlier times are progressively more truncated. There is only one point for 8:30am in the late winter.
- At the bottom of the door, the analemmas overlap. Hopefully the different colors help differentiate the ascending and descending arms of the analemmas.
- The lines running bottom-left to top-right are the locus of the eclipsing point about every 4th week. Because the door faces SE, these lines are not symmetrical about a horizontal line in the middle of the door.
- The distance from the door to the mark on the floor is too small to see differences in the sun's position of less than 1 min.
The day of the equinox (+/-1 day) can be seen on the door analemma.
| Note |
|---|---|
| You can't tell it's the equinox from the door, but you can tell that the locus of the shadow of the sun is a straight line. If you were living in Greece 2000 yrs ago, you would have wondered what it meant. | |
There is a red line (concave down) starting at the bottom left of the analemma as seen from the inside. There is a band of glass with no red lines above it, and then another red line (concave up). Somewhere in this band would go a line of dots that's straight. In the middle of the band is 3 series of closely spaced dots. The top red series is from a previous year and should be ignored. The two sets of green dots below it are two days apart. The lower one is taken the day before the spring equinox in 2009. I just collected this data routinely and it wasn't till late the next day (the equinox) that I discovered that I could see curvature on the previous day's reading (I opened the door an looked at the line from the side of the door). By then it was too late to take a set of readings on the equinox, but the day after I took another set of data (now one set the day before and one set the day after the equinox). The 2nd set was concave upwards. When facing the door, these two lines can be seen to diverge in the rightwards direction. Presumably if I'd taken a line on the equinox, it would have been straight. Presumably if I'd taken a line on the equinox, it would have been straight..
By the the planning of Pope Gregory XIII (http://www.geocities.com/calendopaedia/gregory.htm), the day of the week (e.g. a saturday) advances by 1 (or 2 for a leap year) days each year (i.e. if a particular saturday was the 13th day of the year, then the next year it would be the 14th day of the year). I thought that if I kept collecting data on saturdays, I would get new points each year, till the 5th (or maybe 6th) year when I'll be get to redo my original points again and I would have a completely filled in analemma.
Initially taking a reading was a two person job; one to keep the gnomon vertical (possibly in the breeze); the other to mark the shadow. Often there were manpower problems on the day, so a one-person method was developed. The chalk was put on the ground near the last shadow spot (as a coarse reference), you'd hold the gnomon vertical, then in turn look at the bubble levels, then hoping you didn't move the gnomon, look at the clock and the shadow on the ground, scanning for a convenient feature in the random noise of gravel in the concrete driveway to act as a reference. Since the shadow didn't move all that fast, you had a pretty good idea where it would be at the exact minute. When the moment came, you'd walk over keeping your eye on the reference spot and mark it with the chalk. The shadow of the tennis ball took about 3 mins to pass over a spot on the ground. When I later changed to the WWVB clock with a seconds display, I held the clock next to the bubble levels and only looked up to the shadow on the ground at the exact minute. This method gave a lot less scatter.
Initially I just took one reading at the exact time. If the moment was cloudy, I'd just forget about reading that day. It didn't take much thinking to realise that you can't throw away a good reading, just because it's cloudy - you won't get that data point again for another year. I started taking one minute interval marks leading up to the exact moment, and depending on the cloud cover, might have to interpolate or extrapolate to the required moment. I expected a nice straight line with 15secs of scatter, but found that the reproducability was a lot worse than my initial tests. The errors didn't account for some of the really bad points, but were about the right size (1 min of time error) for many of the bad points. I then decided to take about 5 mins of reading for any one mark.
The initial (before WWVB) clock setting error was 15secs. Initial reproducability tests gave a positioning accuracy corresponding to about 15-30secs of time error (about 1/8th the diameter of the shadow). The actual analemma as it developed over the months was much lumpier than expected, with an error corresponding to about 1min of time error - about 1/2 the diameter of the shadow. As well there were the occasional obvious outliers.
While I can attribute bad data at the beginning of the project, to lack of practice, even after 9 months of collecting data, I still was getting bad data e.g. Analemma spray painted dots looking north. "> data taken at the summer solstice (there are a couple of spots not in the line, one on the right about 4 dots from the summer solstice and one at the bottom left just after the summer solstice - the loop on the left side should be convex and not have a concave section).
With 30 yrs of experimental science under my belt, including a paper on estimating errors, I was greatly chagrined to find that the experimental errors were much worse than I'd estimated and I didn't really know what caused them. I have these clues
- I came to trust the clock, which rarely needed week to week resetting, and wouldn't check if I was in a hurry. It turns out that occasionally (like after a change in temperature) the clock would be out by upto a minute in a week. Now with the WWVB clocks, I check the time on the internet every day, before I take a reading, and the time has never been off by more than a second, for any of the atomic clocks I've used. I've been too rattled by the continued lumpiness of the analemma, even with the WWVB clocks, to just pick up a clock and assume it's correct. While I haven't figured out the lumpiness problem, I'm checking everything I can every day.
- While I could acheive 15sec reproducability in positioning the shadow, I could only do this after multiple readings. When I'd do 15mins of readings in a row, it would take about 5mins for the radial distance to the shadow to converge on a value. One reading didn't do it.
| Note |
|---|---|
| This section details my (so far unsuccessful) efforts over several years, to produce an analemma accurate to 15 secs of sun movement. If you're happy with 1 min of accuracy (or anything that even looks like an analemma), you don't need to read this. | |
There are 3 gnomons described here
Mk1: hand held pole, 3-axis bubble level glued to pole, tennis balls at both ends.
There is no way to calibrate or test this gnomon while in use. I discarded it when I found that the pole had become curved (see calibratable gnomon), and causing the next year's analemma to follow a different path. I appear to have been just unlucky with this pole as the next pole (the Mk2 below) stayed straight for at least 3 yrs. As seen in the photos (analemma looking south, analemma looking north), the first year's analemma produced by this gnomon, was bumpy/irregular with several unexplanable outliers. However if you just want an analemma, this gnomon will do.
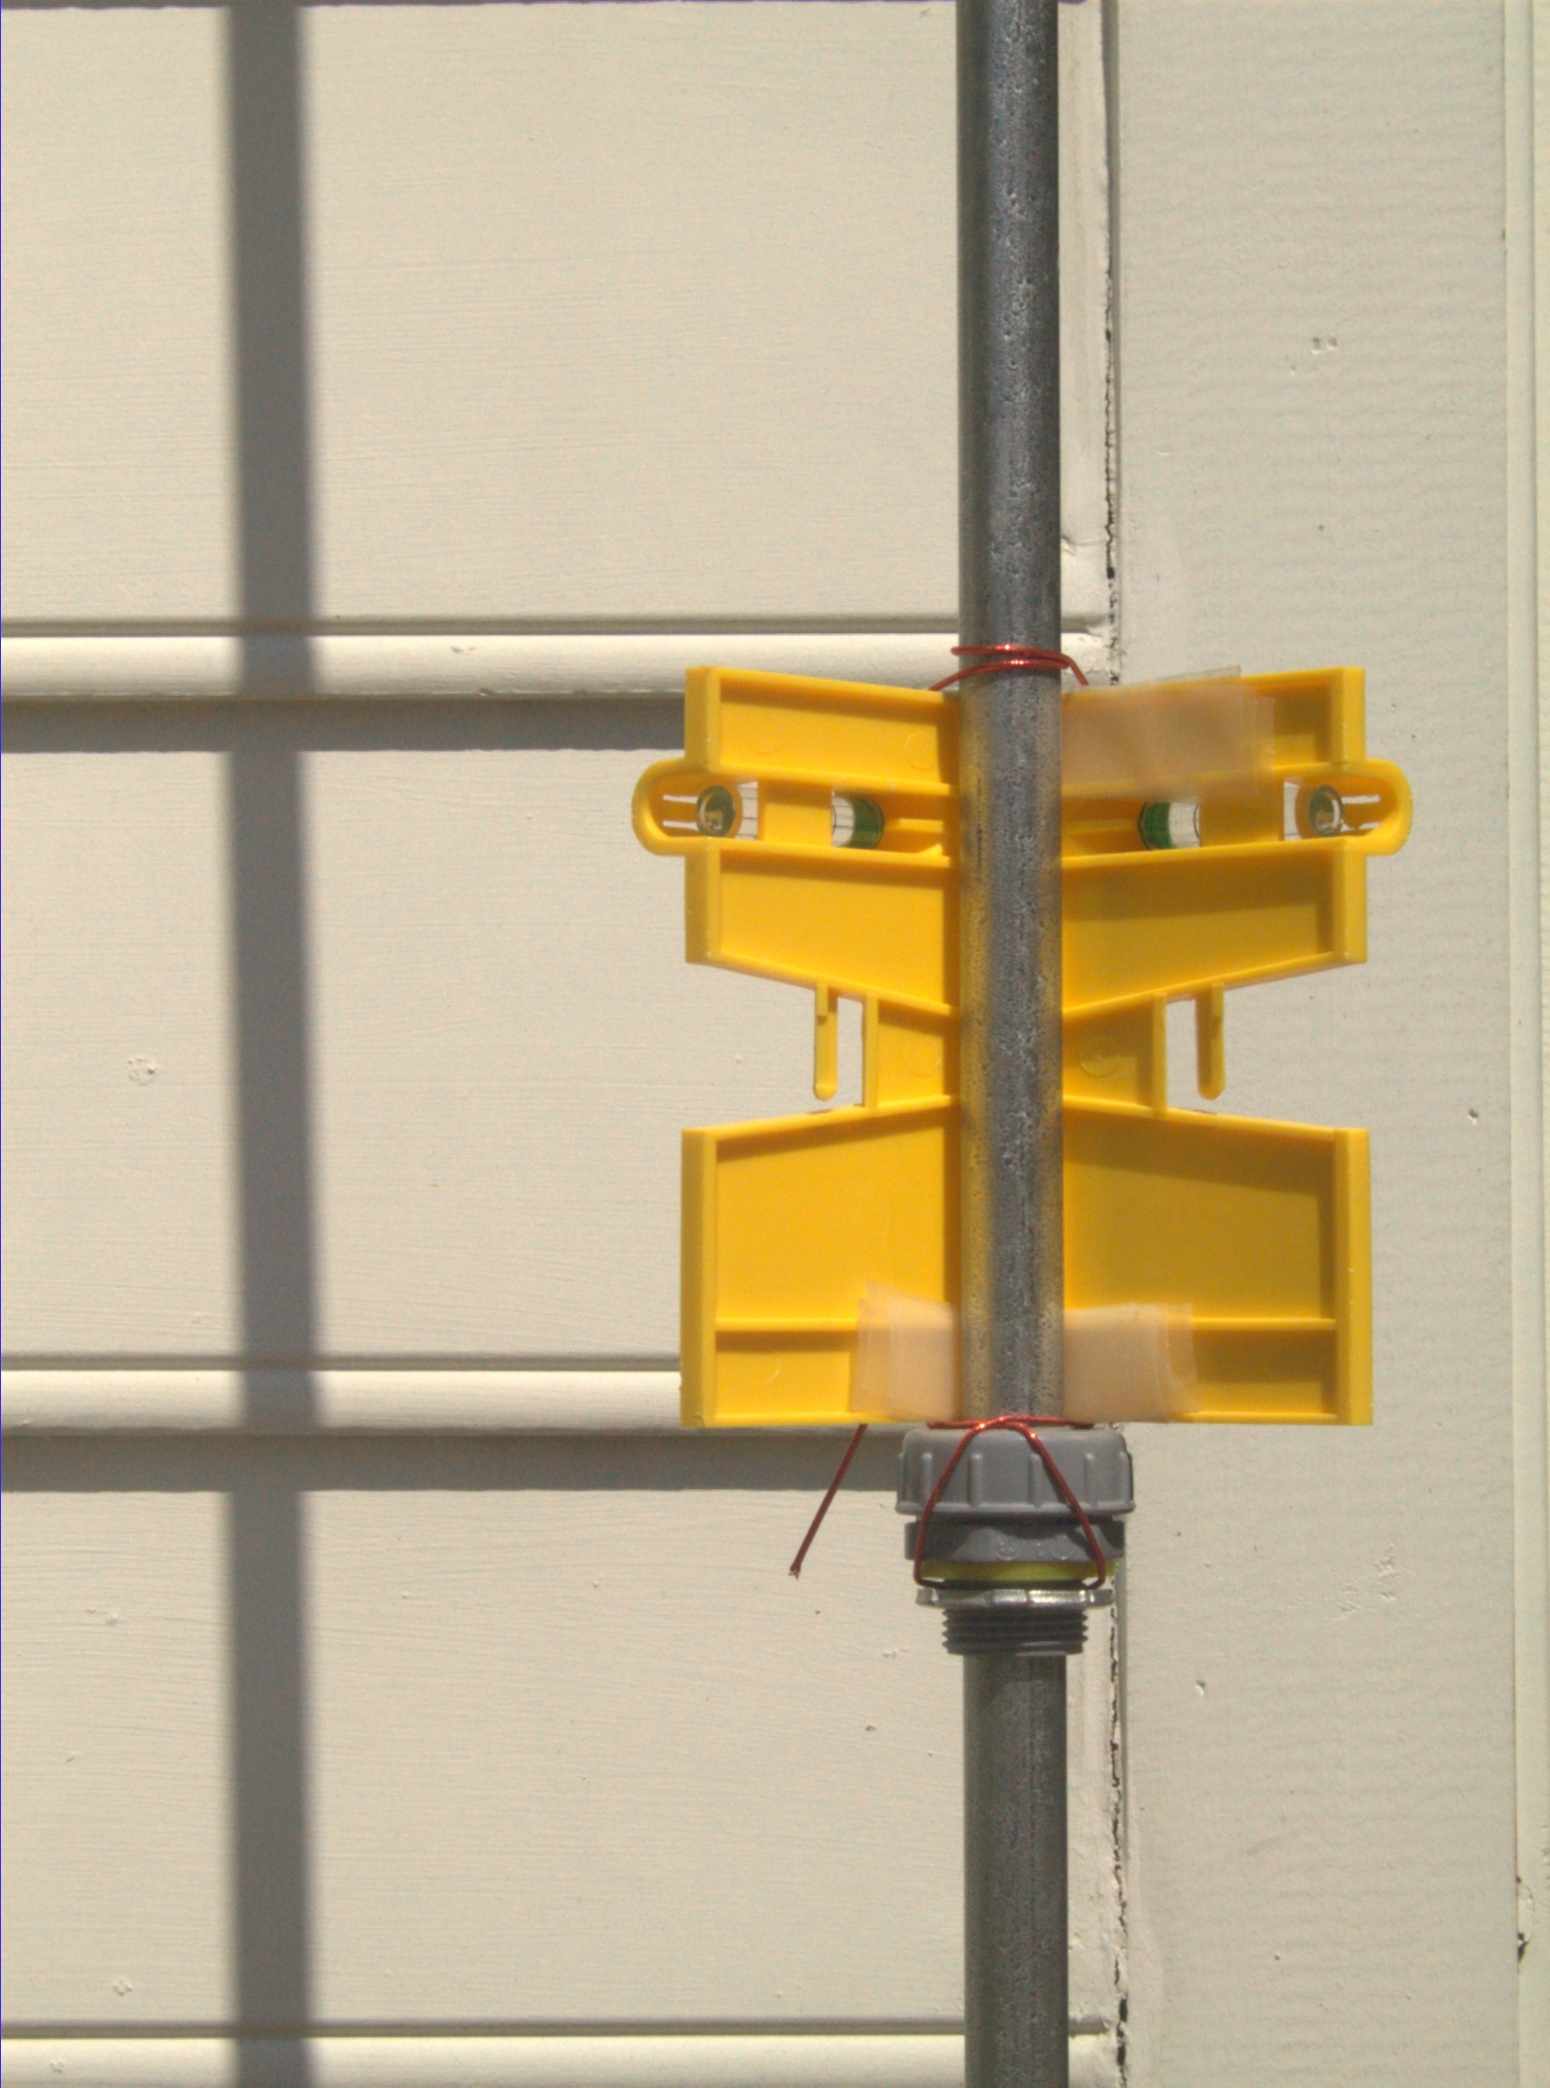
Mk2: same type of hand held pole, 3-axis bubble level tied on with elastic, tennis balls at both ends.
Figure 17. bubble level tied with elastic to pole
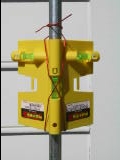
Because of gravity the bubble level hangs from the upper tie point. The lower tie point has the elastic wrapped 1&1/2 turns. The extra turn can be trapped in between the bubble level and the pole (see trapped elastic).
This gnomon is calibrated for straightness and verticallity during assembly, and is tested as part of each day's run. This gnomon produced occasional outliers too, which I couldn't explain. Under the best conditions errors were about 30secs of sun movement. The Mk2 gnomon, being hand held, was subject to some subjective assessment (fudging). However this gnomon stayed straight and didn't need recalibrating over 3yrs of use.
One day about 2yrs later, I discovered a long standing problem hadn't been handled properly. For each 1 min reading, I would eyeball some feature in the random gravel in the driverway cement, and keeping an eye on it, walk towards it. On reaching the spot, out of the corner of my eye, I'd pick up the appropriate colored chalk, left near where I expected the next point, and would record the mark and then move the piece of chalk to the expected point for the next mark. As I walked to the mark, I would carry the gnomon with me, in a roughly horizontal orientation. Occasionally I'd bump the tail of the gnomon on the ground but I never thought much about it. The bump would jolt the bubble level tied on with light elastic, wound 1&1/2 turns around the pole at the top and bottom of the frame. The jolt would allow the elastic to twang inside the bubble level frame, tilting it. Sometimes I'd notice this and sometimes I didn't. If this happened early in the 18mins I'd pick it up with an enormous cusp transverse to the line, but if it happened in the last minute or two, I'd have a point offset along the line by a minute or so, and not notice (other than having an obviously erroneous data point). One day after seeing that my run had been spoiled by a last minute leap of the bubble level, I put a collar (from the hardware store) below the bubble level and wound the elastic around the collar, so that it was well out of the way of the bubble level. The elastic never lept in between the bubble level frame and the pole, at the top of the top of the bubble level, so I didn't put a collar at the top. The collar made a big difference to the noise in the analemma. I still got bad points but not nearly so often. But now the trace produced for December was clearly different to all previous traces (a sign of unsolved problems).
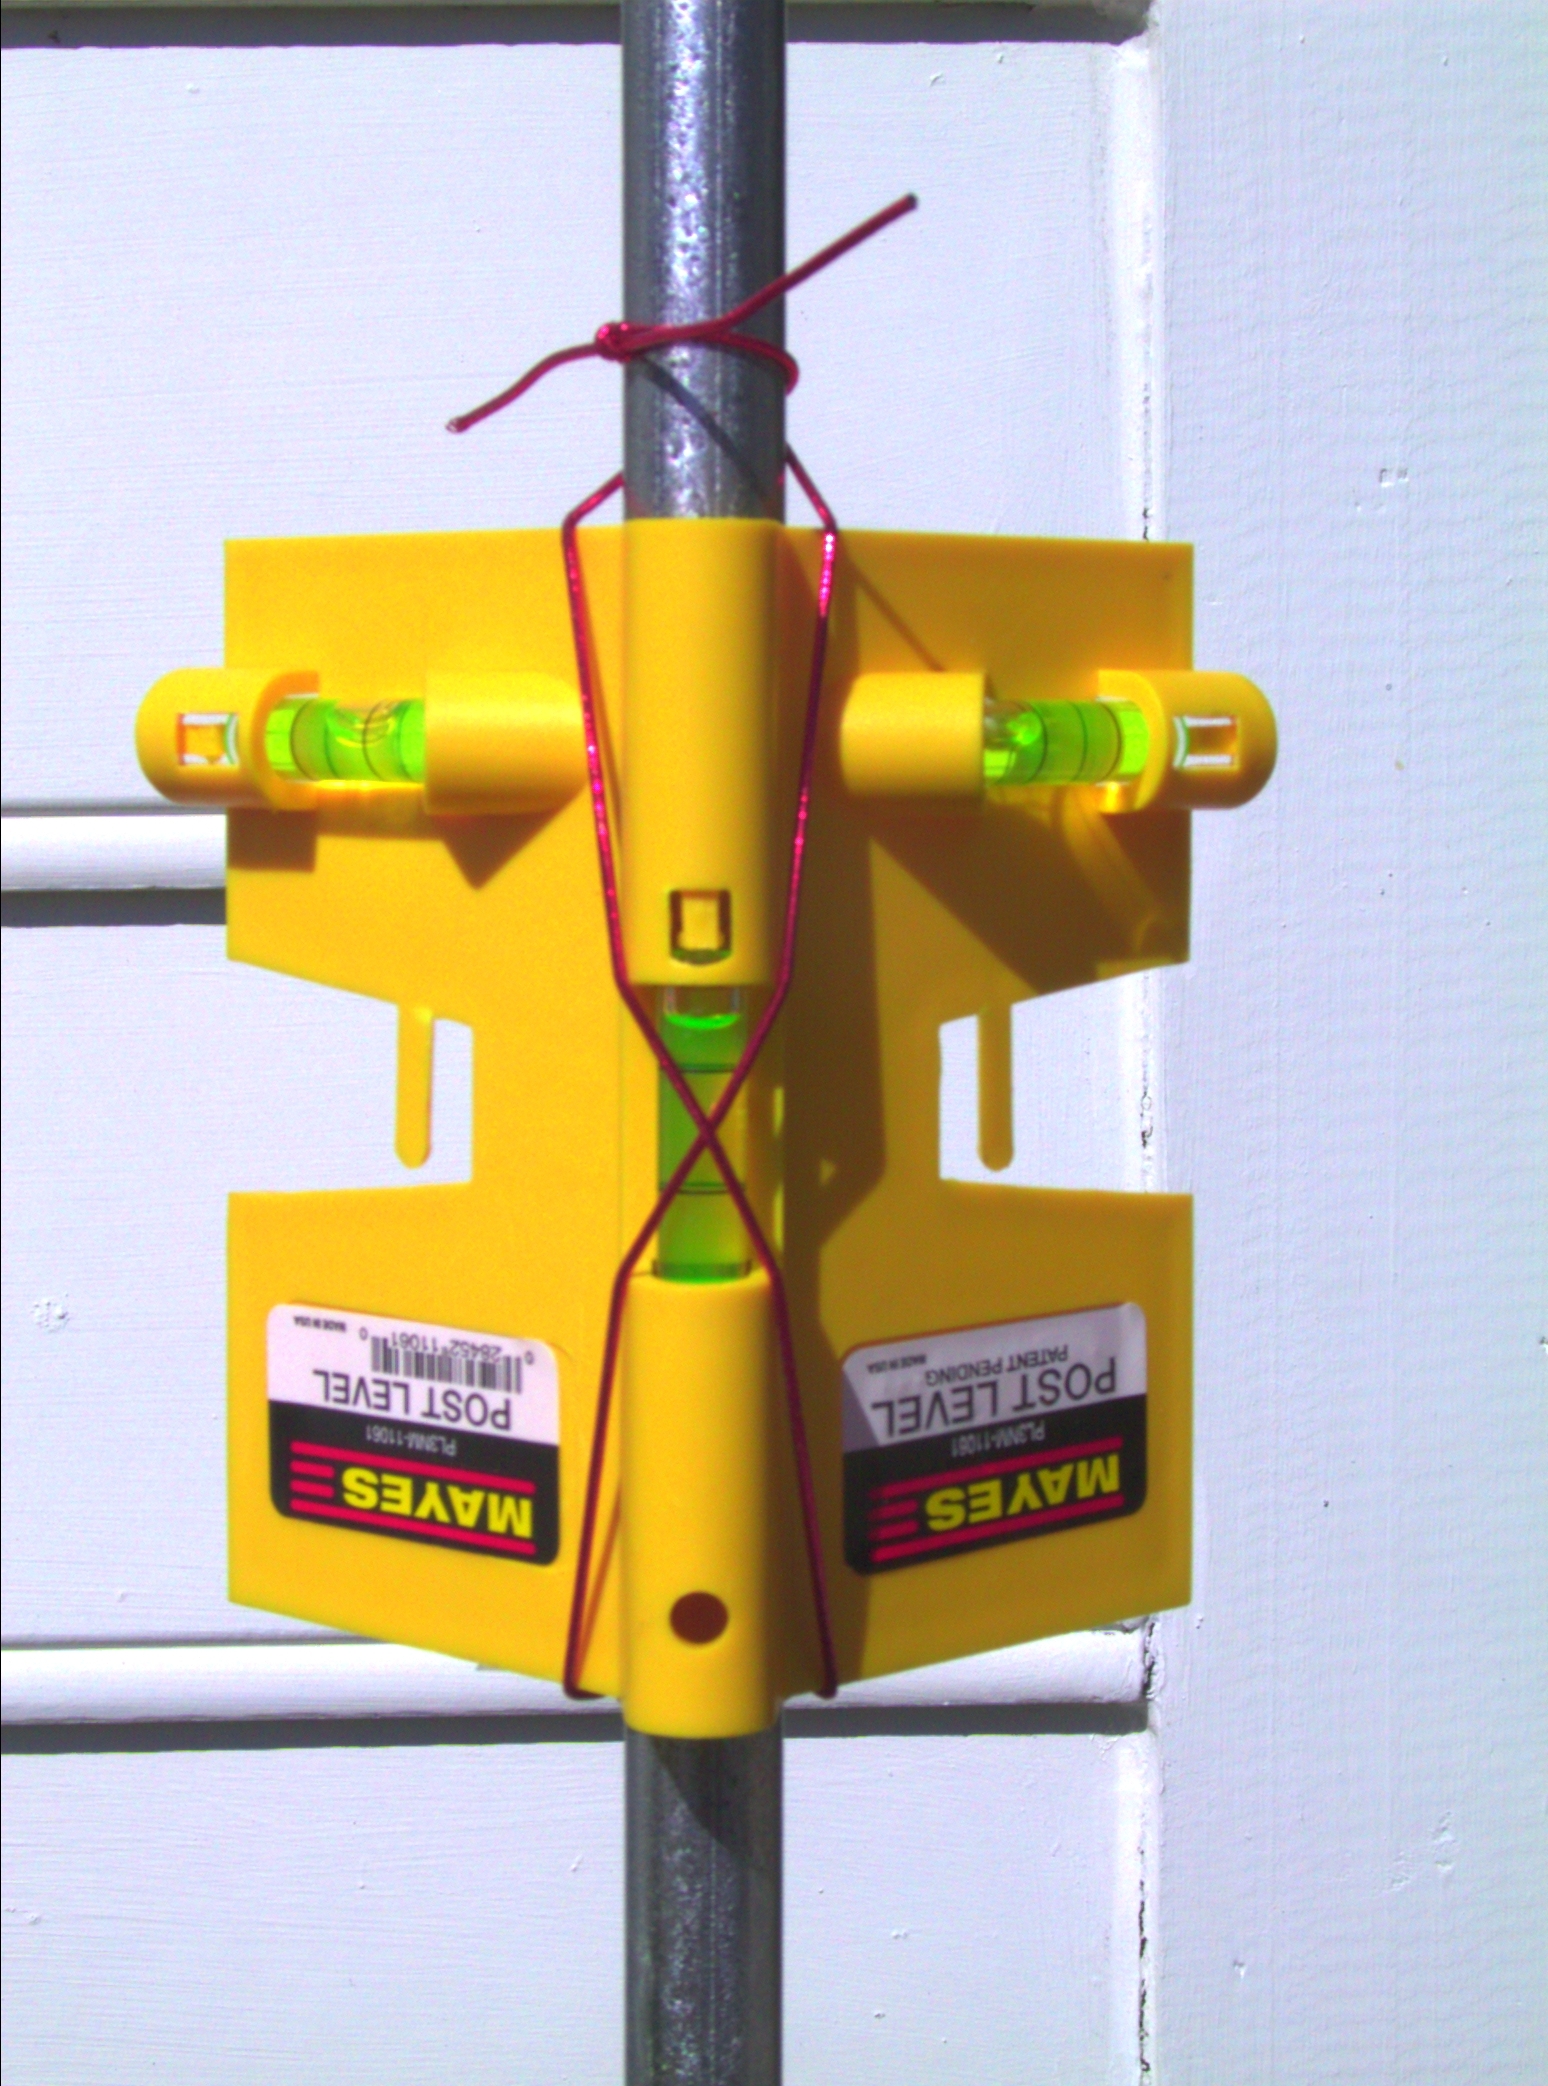
Figure 18. Bubble level with collar
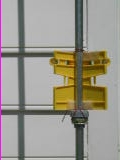
the collar keeps the elastic cord from being trapped between the bottom of the bubble level and the pole. I don't know what the parts are called by the hardware store people. I just looked for bits that looked like it would stop the elastic from being trapped. There's about 5 different pieces in there making up the collar. Now instead of hanging from the elastic, the bubble level sits on the collar (and doesn't continually slide down the pole).
Note note the pieces of tape at three spots that were used to true the bubble level. Mk3: light photographic tripod, no bubble level, raquetball on top.
This gnomon is calibrated for perpendicularity to the ground and is tested while in use.
I expected to be able to mark out an analemma accurate to about 15 secs of sun movement. The three components of an accurate analemma are
- accurate time: the WWVB clock gives time to a second.
- marking the spot with paint: this requires watching the shadow and at the appropriate time, marking it with chalk. With a gnomon you can be upto 16' from the shadow spot. Simultaneously keeping the gnomon vertical, watching the time and the shadow, and keeping your eye on the spot as you walk to the shadow spot to mark it, require some practice. There's lots of room for slop here.
- having a vertical and unchanging gnomon.
With timekeeping already sufficiently accurate (1 sec), my efforts to make a more accurate analemma were to find better ways to mark it and to make a more accurate gnomon.
The ideal gnomon is a object that casts a shadow in a convenient spot and is guaranteed not to move or change size more than 15sec of sun movement (the resolution I was trying for) over the lifetime of the project. Stonehenge is a good model. A flagpole would do, except to install one, I would need to remove a bush I liked. How would I check that the flagpole hadn't moved/settled and how would I fix it if it did? I didn't know, so I started with the Mk1 gnomon, with 10' EMT tubing, it being cheap and simple. I was only expecting to run the project for a year, and was going to accept anything resembling an analemma as success. At the end of the first year, I was pleased with the obvious analemma, but it looked a little sparse; there being quite a few less than 52 points spead over 16'. I decided to keep going and fill in the blank spaces.
To my surprise, the next year's points didn't follow the same line - they were offset by about 30secs. With the bubble level glued to the pole, I was using the pole in the same orientation for every reading. I was assuming the pole was still straight and the bubble level was vertical. Then one day the penny dropped; I rotated the gnomon 180° to find the shadow moving 90secs of sun movement. The gnomon had developed a bend over the year, contracting in a smooth curve along the seam. The bend was obvious when looking along the shaft. That I hadn't detected this long before, was just shoddy engineering on my part. Everyone should have a way of calibrating their tools for every reading. I was checking the WWVB clock against the ntpd internet time servers for every session. I should have had some equivalent way of checking the pole for straightness and verticallity. The problem was that I'd engineered the pole so I couldn't check it easily: The ends had tennis balls, and the middle had the bubble levels, so I couldn't roll the pole on the cement driveway anymore to check it for straightness. I needed a method of checking the straightness and verticallity of the pole without laying it on the ground or removing the bubble levels or tennis balls. Presumably I could have rested the pole on the backs of two chairs and rolled it to see if any curvature had developed, but it hadn't occured to me that the pole would bend.
For the Mk2, I started with a new straight pole (as checked by rolling it on the floor, before adding the bubble level and tennis balls). Instead of gluing the bubble level frame onto the pole, this time I tied it on with easily removable elastic cord.
| Note |
|---|---|
| You aren't going to find a perfectly straight piece of EMT. If when you roll it on the ground in the hardware store, the end wobble is 0.5cm, then the shadow on the ground will wobble by 0.5cm. This at least was my upper limit of wobble. | |
To use this new gnomon in a way that it could be tested while in use, for each day's run, I did a series of 16 readings at 1 min intervals, and for each reading I would rotate the pole/bubble level frame assembly by 45°. If the pole was vertical and straight, the locus of the shadow would be a straight line. If the pole was bent or the bubble levels not vertical, the locus of the shadow would be a cycloid (http://en.wikipedia.org/wiki/Cycloid).
Here are the cycloids for various offsets of the sphere at the top of the pole. In the northern hemisphere the locus of the shadow moves to the right.
Figure 19. Cycloids as a function of offset of the sphere, secs
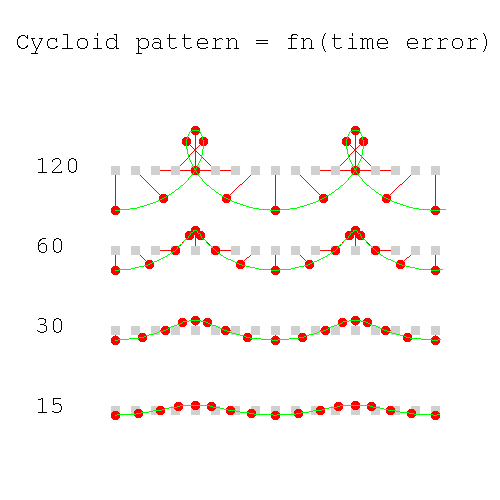 |
- In the northern hemisphere, the shadow moves right; in the southern hemisphere it moves left.
- The grey squares are the true location of the sun's shadow.
- The red line is the vector displacing the shadow from it's true position. The vector can be caused by the pole not being straight or not being vertical. The displacement is measured in equivalent time (secs) of sun movement.
- The green line is the locus of the sun's shadow as seen by the non-true gnomon. For an offset of a minute or more, the cycloid has obvious cusps which can be used to correct the gnomon.
- The red circles are the data that would be recorded with the offset.
To take a reading, the 16 min run starts at 12:02pm and finishes at 12:18pm, with local mean noon at 12:16pm. Having 14 mins lead time, this procedure lets me see any problems developing, before I get to the critical point that will be spray painted. I mark the 0,8 and 16 mins shadows with one color chalk and the other times with another color. I do 16 mins to get 2 repeats of any possible cycloid. A duplicated cycloid pattern shows that the cusps are due to the cycloid and not unsteadiness of your hands. After the run, I spray paint the 12:16pm point. If the locus of the shadow for each day developes a cycloid over time, you'll know that the pole has started to bend or the bubble level isn't vertical anymore.
Before each session (each day's readings) I rotate the bubble level 90° with respect to the pole (using the seam in the pole for orientation), giving 1 of 4 different orientations. If there were any systematic problems in the gnomon, I would see a pattern in the noon spots that repeated every 4 days of readings. I didn't see any pattern with a 4 day periodicity.
With the poor analemmas I was getting, I didn't want any bad data, so if it was cloudy at local mean noon, but I had a good run of points uptil and after that time, I didn't interpolate, and just threw away the data for that day.
That's how you use and test a straight and vertical gnomon. How do you check that it's straight and vertical in the first place? Once the gnomon was assembled I did these two checks in order (any time of day you get a shadow is fine)
Check the pole for straightness: Make the pole vertical according to the bubble level. (The bubble level hasn't been calibrated for verticallity yet, which doesn't matter for this test.) Take a reading (chalk mark the shadow on the ground). For the next reading 1 min later, hold onto the bubble level so that it doesn't rotate, and rotate the pole 45° (the direction doesn't matter, pick one and keep rotating the same way for all tests; you can use the seam on the tube track your orientation). Do a series of readings, at 1 min intervals, each time rotating the pole 45°, while holding onto the bubble level frame, to stop it from rotating. It will take 8 mins to get a complete cycloid. You now have 9 readings (0..8mins) taken with the pole rotating 45° each time, while the bubble level remained stationary. Repeat this, for another 8mins, or until you get the same pattern each time (as above). Look at the line of the shadow points. The locus of the shadow has to be a straight line of evenly spaced points. If you chose the piece of EMT carefully, this test should pass. If this test fails, you need a new piece of EMT.
Check the bubble level for verticallity: The bubble level is only vertical enough to put in fence posts. Here you get it vertical enough for an analemma. This test will only work, when the previous test passed.
This time I rotated the pole, allowing the bubble level to rotate along with the pole.
Note For the orientations at multiples of 90° you can line up the shadow of the pole on the bubble level frame, or have the sun grazing a flat of the frame. For the orientations at multiples of 45° I line up the shadows of the bubble level frame edges. If the bubble level frame isn't vertical in both directions, you'll get a cycloid and you'll need to shim the bubble level frame. You do this by inserting tape (regular office grade sticky tape is fine, see bubble level with collar) at the top or bottom of the two faces of the bubble level frame, where they touch the pole (making 4 adjusting points). Put the pole in the orientation that produces the cusps (or bumps) of the cycloid; shim the bubble level frame to move the shadow back half the width of the cycloid path. Iterate till the locus of the shadow is a straight line (I needed 3 layers of tape in one spot to get it right).
While you can calibrate this gnomon, you can only check its calibration during use. You can't easily add pieces of sticky tape between the bubble level and the pole, to see if that gives a straighter line.
Here's simulated (graph_cycloid.py) and actual data for this gnomon
Figure 20. Simulated data: 15 secs of error, 15 secs noise.
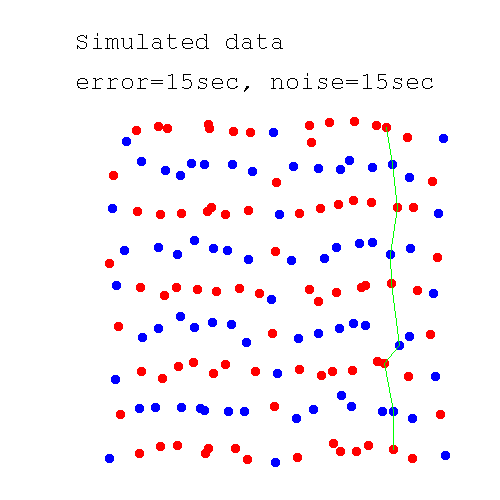 |
- The gnomon has 15 secs of offset, with the reading process adding 15sec of gaussian noise (x and y directions). The phase and magnitude of the offset is the same at the 15 sec line in noise free analemma (the location of the cusps/pointy bits/bumps is the same).
- 9 days of readings are displayed. In a real gnomon, the locus of dots is not perpendicular to the gnomon, but over a short period like this, the lines will all be parallel.
- The coloring scheme is the one I use. Every 8th dot has an different color. On adjacent days I swap the dot colors, so I know which data set a dot belongs to.
- Data collection starts at 12:02pm (first point being on the left, this being the northern hemisphere), with 14 mins of data to my local mean noon (at 12:16pm). Two more data points are collected, the last being at 12:18pm.
- The green line is the estimated location of the local mean noon analemma.
- Notice the number of times pairs of points are almost coincident.
- It would be difficult to use this data to calibrate the gnomon to any better accuracy.
Figure 21. Mk2 gnomon. 7 days of data
 |
This data was collected shortly after I build the Mk2 gnomon.
Up is towards the gnomon (So my body doesn't shadow the dots, I'm taking the photo looking towards the gnomon spot). The locus of the sun is from right to left. The green paint is the local mean noon spot (taken at 12:16) and covers the 12:15-12:17 spots (about a year later I changed to paint spot about 1/3 this size).
The color pattern is alternated each day. Starting at the bottom of the photo, the red chalk mark on the right is taken at 12:02pm, the red spot in the middle is taken at 12:10pm. The red spot at 12:18pm (would be on the left) is covered with green paint. For the next day (the 2nd line from the bottom), these times are marked in blue. To see the (lack of) consistency in the data, follow the middle red dot at the bottom, then up to the blue dot, then the red dot...
At the time I thought this data was as noise free as I could get (it probably was as good as I could get by hand) but now 3 years later, I see it's not going to get accuracy to 30secs of sun time. For 17 days of data taken with the same gnomon (but with a collar to prevent trapping of the elastic) see 17 days of data ">Figure 22.
With a functioning Mk2 gnomon, I had to throw out my previous data, which had been produced by a pole which presumably was progressively bending with time. If you're looking for reproducability between years, you need 2 years of data to get one point. For my next round, I started in spring, with each day's run showing nice straight lines of points. As the days went on, I was still getting erratic points on the analemma, for which I could find no explanation. 12 months later, I saw that the points in the spring were about 30-45secs different from the previous year, but by summer, the points for each day were the same as the year before.
When previous days chalk marks hadn't been washed out by rain, I would have expected the points at any particular time (say 12:05pm) to all line up, but the line joining points of the same time were very noisy, at least 30-45secs. Often it was hard to trace the line of constant time back through previous day's readings.
From my position at the gnomon while taking the 16mins of points, I could see at the accumulating chalk marks and the estimated position for the next mark. If there was anything obviously wrong with the next point, I could see it coming and could look at the bubbles or the elastic for clues as to what I might have done wrong. I know that checking the current datum to see if it's compatible with previously recorded data is fudging, but I had the choice of recording a bad point or recording a much better point which seemed quite compatible with the bubble level. The possibility that I was fudging the data was worrying, but I didn't have any objective measure of how much fudging I might be doing.
By dumb luck, about 2yrs later, due to a run of fine weather, and juggling my work schedule, I collected data for an unprecedented 17 consecutive days.
Figure 22. 17 days of data
 |
17 days of data. I'm standing on the west side of the analemma looking east. The gnomon spot it to my right. This data was collected in spring 2009 and has the earlies set of data is on the left. The locus of the shadow during the day goes from the bottom of the picture to the top. Note
- The lines are straighter than the 7 days of data collected 2 years earlier, when I first assembled the Mk2 gnomon. Was I getting better collecting data, or was I fudging?
- The lines aren't parallel (see the last 4 lines on the right of the image), whereas the lines from 7 days of data are noisy but at least they're parallel. I assume any news skills I've accrued over the intervening period have appeared as fudging the data. (This is a little disappointing.)
From my position at the gnomon, the 17 days of data looked fine, but later standing to the side of the analemma (the direction I didn't see from the gnomon), the data was a mess. The lines should have all been parallel, but while straight (little noise), they weren't parallel. Some adjacent pairs of lines converged as they went towards the analemma and some diverged. Any fudging I might be doing, should have no effect on this non-observed dimension. If I was only fudging left-right, then rather than straight non-parallel lines with little noise, I should have seen parallel but noisy lines. From my view point at the gnomon, I was clearly straightening the lines, while at the same time stopping the lines from being parallel. Whatever I was doing from the gnomon was affecting the data in the other dimension. I was adding about 30sec of fudging.
For a control, I went back to my original method, of not looking at the shadow till I was about to record it (no antipation and corrections of problems).
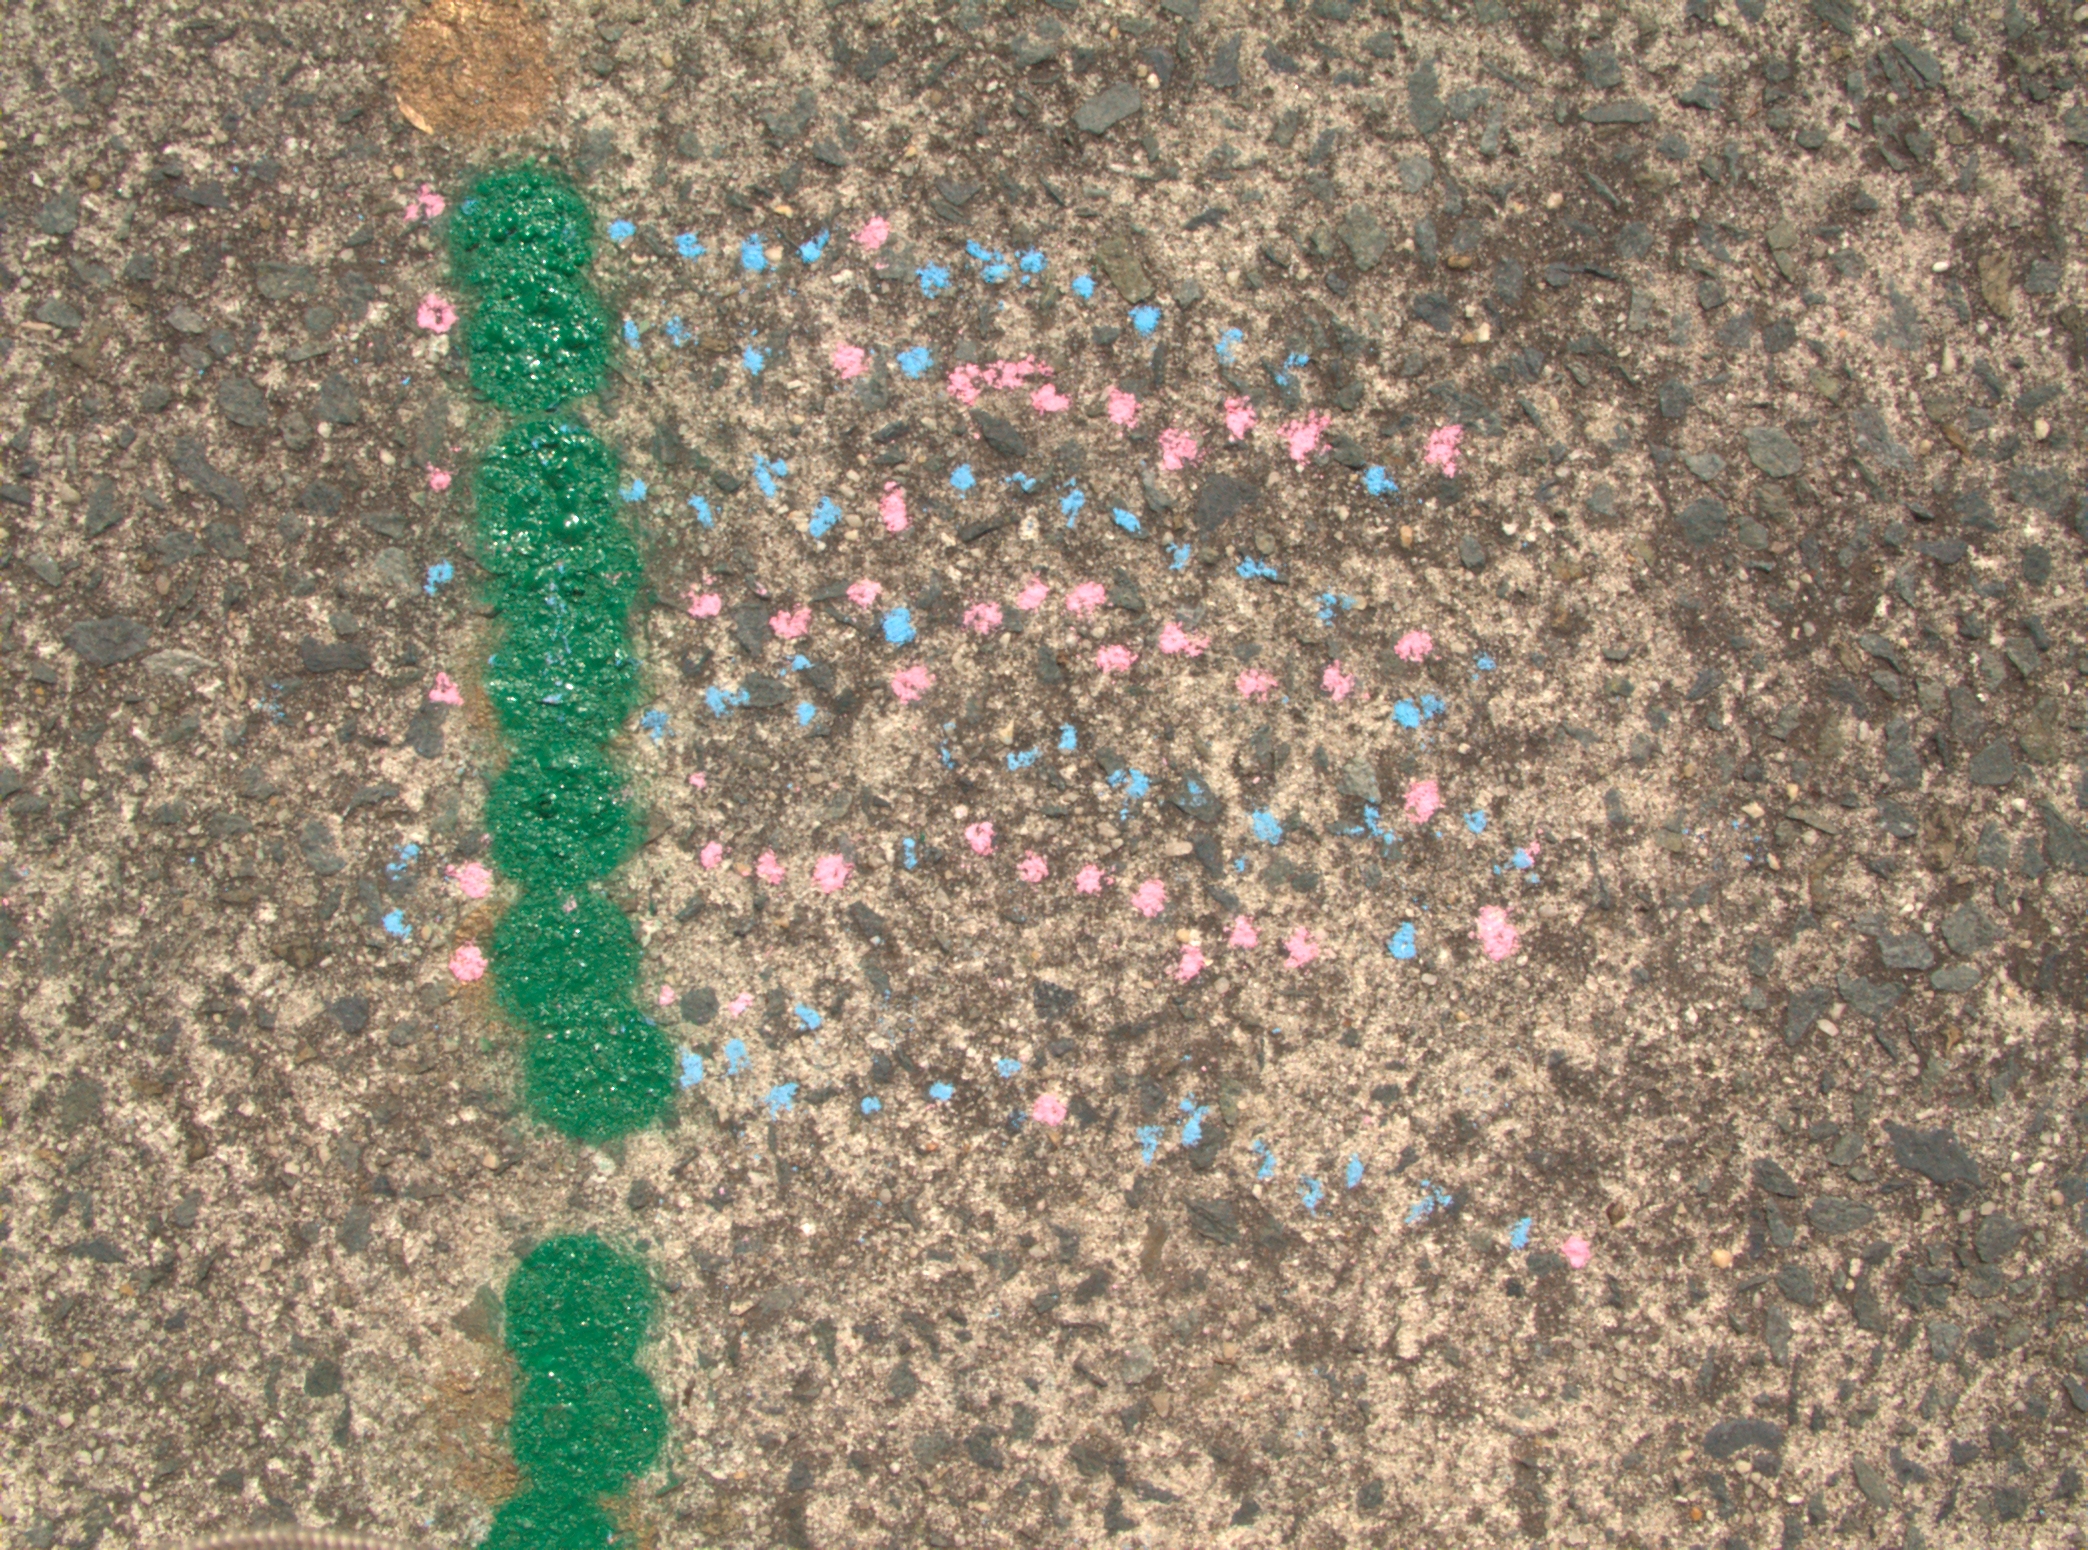
Figure 23. unfudged data, ellow spots, taken near the node of the analemma.
 |
The lines of data (red/blue chalk marks) are again noisy and parallel. However notice that the yellow analemma spots aren't a straight line any more. The data seems to below to two separate lines (two jogs), offset by 1 min (the white lines are separated by 2 mins).
The hand held Mk2 gnomon wasn't going to get any better than 30-60secs of accuracy. Presumably having a fixed jig (rather than hand holding) for the gnomon would have helped this initial calibration. Still even after this type of calibration, I would have to record the data with a hand held gnomon.
Here's the analemma after a few years with the Mk2 gnomon. The white lines are 2 mins of sun movement.
Clearly the best gnomon would be fixed (rather than hand held). Instead of standing at the gnomon, I could stand at the shadow point and when the moment came, I could mark the spot. A lot less room for fudging. I'd spent much time over the previous years, trying without success, to figure out a way to turn a heavy duty surveyor's tripod into a 10' high gnomon. Then one day I met some astronomer friends for dinner in Raleigh. Being early, and having nothing better to do for 20mins, I stopped in at the nearby Peace St Camera Store for some idle walking around. (I'm not much into cameras, I can never keep track of all my photos, and have given up trying to take more, however I admire the technical aspects of lenses etc. I didn't make the transition from film to digital SLRs as I have a bucket of Olympus OM1 backs and lenses, and would have expected Olympus to make a line of digital cameras, which could use my Zuiko lenses. Because of this experience, if I buy another good camera, it will be from a company that wants me as a continuing customer, when a subsequent generation of hardware arrives.) There I spied a light 128" tripod for mounting remote flash attachments, for use in weddings etc. It just might do.
Here's what I had to do to convert the light tripod to be a gnomon
a sphere at the top to cast a shadow
Note A lens, at the top of the pole, to make a bright spot in the center of a shadow, would have been even better, but I've never been able to find anything with a focal length of 18'. Later when I adopted the method of rotating the gnomon 45° for each reading, I would need a way of keeping the lenses in the same orientation, while the pole rotated. Tennis balls (2.5" diam) had proven to too big, at least for the summer points, giving a large umbra. Wooden balls were available at the local craft store and I tried a few different sizes. To get an umbral eclipse of a 0.5° sun from a sphere at 12' (gnomon head to summer solstice point), the sphere would have to be about 1.3" in diameter. This sized sphere was too close to the pole's diameter to be differentiable from the pole in the shadow. A 1.5" sphere worked well at least for summer spots. Winter data collection was simulated in summer by looking at shadows early in the morning. For a winter shot, the 1.5" summer sphere left a large grey penumbral shadow with no umbra. While is was easy enough to find the center while standing at the shadow, an umbra would have been nice. To get an umbral eclipse of a 0.5° sun from a sphere at 18' (approx dist from winter solstice mark to top of gnomon), the sphere would have to be (18*tan(0.5))=1.97" in diameter. The umbra at a distance of 12' (gnomon head to summer solstice point) would then be 1/3*2=0.6". One problem in winter is that the low sun elevation (27.5°) causes the shadow to lengthen. A 2" sphere, just big enough to produce an umbra, will have a penumbra which is 4" wide (twice the size of the eclipsing object) but is 4/tan(27.5°)=9" long.
Whether I'll use two spheres (one in summer and one in winter) or one, I don't know yet.
make the tripod perpendicular to the ground
Since the ground was sloping, I couldn't make the tripod vertical, but I could make it perpendicular to the ground using the cycloid test. I needed to be able to adjust the length (height) of the legs so that the shadow sphere was in the same place independant of tripod orientation.
Note This method will only work on a smooth (e.g. wood) floor. It doesn't work on cement with embedded gravel. See ball joint tripod foot for a method that will work on rough cement. I removed the plastic caps on the tripod leg ends and replaced them with copper pipe end-caps. The end-caps were drilled to take a long bolt and a brass nut soldered inside the end-cap to hold the bolt (I soldered the brass nut by putting the end-cap on the rings of an electric stove). I then adjusted the tilt of the tripod, by screwing/unscrewing the bolts.
Figure 26. adjustable foot for tripod - bolt type
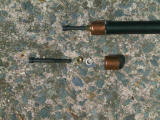
The pipecap has a brass nut soldered inside it to hold the bolt. The visible nut and washer are to tighten the bolt once the correct length is found.
calibrate the gnomon with the cycloid test
The cycloid test was done by rotating the tripod 60° about the pole for each reading at 1 min intervals. The cycloid interval then was 6 mins, rather than the 8 mins of the Mk2. To get a repeatable orientation, I colinearised the shadow of the pole with the shadow of a tripod leg (alternately a leg in front of the pole and then a leg behind the pole).
A few things needed to be done to the tripod before I could calibrate it.
Center the tripod
I hung a plumb-bob from the rigging at the bottom of the pole.
Note (It's a little hard to find the center of the pole by hanging a plumb bob, when you have a 3-fold hardware symmetry. I decided it didn't really matter if the plumb bob wasn't exactly in the center, since the plumb bob would always be over the same mark, and using the cycloid test, I could put the sphere over the plumb-bob. Just make sure the plumb bob stays tied on the same way.) I later figured out how to make a four fold symmetry, passing string through the outside joints of one leg and the inside of the opposite two legs.
stop the tripod legs from rattling
There was lots of slop in the screws etc. When I did the cycloid test, there was lots of non-cycloidal noise in the locus of the shadow.
Figure 27. locus of shadow for initial, rattling tripod

4 cycles of data (of 6 minutes, note red chalk marks) were collected. The legs were adjusted after the 4th set (noted by vertical blue chalk mark line), to reduce the eccentricity of the gnomon tip, but the scatter of points is still high.
Note because of the bumpiness of the cement and the large diameter of the piece of chalk, sometimes a single point appears as 2 or 3 smaller points e.g. the 1st and 2nd blue points in the last set of 6 on the right; the 4th point in the first complete set on the left. Because of the rattle, the tripod wasn't going to be in the same configuration every time I put it down. There was lots of room between the bolts and their holes. I covered the machine screw (bolt) threads with heat shrink tubing, making a tight fit, put neoprene washers in all the joints and tightened the screws. Now when you shook the tripod, it didn't rattle.
Figure 28. locus of shadow after adding heatshrink sleeves to bolts, and neoprene washers to joints.
4 cycles of data were collected (note repeating pattern, cusp assumed to be last blue point in cycle). The legs were adjusted after the 4th set, to reduce the eccentricity of the gnomon tip. The scatter is much reduced over the rattling tripod, but it's still not a straight line.
get better feet for the tripod
There were two problems with the bolt ended foot for the tripod.
- The black gravel bumps in the cement weren't large as far as driveways go, maybe 0.5cm, but were too large for the analemma project. The bold heads contacted the cement at a point and since I was never putting the tripod down in exactly the same place, the tripod would be tilted differently each reading. The gravel wasn't a problem for the Mk1 or Mk2 gnonoms which rested on a large radius tennis ball at the same spot.
- The bolt heads don't slide over the cement. To place the plumb bob exactly over the mark, you need to be able to tap the tripod a few mm. Picking it up and putting it down again isn't accurate enough.
To test if these were the only two problems left, I put a sheet of Masonite (R) on the ground to make a smooth surface to find both the surface noise and the non-sliding problems solved.

In the 2nd last iteration (above red chalk), instead of getting a line of 5 blue and 1 red dot (6 dots), I got 4 blue dots. The 2nd blue dot is actually a pair of almost coincident dots. (The 3rd last iteration has 2 closely spaced points in the same position.) Coincident spots on a cusp is a normal cycloidal pattern for a non-centered shadow sphere. What was unexpected was that due to experimental error, there wasn't a cusp (or bump); it looked like a good straight line to me. Adjustment of the tripod legs, treating the 2 coincident points as the location of the cusp, gave 6 evenly spaced dots for the last iteration.
Note the improvement in the locus of the shadow from the initial data with the rattling tripod.
Until this moment I'd accepted a straight line as indicating no cycloidal error. However to get only 5 spots, the sphere would need to be off-center by 30 secs of sun movement. Presumably if I were presented with the coincident spot situation with the Mk2 gnomon, I would have made minor adjustments (fudged the data) to get evenly spaced spots, and I would have accepted the gnomon as true. Thus the cycloidal method of truing the Mk2 gnomon by hand wasn't capable of better than 30 secs accuracy. The problem all along then had been that the Mk2 gnomon had never been trued properly; it was only true to 30 secs.
I wondered if the Masonite (R) could be a permanent solution to a flat smooth base for the tripod, until a few hours later in the middle of the day, when the heat had cylindrically warped the Masonite (R) sheet. With the plumb bob in the center of the sheet, tripod rocked back and forth with each 60° rotation, depending on whether an apex of the triangle was facing the raised part of the sheet in one direction or in the other. The locus of the shadow was now two parallel lines.
ball joint padded foot for tripod
Note The ball joint with the large foot works on rough cement The bolt ends poking out of the tripod legs angled at 45° to the pole, had to be changed to flat sliding pads, large enough to average out the bumps in the cement. To join a flat pad to a rod at 45° I needed a ball joint. Standard industrial ball joints (even light duty ones) have a swing angle of 30-36°. I needed 45-0-45° (a 90° swing angle). After scouring hardware stores looking at shower heads etc, I remembered that camera tripods have heads with large swing angles.
Note later I remembered that hardware stores have two axis rotatable pads, which screw onto poles; these are used for painting ceilings. Presumably the threaded pole could become part of a tripod leg. However I couldn't find any way to adjust the height of each leg independantly. I bought 3 of them off the internet. I drilled wooden dowls to make sleeves to fit the leg of the camera tripod into the leg of the gnonom tripod. I then fitted large teflon pads to the ball joints with adjustable links to change the height of each leg of the gnomon.
Figure 30. disassembled tripod ball joint with small foot - not a good solution.
components from top to bottom
-
wooden dowel, fits into tripod leg, drilled to accept leg of small tripod (designed for point and shoot digital camera).
The drilling can be done by hand.
- clamp the dowel horizontally (two clamps on a table is fine)
- center mark the end face of the dowel. use a small drill to make a small divot at this spot (makes sure you have the divot in the center).
- You need two people. You drill with a small drill, watching the drill is centered left/right. A partner stands to your side checking that the drill is OK in the up/down direction.
- follow the hole with a bigger drill (I used 3 drills, one to mark the end face and two to drill the center hole.)
- small tripod. two legs have been removed, the rubber foot on the remaining leg has been removed (so the leg will fit into the drilled dowel). A circular collar, normally on the thread, for the camera to sit on, has been removed.
- a double female threaded connector (forget official hardware name)
- a teflon pad which has been drilled to take a counter sunk bolt. The bolt is held onto the pad by a nut on the other side. The bolt has about 1/2" free thread to adjust the distance of the pad from the connector. A flanged nut tightens the thread when the correct height has been found.
This tripod is unstable (the feet are too narrow for the height of the swing arm). Here is what I hoped the tripod would look like in use
Here's what happens when I pick up and don't put the tripod down squarely, or you tap it to move it slightly sideways.
Larger feet made the same way work better.
-
wooden dowel, fits into tripod leg, drilled to accept leg of small tripod (designed for point and shoot digital camera).
The drilling can be done by hand.
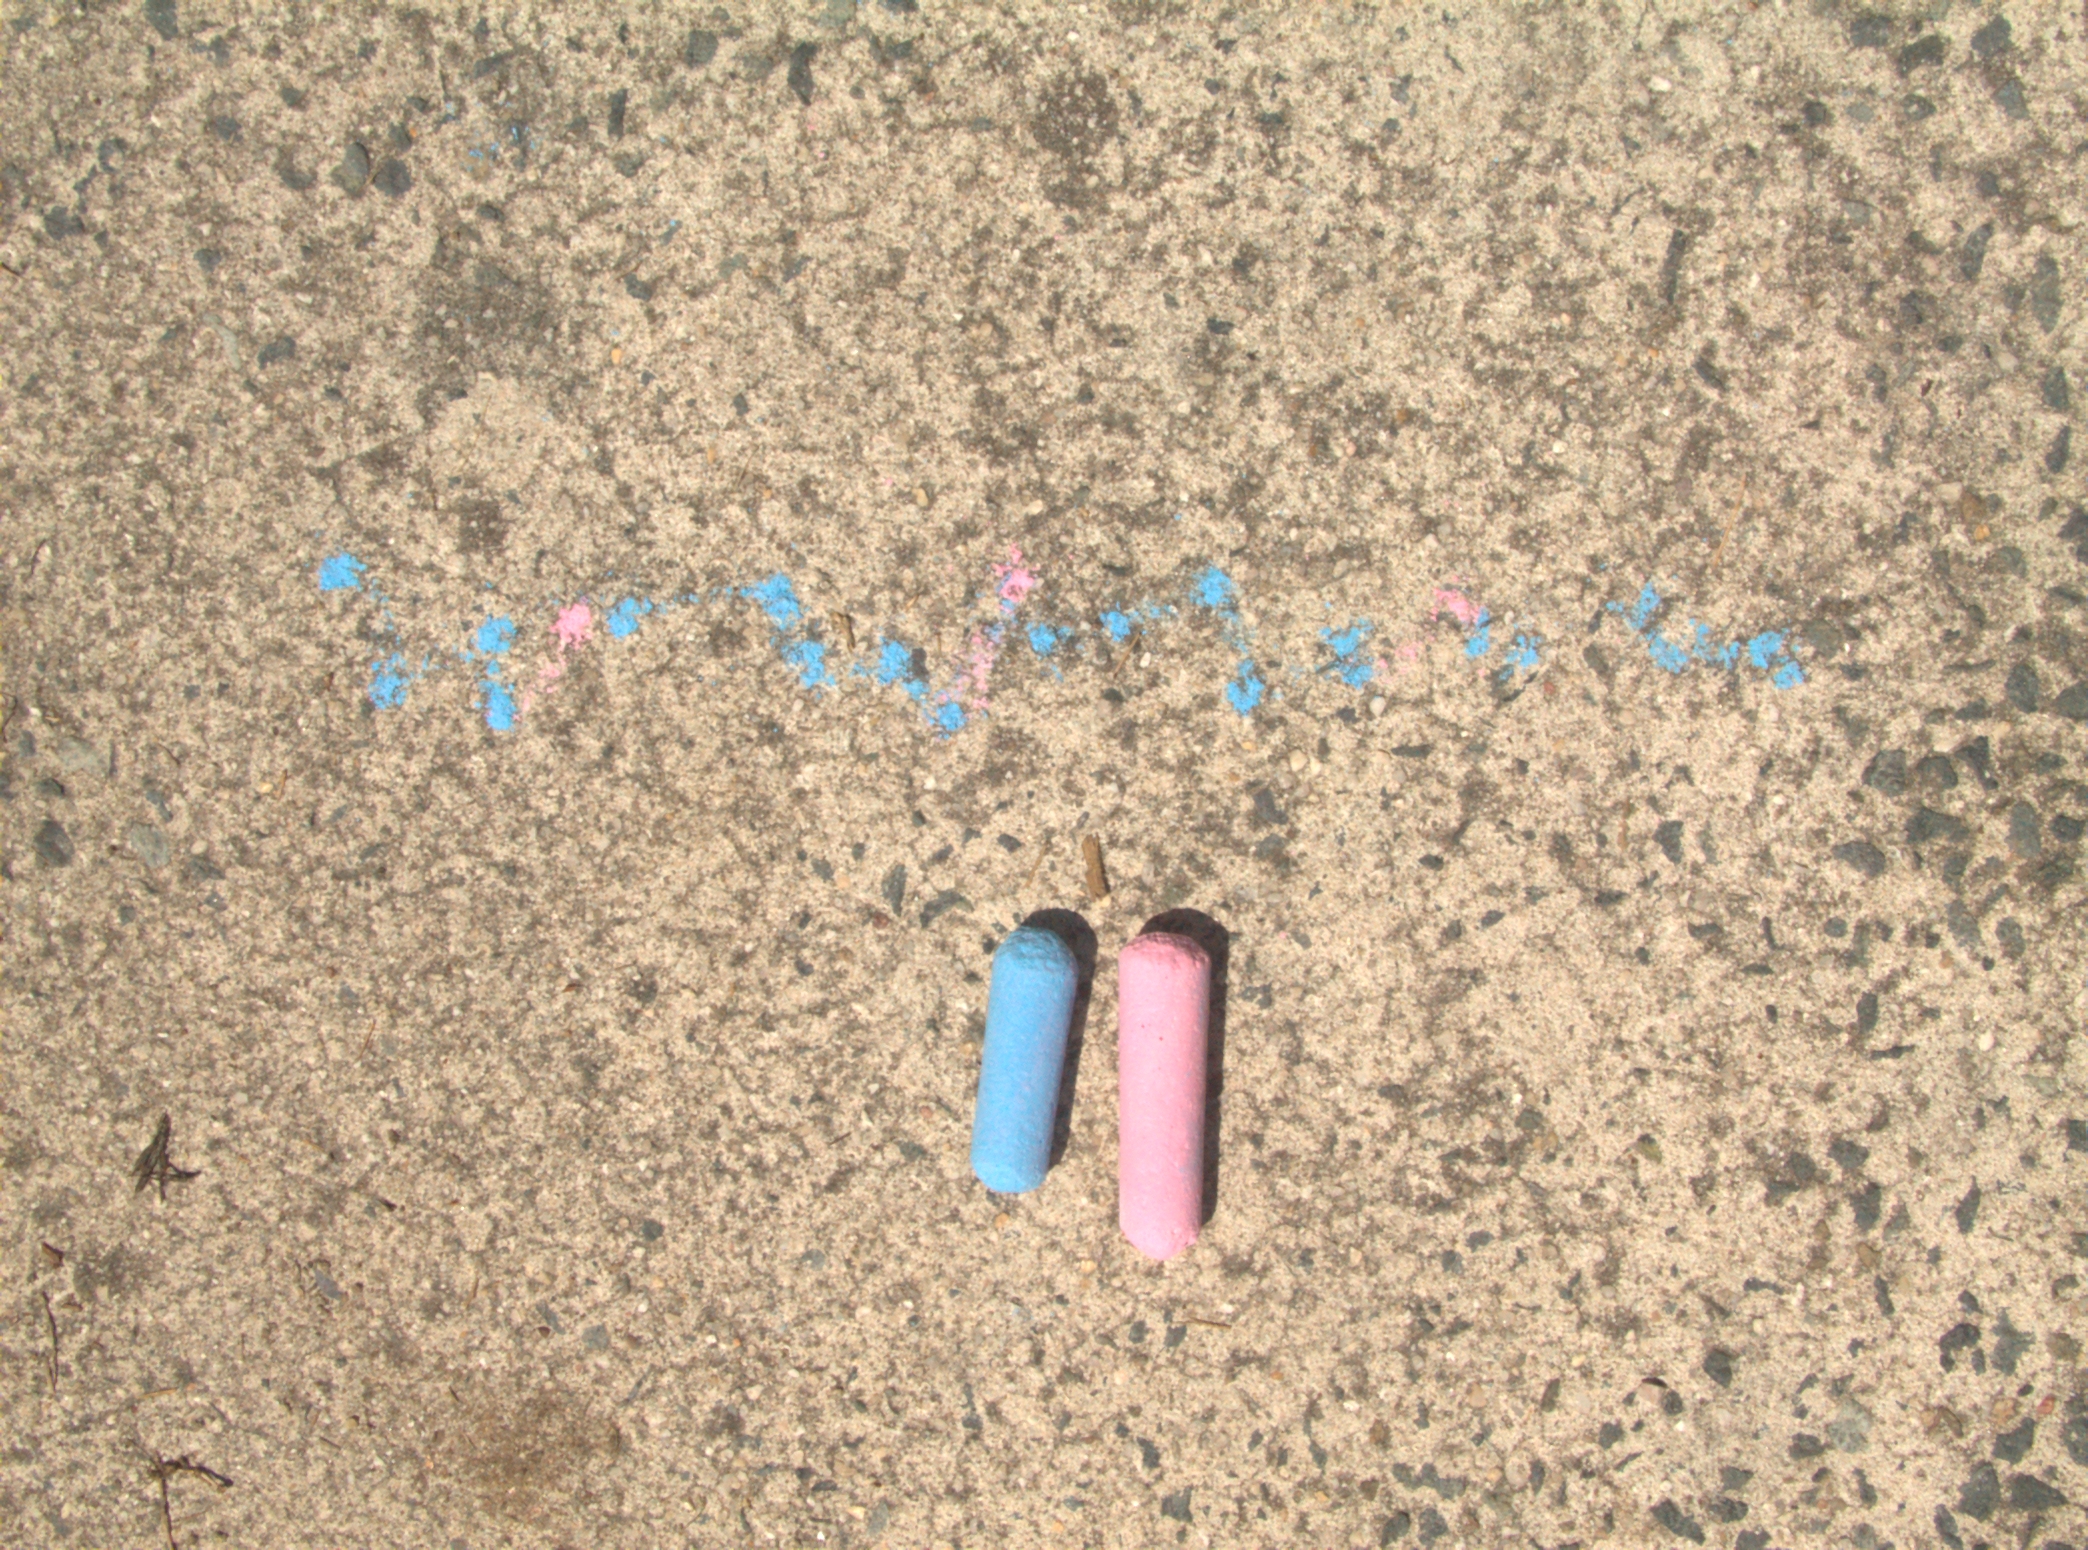
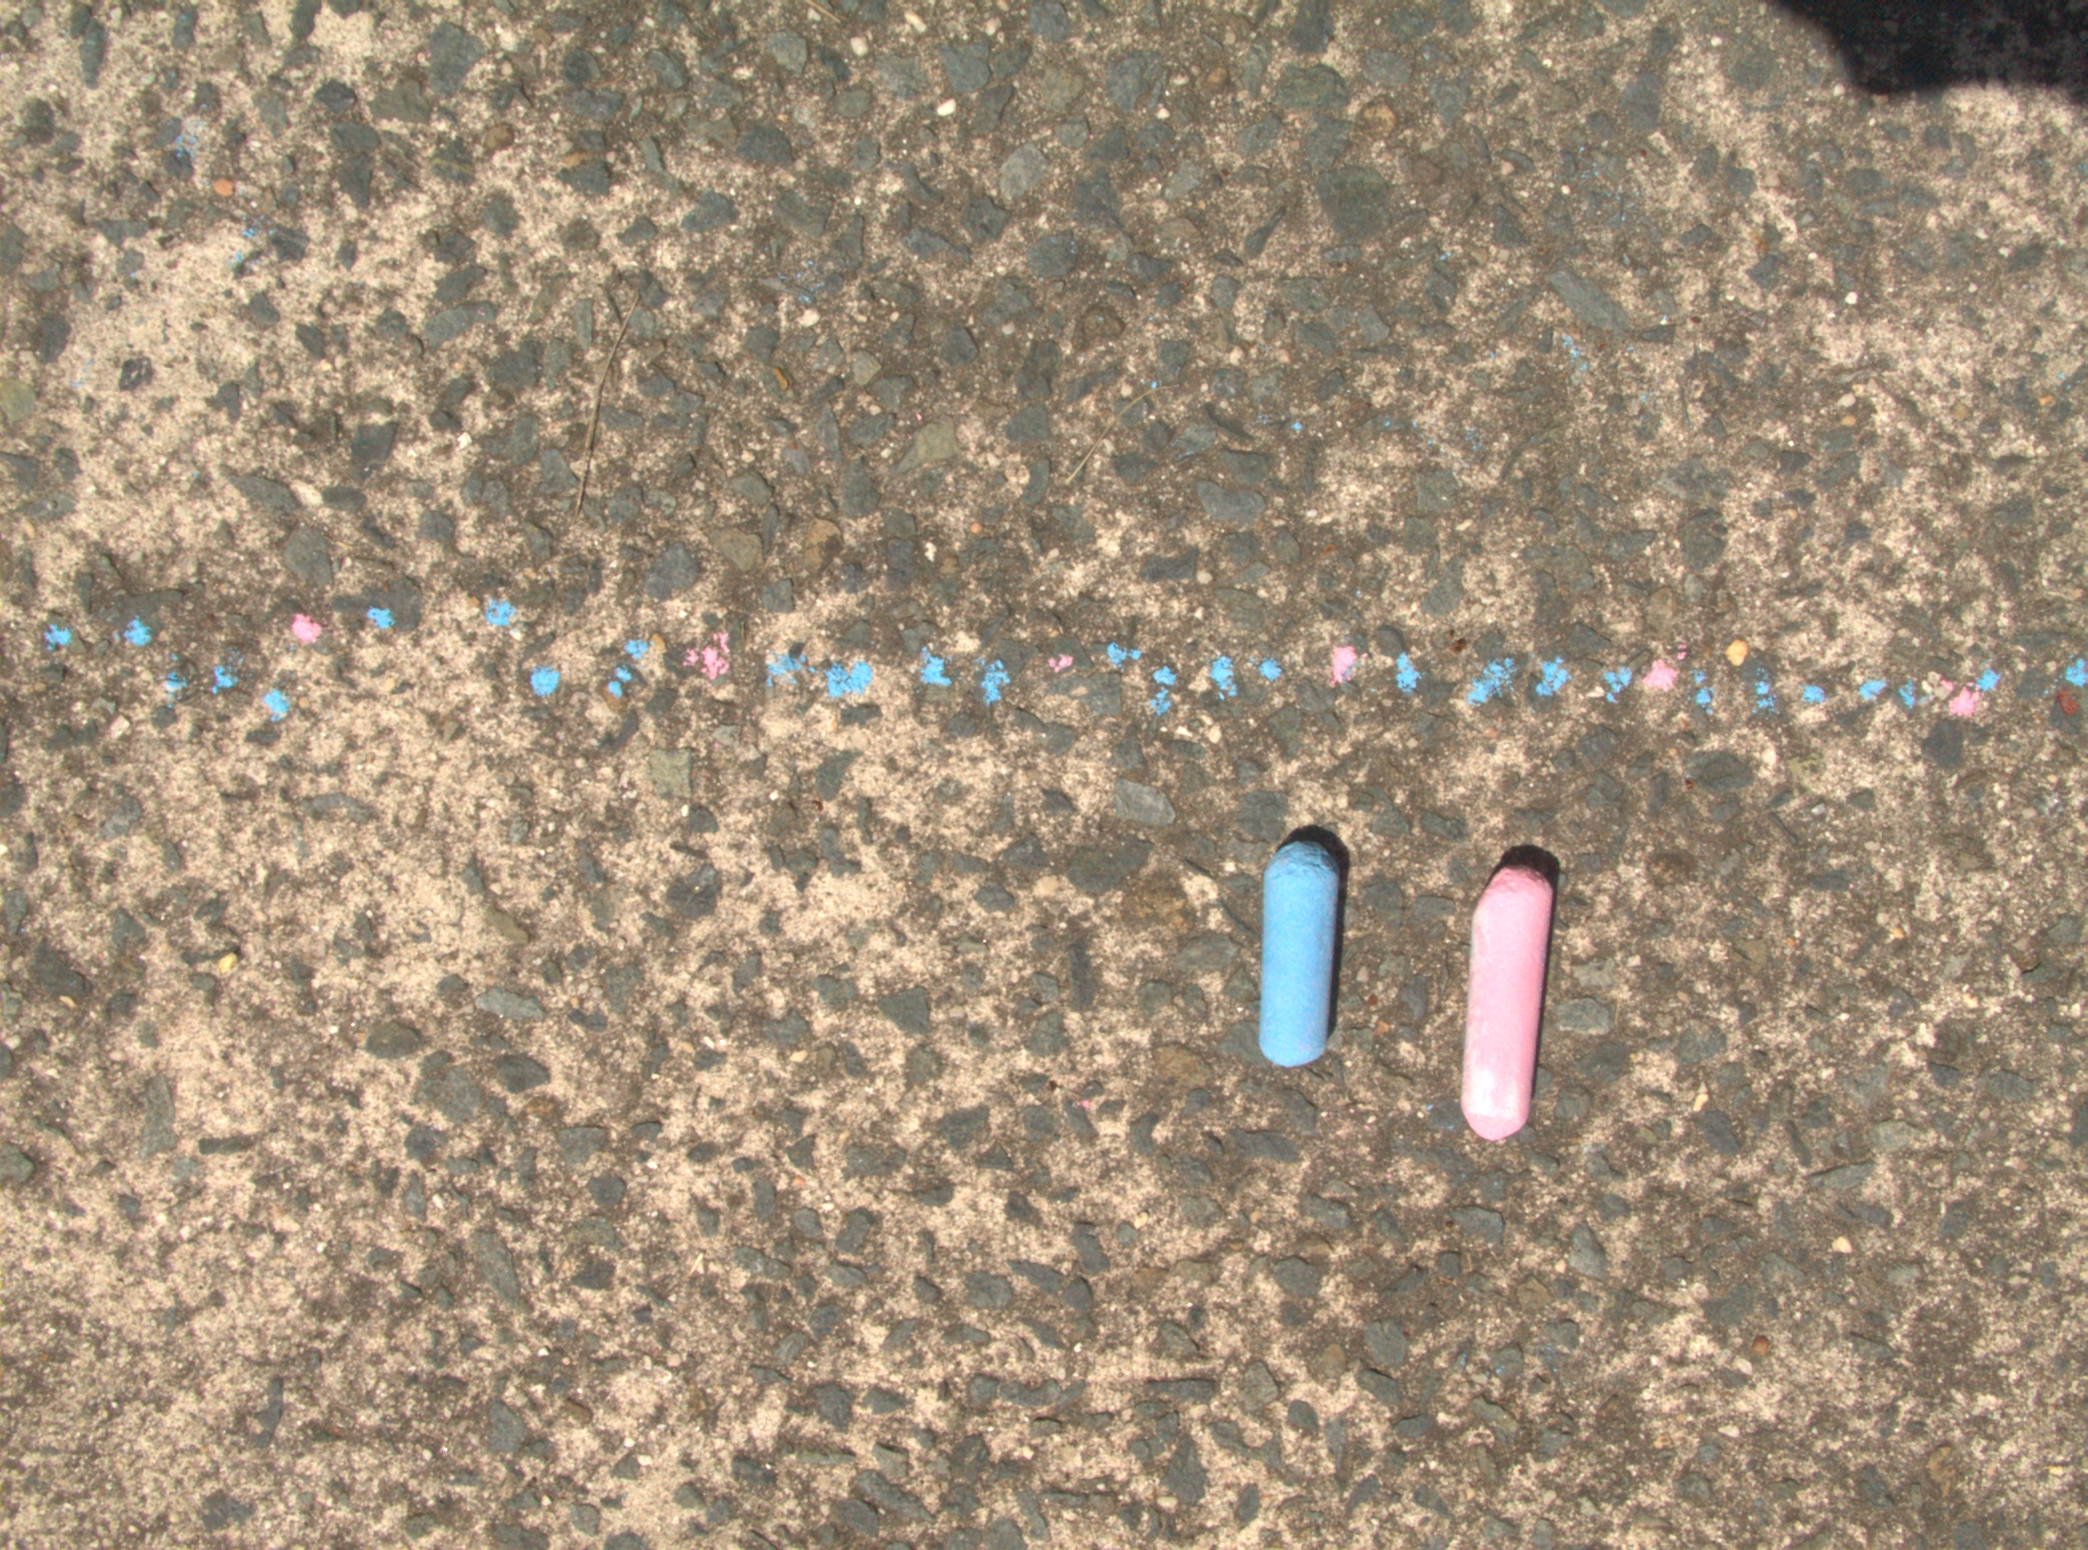

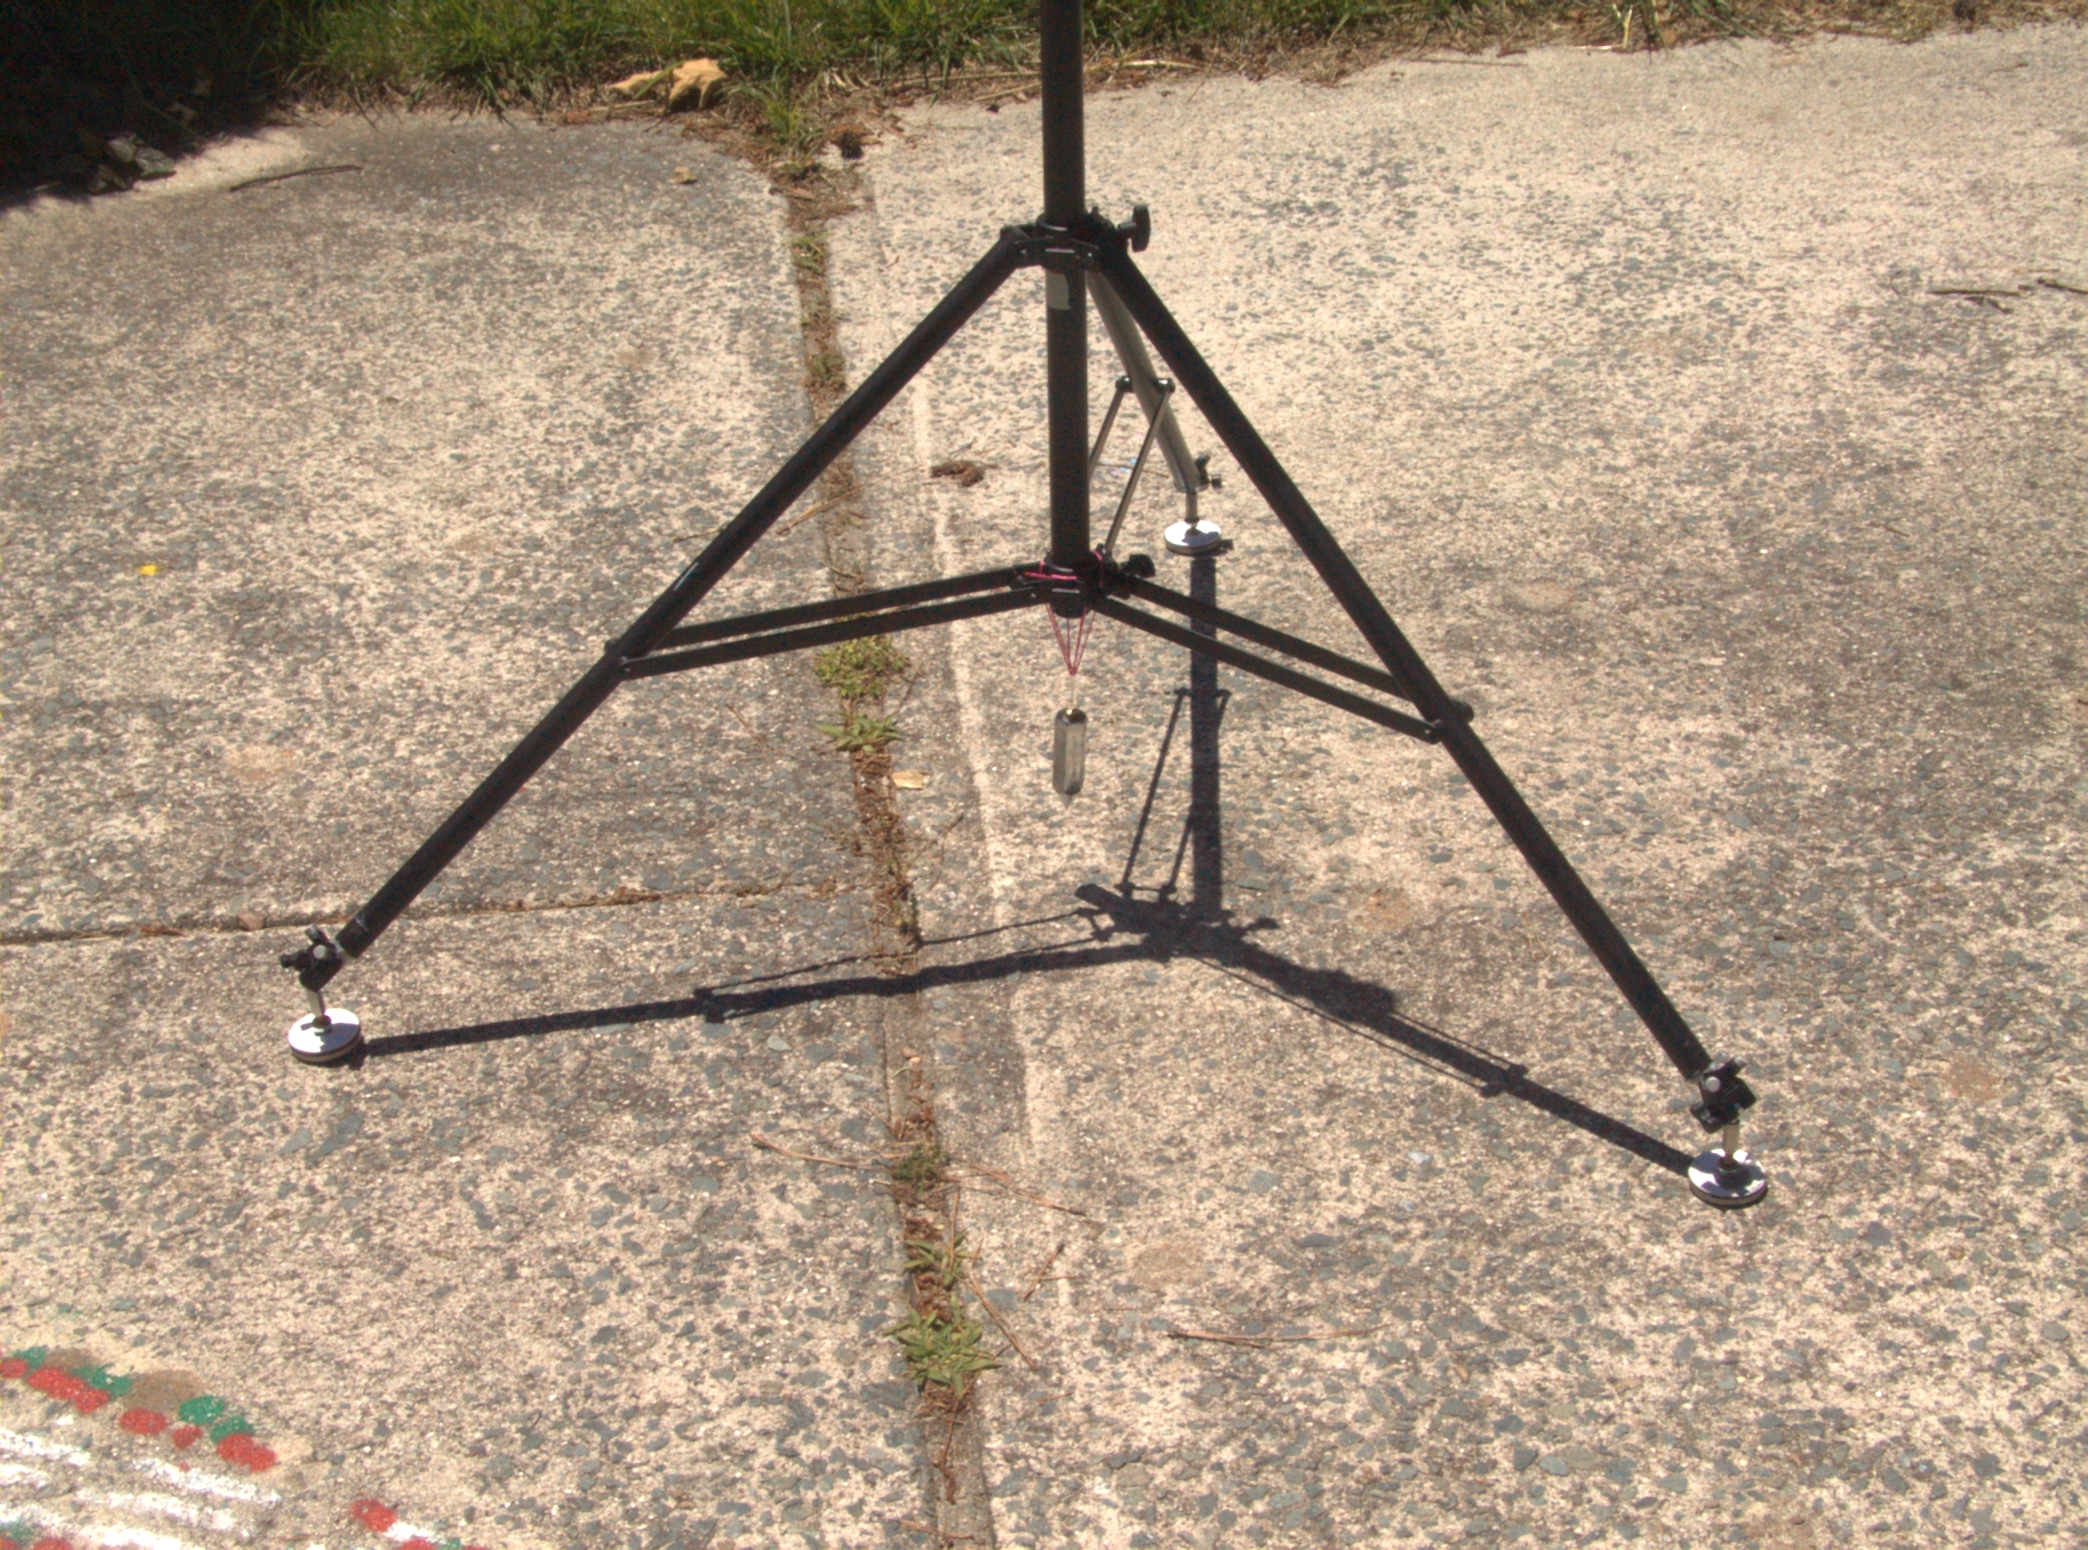
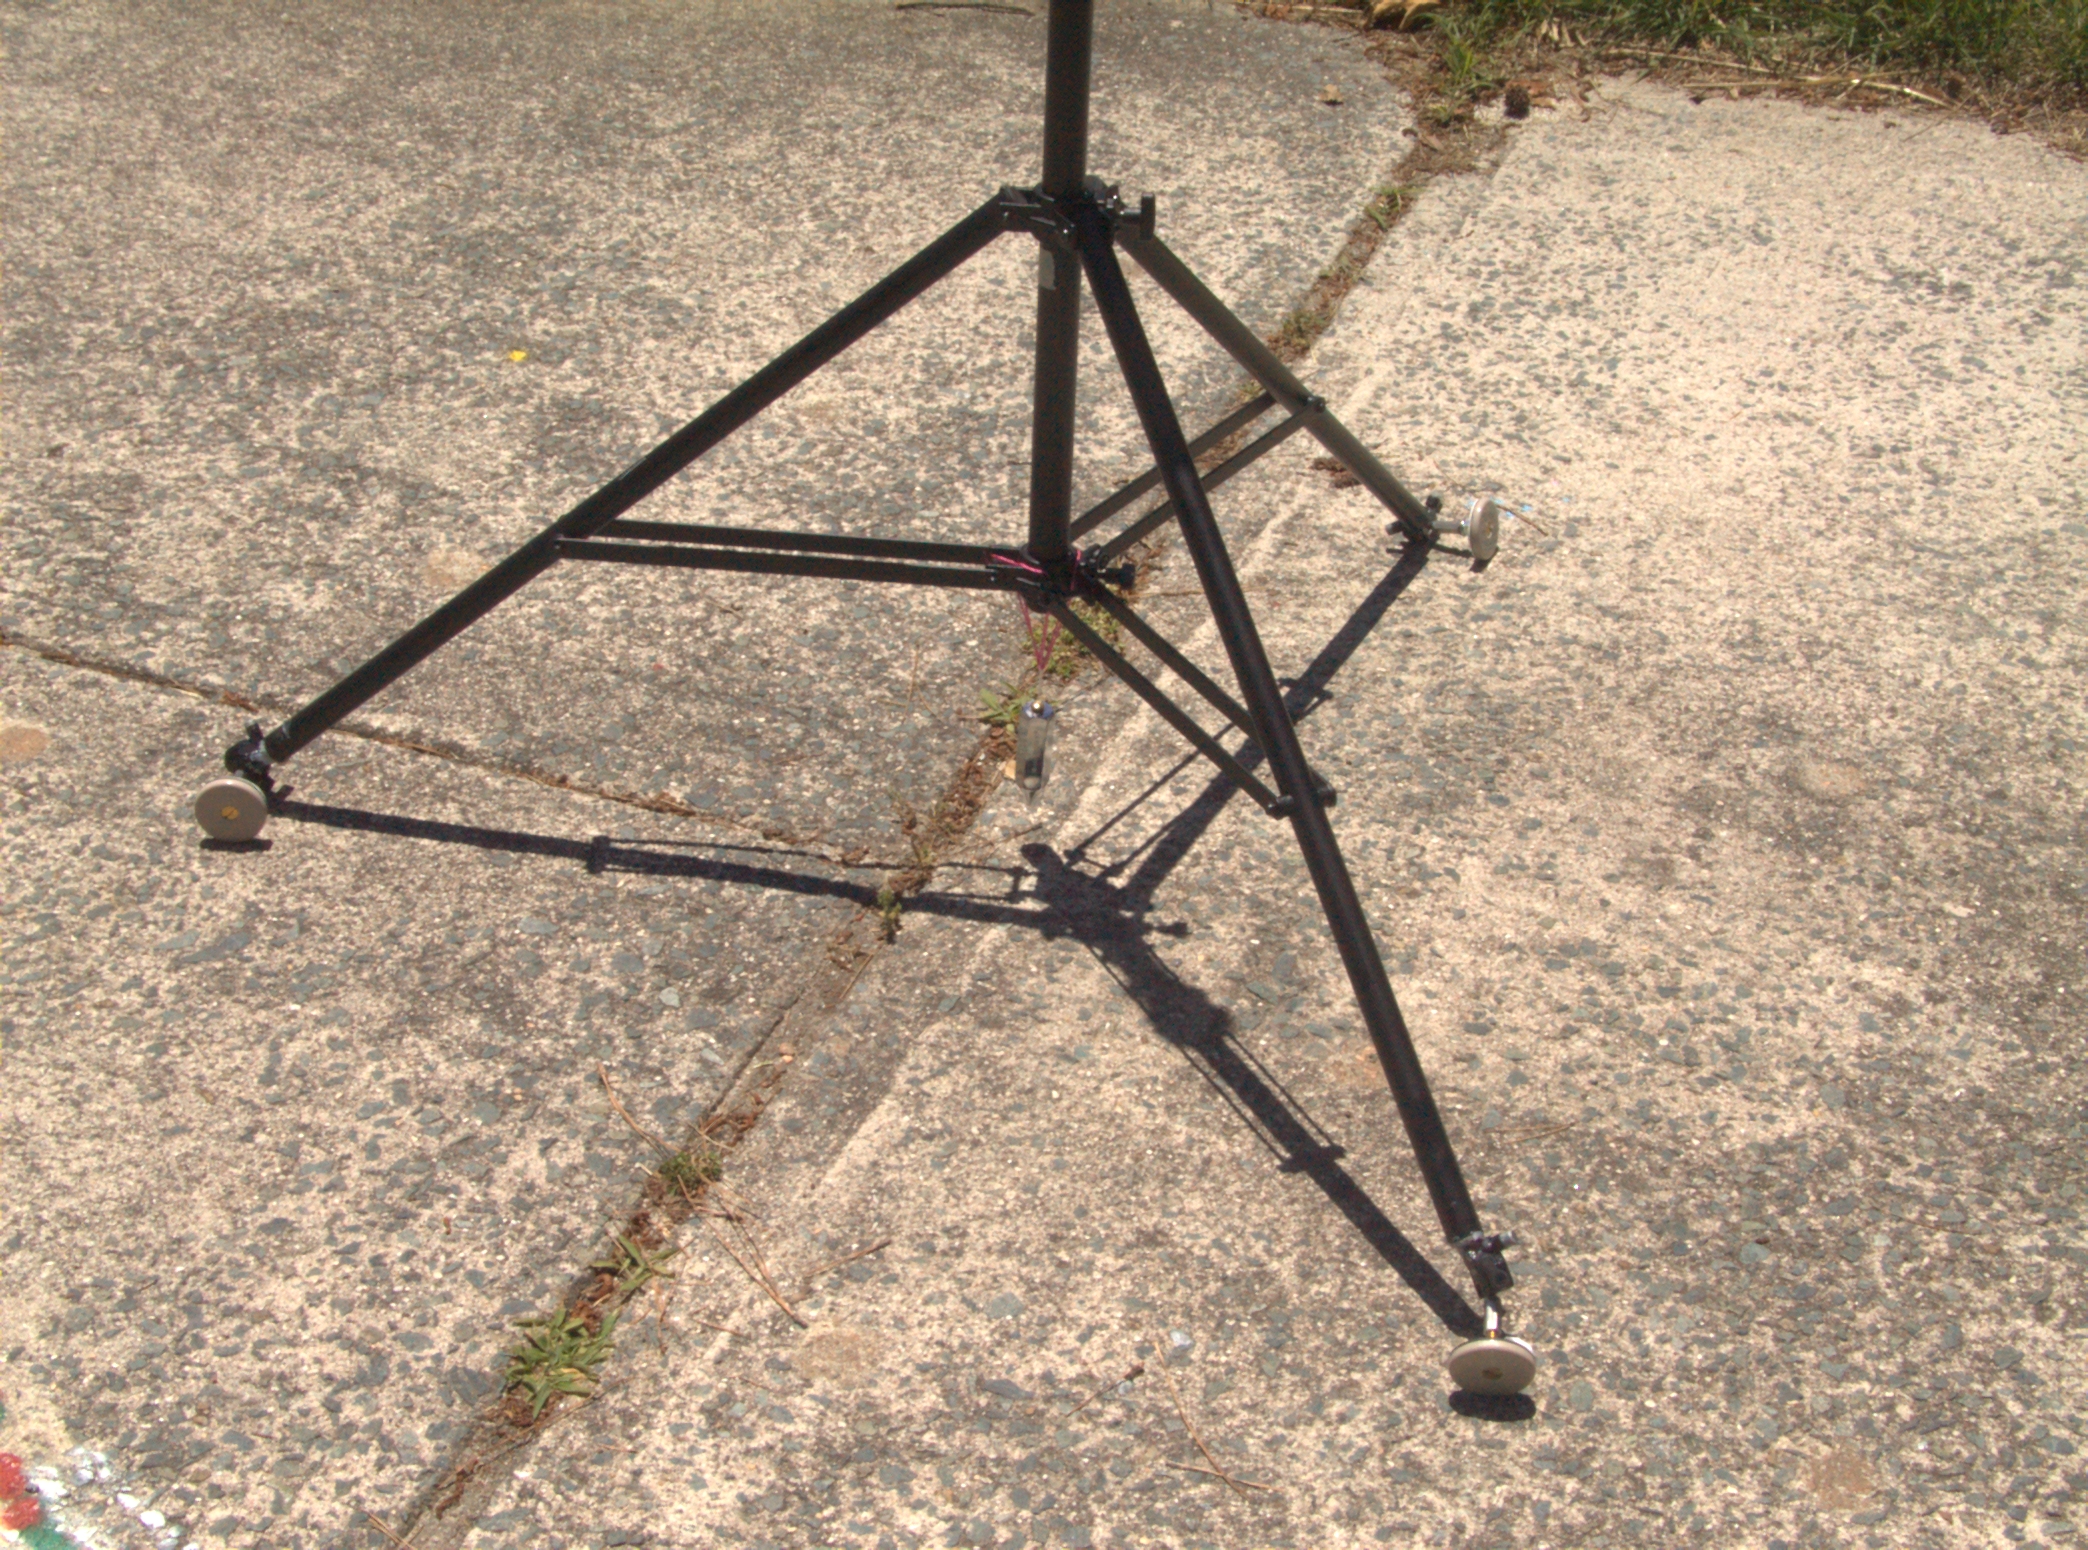
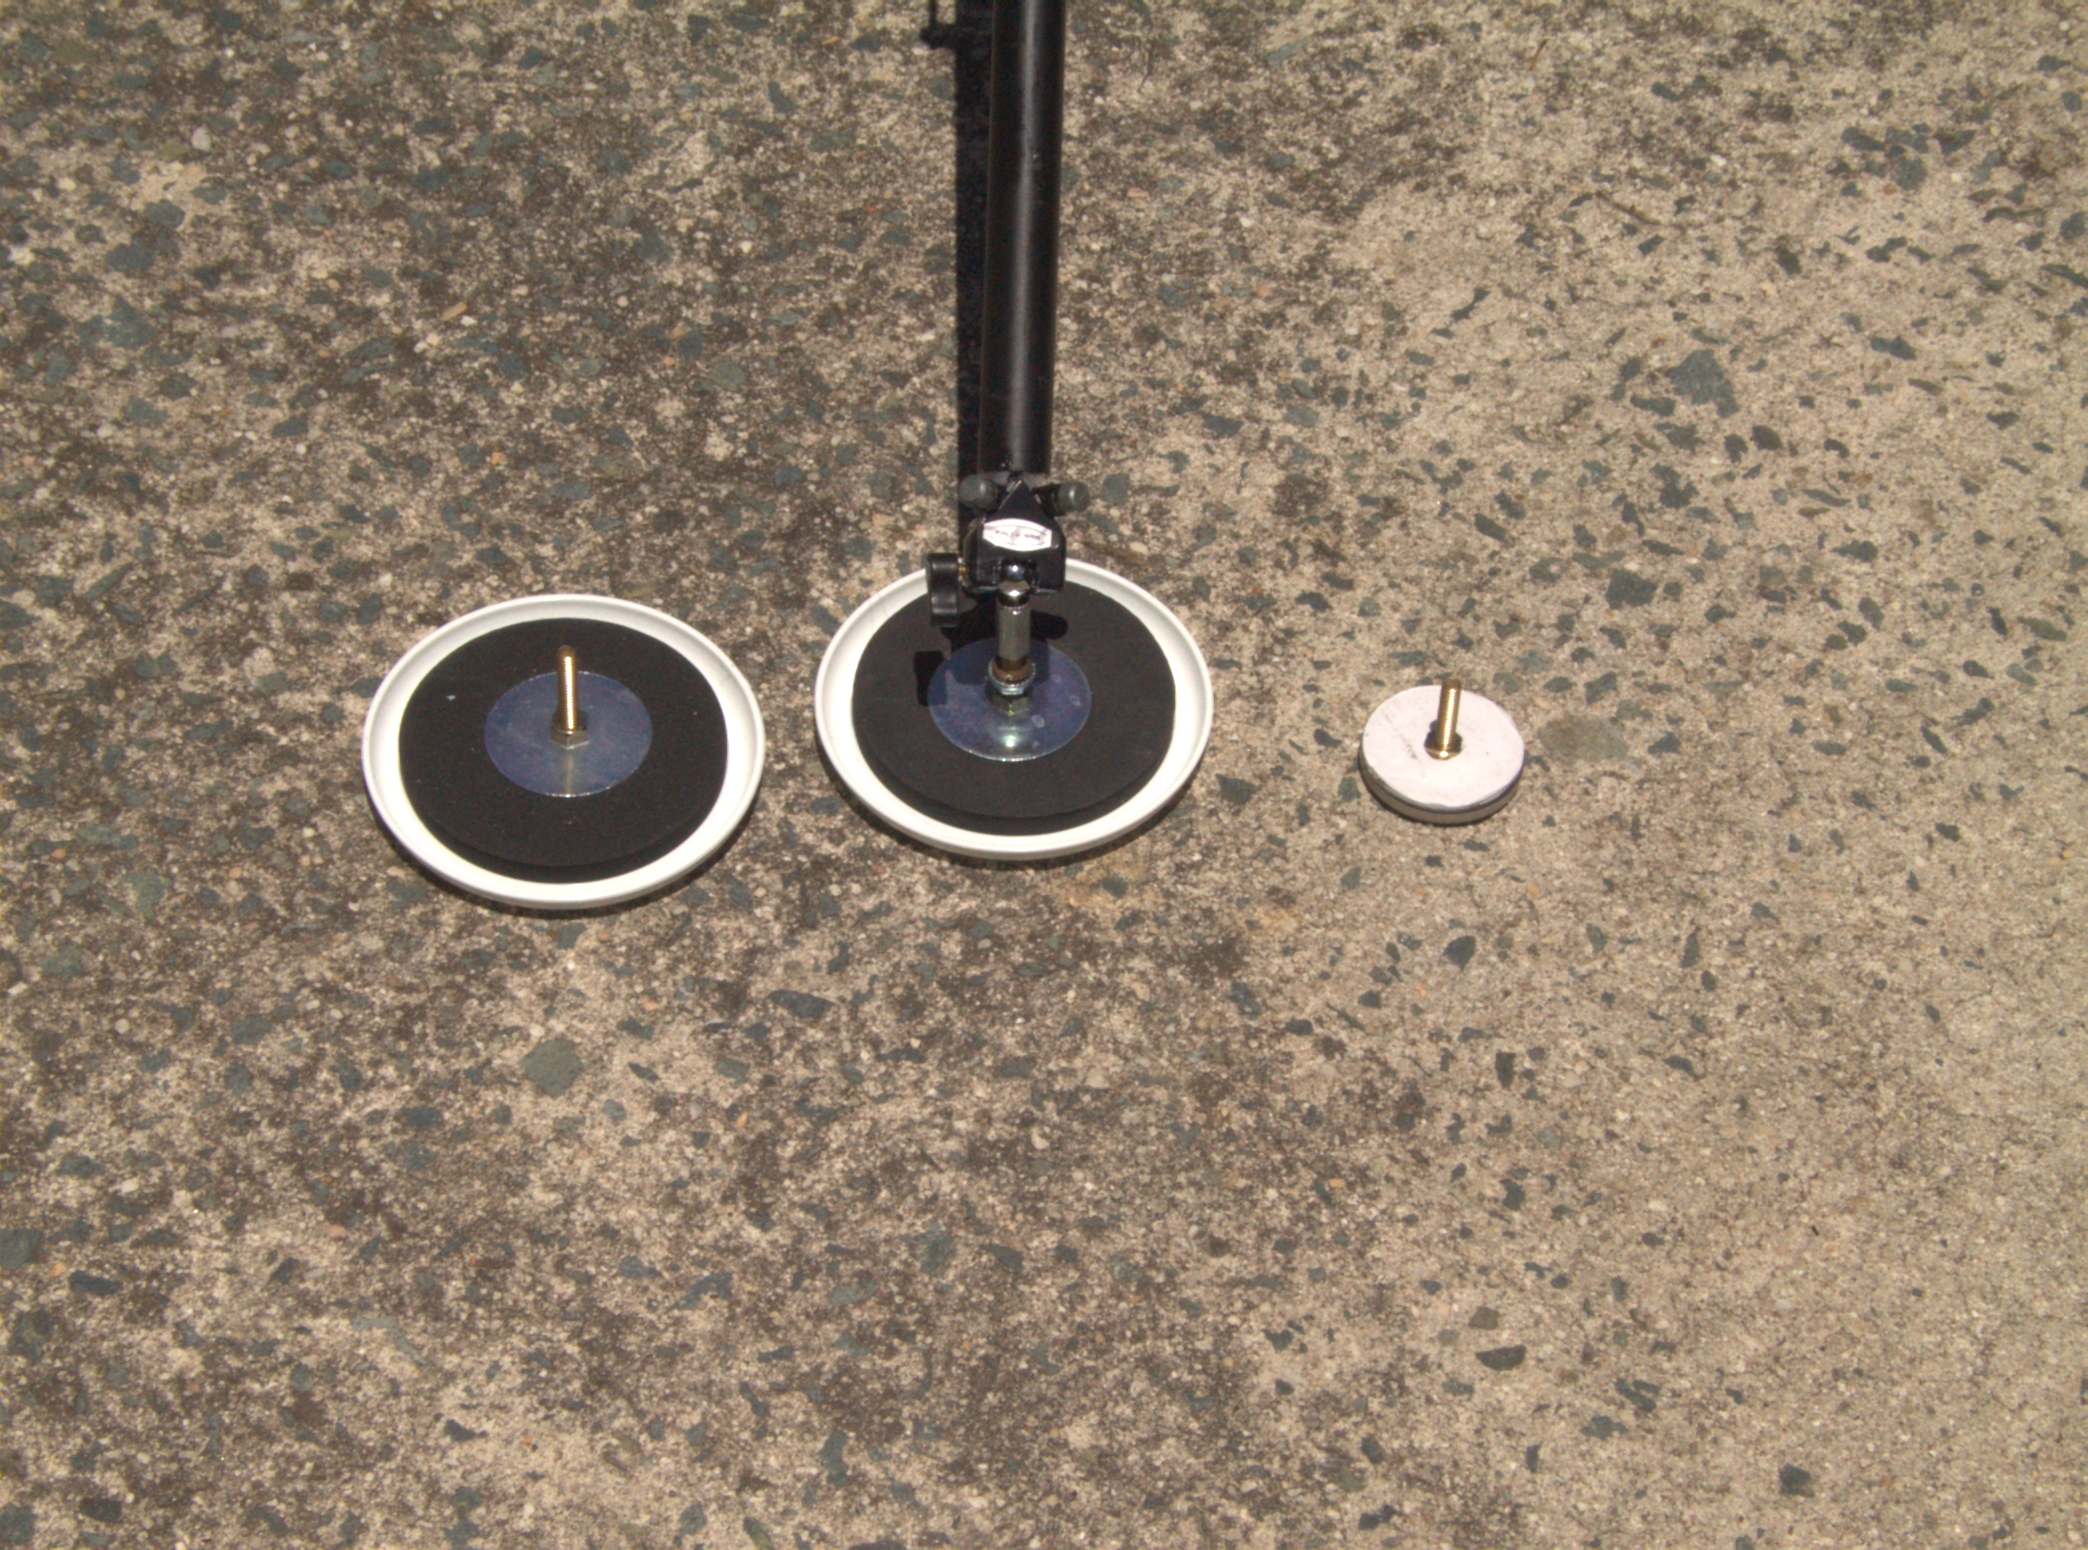
I'm off to try out the Mk3 gnomon. I will see whether the analemma is straight in a few weeks, but it will take 2yrs to see if I can reproduce the analemma. Check back in the middle of 2011.
[1] A child's idea that the continents were once joined, as seen from the obvious fit of South America and Africa, were dismissed too. It was just coincidence - it had been proposed before by a crackpot meteorologist who was quite rightly laughed out of academia by the world's best geologists.
[2] Polaris is always below the horizon in the southern hemisphere.
[3] Celestaire sells lovely brass sextants. I can't afford any of them, so I bought their plastic Davis sextant. Over the range Maine to Florida, it's only accurate to about 1 degree, which is not all that great, but if you need a sextant (and who can be without one nowadays), I was happy with Celestaire. I like reading their catalogue too. If I had an ocean going yacht and time and money to sail it, I'd have a lot more neat stuff from the Celestaire catalogue.
[4]
- local noon: a straight line
- local mean noon: an analemma
- if you don't know, you need to keep reading