Copyright © 2010-9 Joseph Mack
05 Mar 2019, released under GPL-v3.
Abstract
A video of a lesson on the Platonic solids, given to 3rd graders, 4 Mar 2019.
Material/images from this webpage may be used, as long as credit is given to the author, and the url of this webpage is included as a reference.
Table of Contents
- 1. The Platonic Solids, Assembling an Icosahedral Globe of the Earth
- 2. The Video
- 3. Speeding up the class
- 4. 2008: new version of the map (v2)
- 5. Comparison of v1 and v2 maps
- 6. miscellaneous
- 7. Detailed class notes
- 7.1. Goal
- 7.2. Introduce Platonic Solids
- 7.3. Introduce Viruses
- 7.4. Globe
- 7.5. Smoother Spheres
- 7.6. Trusses
- 7.7. Question Time
- 7.8. Materials
- 7.9. Camera
- 7.10. Schedule
- 7.11. Setup, week before
- 7.12. Setup, day before
Since about 2002, the science teacher at my son's school, Lyn Streck, has let me teach a science class to her 3rd and 4th graders. This class is for 3rd graders. There's four classes in each grade and I usually give all lessons in one day.
The students pop out and assemble the NOAA Surface of the Earth Icosahedron Globe (http://www.ngdc.noaa.gov/mgg/fliers/04mgg02.html).
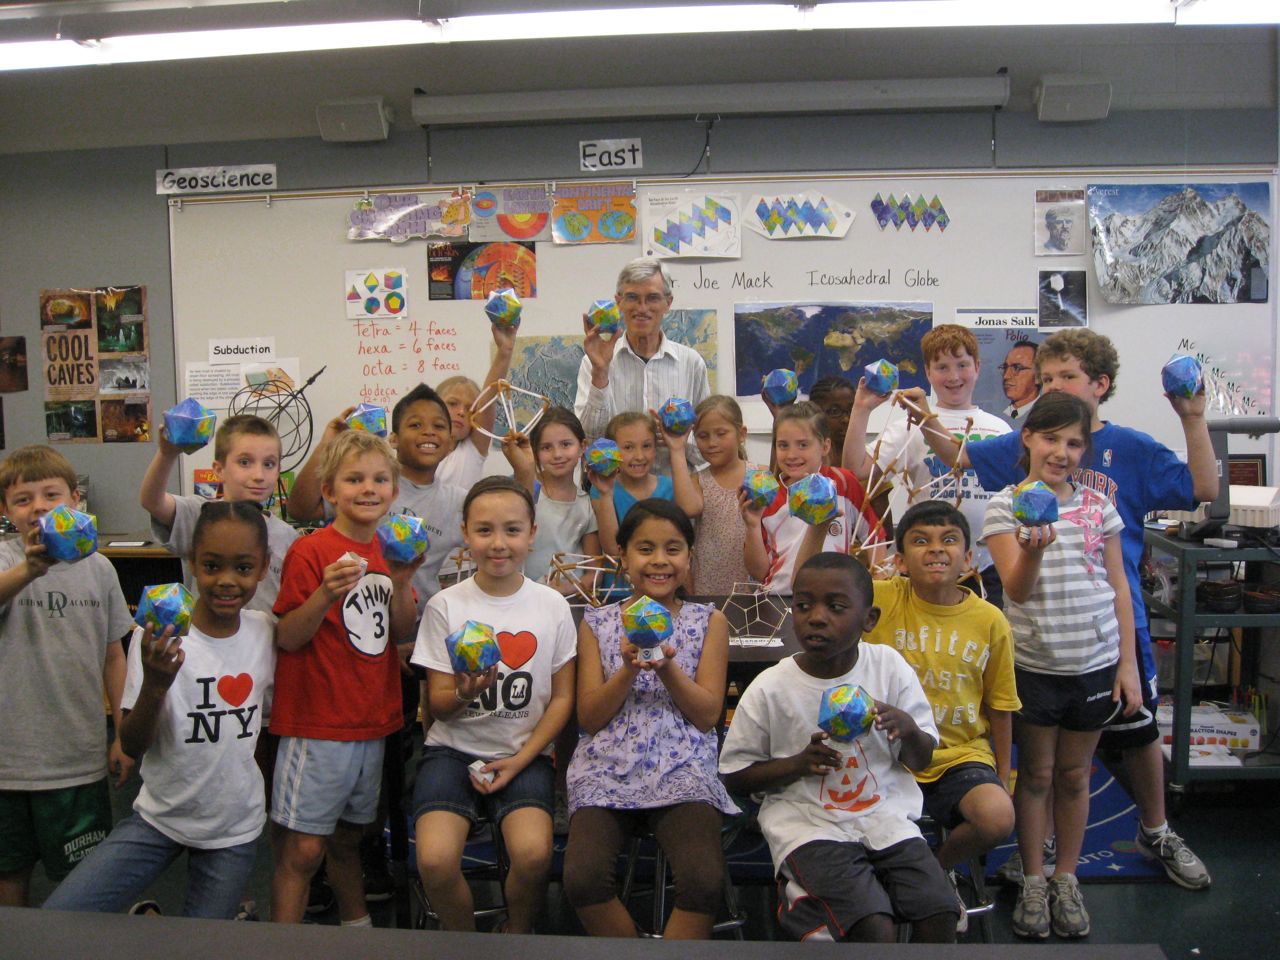
The maps are low cost ($0.50 ea), and printed on cardstock making a nice finished globe (I have them on my desk at work and home).
 | Note |
|---|---|
| You can download a pdf of the maps from NOAA and print them yourself, but you'll need a large format printer, lots of ink and your own cardstock. It's cheaper and more convenient to buy them from NOAA. | |
A new version of the map (released in 2008, here called v2 globe) has press out rather than cut out tabs. In the video I'm using the old version, v1. I didn't start using v2 till 2013, when my stock of v1 maps ran out.
obsolete
With the v1 globe each student needs
- a map
- scissors
- a table with a square edge
- double sided sticky tape
The class is 40mins and can only just be done in the time.
You want every kid to walk out with a functional globe, no matter how badly the kid botches the job. Following a large mistake, there isn't time to start again, and an adult will have to handle patching the globe.
The instructions for assembling the globe are relatively complicated, and for v1, the cutting takes time. Adults need to be on hand to help the kids. Despite my best attempts to give clear directions, with the v1 maps, some student will cut off the flanges (tabs), while others turn their scissors around and cut from the inside out, gouging the map (see the video for directions).
don't do this anymore (i.e. fold the map along the creases anymore) to save time. The resulting globe is just as good as the one that's folded.
To help form the map into a sphere, the carboard is folded over the edge of a desk, to make 60° bends in the carboard. Again despite my best efforts demonstrating what to do and what not to do, by showing that the map is being folded into a sphere, and not being folded into a cube, by holding up the partially folded map, there is always some kid who folds the cardboard over 180° and attempts to iron the fold flat with a hard object.
The last part of the taping (closing the globe) is tricky and usually has to be done by an adult.
Besides building the icosahedral globe, other material covered in the class is
the Platonic Solids (http://en.wikipedia.org/wiki/Platonic_solid).
viruses (since some have icosahedral capsids)
trusses (since the icosahedron is made of triangles). (Trusses were first mathematically studied by James Clarke Maxwell. Trusses are a good place to start when studying mechanics.)
The model platonic solids are made of drinking straw sides and (deformable) silicon rubber vertices. Despite the deformable vertics, the tetrahedron, octahedron and icosahedron (with triangular faces) are rigid. On the other hand, both the cube (hexahedron, with square faces) and the dodecahedron (pentagonal faces) are floppy. Early in the class I ask the kids if they can figure out why some of the Platonic solids are rigid and some floppy. For the first 10 years, I encouraged them try out the models themselves, during their spare time in the class and, if they have an answer, to let me know quietly (so not to let the cat out of the bag to the rest of the class). About half the time, some student figures it out (or already knows, I can't tell which). I had expected that most students would figure it out. As I discovered accidentally in 2011 (see below), the reason the kids weren't figuring out the answer, was that they had no spare time and I wasn't giving the kids enough time to play with the models.
The trusses and the earlier versions of the Platonic solids were made from toothpicks and hotglue. Making these models took several sunday afternoons. (Buy your toothpicks all at once; toothpicks bought a year later, at the same store, in the same type of box, were a different length.)
With about 30 models arrayed on various tables, one student asked in amazement if I'd made all of them. I said "yes, and it was great fun".
When I asked the kids to figure out why some of the toothpick and hotglue models were floppy and some were rigid, I first had to convince the students that some of the solids were intrinsically rigid and some were instrinsically floppy. With the glue providing some rigidity at the vertices, even for the floppy models, the usual answer was that the rigid solids had more glue. While the kids saw the glue as providing rigidity, they wouldn't look further to structural elements as the answer. As well the kids often broke the relatively fragile toothpick and hotglue models while testing their rigidity.
My first approach was to tell the kids that the rigidity wasn't coming from the glue. Quite reasonably kids don't trust adults, who are in charge, make arbitary rules and can make a kid's answer wrong any time they want. As all the kids could plainly see, the glue was providing (some) rigidity. It took several years before I saw the futility of expecting them to believe that the glue wasn't providing rigidity. I needed models with demonstrably floppy vertices. This led to the models with rubber tubing vertices in the video. Since I've changed over to these models, students have stopped proposing glue as the agent of rigidity.
In 2015, after displaying the relatively fragile toothpick and glue models in the front row of the table, I moved them behind the more resilent rubber tubing and drinking straw models, and let the kids play with the more resilient models.
- At the end of the class, when the kids have assembled their icoshedral globe, I used the elevation colours on the globe as a guide, to locate and discuss high (mountains) and low places (oceanic trenches) on earth. This reinforces mountain building and plate tectonics, which they've had in class.
By the wonders of digital editing, on combining videos from four different classes, the students give correct answers to all the questions.
Errata. A volunteer at the school kindly edited the videos of the four classes for me in their spare time and I wasn't able to get the following fixed.
- a screen shows bacteria causing plague; they cause plaque.
- The coloured scale showing elevation is a legend, not a ledger.
There is some duplication of material; the same part of the talk from different classes appears more than once. A virus not mentioned in the talk is HPV.
There is not enough time in class to refer to these notes; you have to know the material off by heart.
There's a lot of things that can go wrong here, that are not obvious to an adult like me, unfamiliar with the limitations of kids.
With only a few minutes at the end for the kids to explore trusses and their globe, an extra 5 mins, if you can find it, can make or break the class. In 2011 I made these changes to the class
Ask Lyn to get parent help. I didn't have this in 2018 and it slowed the class down, particularly at the beginning, when checking that the tab for the stand is right. So I need the assistant and a parent, as well as Lyn.
The class needs adult help. Most kids can't handle the manipulations by themselves. In the beginning of the class, someone needs to check that the kids have the stands done correctly before taping them.
Most of the kids don't have the tab pushed in right; it's too far in, not far enough in, skewed, or put in from the inside. Some fold the tab back on itself.
If there's only one person available (me), like happened in the 4th class in 2018, the whole class has to wait till I check each kid. This stage absolutely needs all hands on deck.
v1 (no longer relevant). At the suggestion of the teacher's assistant, I precut the cardboard sheets (for the v1 maps) (paper cutter/guillotine; a sharp one helps) removing extraneous cardboard and separating the legend and base from the map. This eliminated the first cutting step for the kids.
v2 Initially I pre-popped out the maps and handed the kids the whole piece of carboard, with the popped out pieces resting in the original locations.
From 2018: For the day with a late (10am) start, there is no lunch time, just the standard 25 mins between classes. Even with the partially popped out maps, it took me most of that 25 mins to completely pop out the maps and put them out and for Lori to put out the tape.
In 2017, I handed the kids only the popped out pieces and threw away the outer cardboard. Not having to collect the trash in class time saved a couple of minutes. It's too bad that education now is paced too fast for the kids to explore what they're doing, and be able to pop out their own maps (the class was originally 50min, with 16 students; now it's 40mins with 19 students. The 10 mins was taken from a couple of classes to allow the students to take an extra class in being well rounded. I'm sure we all agree that being well rounded is much better for the kids than understanding trusses.)
In the early years, I had held off putting out the maps until the kids were ready to start building the globes. I had expected the kids would be distracted by the map and not pay attention to my explanation of the platonic solids. However stopping the class to hand out the maps adds time to the class.
In 2015, following a suggestion by the teacher, I put out the maps before the class started. To head off the kids being distracted by the maps in front of them, in the introductory phase of the class, I first acquainted the kids with the maps by having them put their name on some blue spot (ocean) and on the stand, with marker pen. This seemed to give them time to satisfy their curiosity about the maps and they were happy to pay attention to my discussion about the platonic solids.
The first thing the kids need to understand is that the tabs are pushed in from the outside and that the tab, which now points inside, is taped over on the inside, where it can't be seen (from the outside). This is obvious to an adult, but not to the kids. If you start by having the kids taping the globe (with multiple tabs), an adult will have to cut the tape on the outward facing tabs to allow the tabs to be reinserted from the outside.
In 2015, in the first class, despite holding up a sample and showing them how to put the tab in from the outside, half of them got it wrong (==random), which means that none of them were listening (or my explanation was unintelligible).
Now, I first have the kids make the simpler stand. The stand has only one tab. A mistake here can be fixed relatively easily. Closing the loop that is the stand, requires the kid to put the tab in from the outside, and align the colours, so that the white is only just showing. I tell them to show me their stand before putting on the tape. By the last class of the day, I'd emphasised it enough that they'd all showed showed me the tab with the correct orientation for insertion before taping.
For the first 15yrs or so, I've been letting the kids pick up the tape dispenser and tear off the tape each time they needed tape. This requires them to put the globe down, pick up the dispenser and then when they have the tape, pick up the globe again.
I found that none of the kids knew how to tear off a piece of tape. This class must have been their introduction to the tape dispenser. They pulled the tape down straight, rather than tearing from one corner. This required enormous force and sometimes resulted in the tape dispenser flying out of their hands. I wasn't prepared for this and didn't know how to handle it.
The next year, in the preparation part, I showed them how to tear off tape. I told the kids to only tear off a piece of tape long enough to just cover the tab (1cm). Instead they tore off a piece about 4cm long. I expect they don't have the dexterity to pull off a short piece of tape. Initially I let this go.
In 2016, one of the assistants (Miss Connie), suggested that 15 short pieces of tape be pre-dispensed and attached at the edge of the table, with enough tape hanging horizontally over the edge for the kids to pick up the tape. What goes wrong now is that the kids, in their idle time, push the freehanging end of the tape down onto the vertical edge of the table, or else brush up against the tape, pushing it onto the table. We evetually put the tape on a side of the table away from the kids, where the kids would not brush up against it. At the beginning of the class, I asked the kids not to push the tape down, telling them that the ends are there so they can lift the tape off easily. When the time comes to assemble the globe, the table is too wide for the kids to reach across the table to the tape on the other side. Instead I have the kids walk around the table to use the predispensed pieces of tape.
In 2018 for the first class, we found that most of the tape got folded over the desk and the kids could no longer pick it up. Kids pushed against the tape while leaning on the table, or brushed up against it walking past. If they didn't quite pick it up right, it wound up stuck against the table. Clearly the idea was no longer working. Lori thought of some wooden boxes in storage, which she put the tape on. This worked quite well. I noticed that some kids could tear off tape, but they always pulled off a very long piece.
In 2019, I had forgotten about Lori's wooden boxes. For the first class I had put out tape on the setup day, on the outer edge of the table, away from the kids. This had lots of problems.
- Anyone who brushed up against the tape caused the free end to stick to the table. This included the cleaning crew who came through the night after I setup.
- The tape was on the other side of the table to the kids. They had to go around to the other side of the table to get to the tape, and once their they leant on the tape and pushed it down onto the table.
- Bored and idle kids just folded the tape down anyhow/
- If you didn't pick it up right, the tape would wind up sticking to the table anyhow through no fault of the kid's.
Lori brought out
In the v2 map, the slots for the tabs are 1-D cuts rather than a real slot. Even an adult has difficulty on inserting the tabs, unless you expand/open the slot a little bit with scissors or a screwdriver. One of the problems was aligning and joining the edges. The kids should push the tab in till the colours match. If you push the tab all the way in, rather than stopping just a bit short, i.e. when the colours match up at the edges, then at the end, you can't close the icosahedron withough cutting of bits off the icosahedron. The resulting icosahedron is no longer symmetrical. With all the instructions being foisted on them, the kids had a hard time adding colour matching to their tasks.
In 2014 I found that telling the kids to leave the thinnest white line between the adjoining colours worked. Introduce this idea when the kids are making the stand. Make sure the tab is inserted from the correct direction (pointing inside the stand/globe) and there is a thin white line at the join of the two pieces before taping the stand.
In 2017 we no longer folded the maps along the creases, over the edge of the desk any more. The maps assembled, without the folding, just as easily as when the maps were pre-folded along the creases. Not doing the folding saved time. As well, we no longer had to deal with maps that had been folded 180° along the folds.
Several stages of checking are required (cut out, fold along all the black lines) so that the final map folds to a globe.
At the time I did the video, as soon as the first student was ready for the next stage, I stopped the whole class and demonstrated the next stage to everyone. This didn't work; the kids are busy with their efforts and quite reasonably don't have attention for much else. They certainly can't listen to instructions about a stage they haven't yet reached yet, whose problems they haven't seen. This is particularly so when the first student reaches the last stage of closing the globe. At this time some students are still back two stages - cutting out (for v1). I would have to repeat the taping instructions only a few minutes later, individually to confused students, as they reached the taping stage.
Instead, in 2011, as student(s) were ready for the next taping instructions, I walked over to the students and showed them individually how to apply the tape. The tape and the to-be-taped globe were in my hands, right infront of the students, who could see exactly how I did it. Initially only the first student was ready, then a few minutes later, a group of four more students were ready... Although this method required me to be in a constant frenzy, repeatedly explaining the next step to whichever student was in front of me, few students had to return for clarification, reducing the time on this step. (Your job is to make the class easy for them, not for you.)
- As the globe is closed up, it is harder for the kids to put their short fingers into the globe to put the tape on top of the tab (which is inside the globe). Previously I've had the adults help with this. Now I tell them that if they couldn't reach inside, to put the tape on the outside. In the time allowed for the class, the last three joins, which close up the globe, if done on the insides, have to be done by an adult, for almost all the kids. One or two kids in the day (of 74 kids) managed to put tape inside for the 2 rows of 5 tabs, and close up the last three tabs with tape on the outside, without any help from adults. For the rest, just let the last three tapings be on the outside.

With these changes, which allowed the students to more quickly assemble their globes, (but which didn't allow the kids to figure out how to assemble it themselves, thus depriving them of the chance to explore), the students, now had time to gather around the rubber and drinking straw platonic solids, to figure out why some were rigid and some were floppy. Talking and poking, they collectively figured it out and when I asked for the answer, they all knew it was triangles. Over the previous 10yrs of this class, only a couple of times has a student figured out the answer. I'd concluded that the problem was too difficult for them, when all that was missing was a few extra minutes poking the models.
In 2018, instead of introducing the Platonic solids, and then showing which were floppy and which were rigid, I would introduce each Platonic solid, point out the type of face (triangle, square, or pentagon) and say (and show) whether it was rigid or not. This seemed to give some of the kids the hint that triangles were associated with rigidity.
I then had about 5 minutes at the end of the class to talk about the trusses and explore oceanic trenches and the location of mountain ranges on their globe. You still have about 1/4 of the class with uncompleted globes; these are handled by the adults, while you're talking.
The first class of the day is always difficult for me; I haven't given the class for a year. In 2016 following a disasterous first class, when the kids barely completed the globes, and we didn't get to talk about trusses, I made the following changes.
- Pre-popped out the maps, stand and legend, and discarded the rest of the cardboard. When the kids arrive in class, they see only the popped out pieces of cardboard.
- Pre-dispensed the tape.
In 2017, I accepted starting the first class at 8:30am, because that day fitted my schedule better. Usually I start at 10:30am. Starting at 8:30am doesn't leave enough time to train the assistants to assemble a map and to put out the maps, and pieces of tape. I arrived at 7:30am (when the school opened) and we got it all done. Still it was a rush.
In 2008 a new version of the map (here called v2) was released. (I had plenty of the v1 maps and didn't start using the v2 maps till 2013). With the v2 map, no cutting is required. The map presses out by hand from the cardboard sheet. The tabs fit into precut slots in the cardboard. Like the v1 map, an adult can make the v2 into a perfect globe in relatively short time. With the v2 map (like the v1 map) the kids, particularly under the gun of time, need adult help.
After a little folding of the edges, the map can almost be assembled into a recognisable globe. Unfortunately it springs apart in your hands. I tried a rubber band around a diameter, but the globe collapses. I expect you need 3 not-too-tight rubber bands placed symmetrically to make this work. Thus sticky tape is still required.
With the v2 globe, the tab in the middle of each flange is required (for v1, I cut it off). If you use the v1 method, of double sided sticky tape to seal the flange to the inside of the globe, then each flange requires the positioning of two half sized pieces of double sided sticky tape. The dexterity required is OK for an adult with plenty of time, but is beyond 3rd graders, under the gun to finish on time.
For the v2 globe:
- Have the kids pre-cut off about 15 1cm long pieces of tape and touch them to the table (so they can be easily lifted off later). It's too hard to flip between taping the map and cutting off tape from the dispenser.
- The adults need boxcutters to lift off misplaced tape.
- There are two types of joins: the initial joins along the top and bottom (2 x 5 tabs) and the three final joins to close the globe.
Initial joins:
There are two rows of tabs to tape down; top and bottom. Pick one row and then start taping from one end to the other interlocking the pair of edges with the tab Do not start taping in the middle; it's hard to get your hand in to insert the tape.
Insert the tab (from the outside), carefully line up the colours on the maps, so the white cardboard underneath is only just showing. (The thinnest white line possible is needed.) Alignment of the edges (using the colours on the outside) is critical, or you can't close the globe. (You won't find this out till the end. If the globe doesn't close well, an adult has to cut pieces out of the globe.) Once the edges are aligned, put a piece of tape lightly on the tab (inside of the globe). Check that the map join is placed correctly. If you want to change it, an adult can lift the tape off the inside of the globe with a boxcutter, and the kid can do it again. If the alignement looks right, press the tape hard between your fingers.
As you work along the top/bottom, you'll find that accessing the inside of the globe needs longer fingers or more dexterity than the kids may have.
While the alignement of the colours at the edges of the join is critical, the placement of the tape in the inside is not; almost anything that holds the globe together will do. You can tape along or across the join of the edges.
Once you've done the top, invert the globe and start on the bottom, taping from the end.
Final joins
At the end you are left with 3 pairs of edges to join As well the three pairs of edges each have a tab in the middle. For almost everyone in the class, an adult will have to join these edges. We just used single sided tape on the outside of all 3 joins. It doesn't look great, but the kids get the class done in time.
If you want no tape showing, you need 6 pieces of double sided sticky tape. Each of these is inserted, after first slightly prying open each of the 6 gaps, to insert a piece of double sided sticky tape on the blade of a small screwdriver. This is OK for adults, but doesn't fly for kids in a time limited class.
In the v1 globe, I had the students cut off the square tabs. Each pair of edges was joined by a single piece of double sided sticky tape. At the last step, an adult handled the final pair of edges. You squeezed the globe (or pried open the final pair of edges) so that the edges opened slightly like a mouth. A piece of double sided sticky tape was inserted into the gap on a not-too-sticky flat object, like a small screwdriver, letter opener, or one blade of a pair of scissors. The tape was pushed hard against the cardboard on the inside of one of the edges, where it would stick, allowing the flat blade to be carefully withdrawn, leaving the double sided tape stuck to the cardboard. You then allow the globe to unpucker, when the two edges meet and stick. A bit of massaging of the join from the outside, with your fingers, forms a reasonable seal.
With the v1 map, to save time, I precut the maps, removing the main extraneous carboard. With the v2 map, popping out the map is simple for an adult, once you've done is a couple of dozen times, but it's new to the kids and naturally they're interested in how everything works. I found the v2 maps went slower than the v1 maps. For the first year, I pre-popped-out the base and legend, leaving them attached at one or two points, so they didn't separate from the main piece of cardboard. I also pre-popped half of the map (leaving some for the kids to pop out, since it's fun.) For 2014, the class was 5 mins shorter (now 35mins) and I had to pop everything out before the class, just giving them the relevant pieces of cardboard, and throwing away the trim.
About half the joins have to be done with adult help or the class won't finish in time. It helps to have a couple of adults on hand.
Is the v2 map better? Most of the students don't do a great job of cutting, so the resulting v1 globe isn't particularly symmetrical and the colors don't match up well across joins. With v2, the cutting problems are gone, but the colour matching at the edges is still a problem. At the last step in the assembly of v2, there's a lot for the adults to do. Even so, the class is finished a few minutes earlier, which helps. I'd say it was a step sideways, but what you've exchanged is different for adults and kids. The cutting is gone, making that easier for the kids, but closing the globe is impossible for kids and has to be done by adults. (Note: For 2013 we had the kids close the globe by putting single sided sticky tape on the outside, rather than the adult method of double sided sticky tape between the flanges and the inside of the globe. Many of them do this on their own, without waiting to be told how to close the globe.)
Suggestions for testing: As part of the design phase, the map needs to be tested on kids (adults can stand in for kids in the early rounds of testing). The students have a lot of trouble getting the tab into the slot, particularly when closing the sphere, when their sphere isn't symmetrical and the tab and the slot no longer line up. A pointed triangular tab, rather than a square tab, would help get miss-aligned tabs into the slot. It would be nice to have a sphere that can be assembled without sticky tape. The tabs could be non reversible - e.g. have an "L" shape that catches on the inside of the slot, using the natural spring of the cardboard.
The 240 piece icosahedral jigsaw globe of the earth, seen in the video, comes in 3 versions, with 240, 560 and 960 pieces (search in the internet with "3-D puzzle of the world" or "icosahedral puzzle globe of the earth"). Presumably they're all icosahedrons. An icosahedral globe will have multiples of 20 pieces (4-fold as for my 80 faced toothpick icosahedron as seen in the video, or 3-fold as seen for the 60 subunit capsids of icosahedral viruses).
I have no vested interest in the use of these maps. I like maps and bought a few of these to decorate home and work, several years before I met Lyn. I think everyone should get a chance to build one of these.
There is a large spread in skills in any class. Usually there will be one kid for whom the whole process is obvious, and who won't need any direction, while there will be another kid who has no idea what's going on and has to be walked through the whole process and then thrown over the finish line. There must be at least a log difference between the top and the bottom kid in each class. I had not expected this, but now after being a soccer coach and referee for 10yrs, teaching several different classes at the school, and teaching astronomy to boy scout troops, I find the same spread no matter what you're teaching. Presumably professional educators know about this spread, but I didn't. Previously all my teaching had been at university level where the difference between the top and the bottom kids wasn't so marked.
I remember in one of these 3rd grade science classes, when I was showing the kids how an eclipse occurs, having one of the whizzes from my soccer team, looking at me with exasperation - he had no idea what was going on. So as the kids move between environments, the kid on top and the kid on the bottom changes every 40 minutes.
| Note |
|---|---|
| Maps and 18 pieces of tape are already set out on the table when the kids come in. Lyn will tell the kids before they come in the classroom, not to press down the tape, or brush up against it. | |
Goal is to make the NOAA globe, starting from a flat sheet of carboard (hold both up). Everyone will go home with a completed globe.
| Note |
|---|---|
I'm going to be asking you questions. If you think you have an answer, put up your hand. Don't call out. I won't neccessarily ask the first person to put their hand up; I'll try to get as many people to answer questions as possible. Don't put your hand up unless you have an answer. Some kids like to put their hand up and not have an answer. You're only going to waste people's time. There'll be plenty of questions, so anyone who wants to give an answer will eventually get a turn. | |
- Before you do anything, put your name on the globe (the middle of the Pacific Ocean is good.)
- show and name the 5 platonic solids. Point out the faces (modern)/heads (ancient)(triangular, square, pentagonal).
- explain regular solid nomenclature: edges, faces/heads, vertices
- show that some are rigid and some are floppy. show still true even for models made of straws and rubber tubing. explain rigid==stiff.
ask for examples of words with names starting with the prefixes tetra, hexa, octa, penta (photo of the US military building, the Pentagon, on the board), (in the dodecahedron, the face is a what?).
Note for oct (octave, octopus, octane, Octavia, october). Is october the 8th month? (Many cultures start the new year at the spring equinox. The Romans also started their new year in the spring, (on the Ides of March https://en.wikipedia.org/wiki/Ides_of_March) but for political reasons decided to shift the new year back by two months, but didn't bother to renumber the months. The leap year date of 29 Feb used to be at the end of the year, but now it's two months into the year. The politicians in the US aren't any different, with the result that the US is the only major country in the world not using the metric system.) When do the Chinese have their New Year? (Jan, Feb, it's a soli-lunar calendar, meaning the new year is determined by the position of the sun and moon.)
Octavia (a highly respected woman in Rome, one of the first Roman women to have coins minted in her image), Octavian (none of the kids ever pick Octavian as the male version of Octavia. Try prompting them with Julia/Julian.)
For those of you with a pet octopus, you could call it Octavia or Octavian, depending on whether it was a boy or girl.
- Named after Plato. Plato lived where? (Athens). Student of Socrates, teacher of Aristotle. Plato is one of the most important founding figures in Western Philosophy. He was the founder of the Academy in Athens, the first institution of higher learning in the Western world. The Academy was named after Academus, the previous owner of the land on which the school was built. So even back then property owners and developers had things named after them.
- demonstrate polyhedral dice. First demonstrate the normal 6 sided dice as a way of generating random numbers from 1 to 6. Then ask them for the shape of a dice that will generate a number from 1 to 4. This will take a few seconds, but insist on the correct name (in this case, tetrahedron).(Suggest if the kids are stumped for a name, to look at the labels in front of the models on the table.) Then roll the tetrahedral dice on the table. Then ask for 8,12 and 20 - they will pick it up pretty fast and call out the names as you roll the dice on the table.
- If nature wants a sphere it has two choices. icosahedron makes a rigid near sphere. the dodecahedron is a sphere too, but it's not rigid.
- show T4 picture, hold up toothpick icosahedron. Head holds the DNA, which is injected into the host cell, thus turning the host cell into a virus producing factory.
- virus is simple - it's self assembling
why do we care about viruses? flu, cold, polio (FDR, vaccinations, Salk and the March of Dimes - in 2015 I noticed how angry I was that the US govt did not think it was any of its business to fund Salk's polio vaccine - it was someone else's job to develope the cure for polio), rabies, chicken pox/shingles, smallpox/cowpox (vaccination, Jenner), rubella/german measles, mumps, ebola, HIV (AIDS), hepatitis, herpes (cold sores), scarlet fever, HPV, rota and noro viruses cause diarrhea. Mosquitoes carry yellow fever and dengue fever, West nile and zika (from mosquitoes).
Measles was so common in ancient Egypt that it was thought to be a normal stage of human development Social history of viruses (http://en.wikipedia.org/wiki/Social_history_of_viruses). As well (https://www.unicef.org/immunization/index_why.html)
Measles, a viral respiratory infection, killed over 500,000 children in 2003, more than any other vaccine-preventable disease. The measles death toll in Africa is so high - every minute one child dies - that many mothers don't give children real names until they have survived the disease. Measles weakens the immune system and renders children very susceptible to fatal complications from diarrhoea, pneumonia and malnutrition. Those that survive may suffer blindness, deafness or brain damage.
the deaths are from secondary infections, which doesn't happen in developed countries.
Pneumonia comes in both viral and bacteria versions.
Until the 19th century upto 50% of children died before the age of 5, almost all from infections. When European infectious diseases were introduced to the Americas, they wiped out the natives, who had no immunity. In Cuba and the surrounding islands 1/3 of the population was killed by smallpox starting in 1518 and 2/3 of the survivors of smallpox were killed by measles in 1529.
- do viruses only target humans? (all living forms, plants, animals even bacteria have viruses)
- non-viral infections: (only in case any kids ask about them) the plague (black death, killed 1/4 the world's population in the 1300s) (Yersinia pestis), cholera (Vibrio cholera), diphtheria (Corynebacterium diphtheriae), Lyme disease (via deer ticks, Borrelia genus), tuberculosis/consumption (Mycobacterium tuberculosis), typhoid (Salmonella enterica) comes from drinking water that has been contaminated by poor sanitation, The different disease Typhus comes from Rickettsia bacteria carried by lice on rats. Rocky mountain spotted fever (via ticks, Rickettsia rickettsii),
You kids probably haven't heard of many of these viruses. That's because you don't have to worry about these diseases now. Vaccinations, modern medicine and public health measures have handled most of the problems. When I was growing up, every kid was off for a week from school every year, sick and home in bed, with some viral disease. Vaccinations have made a huge difference to the health and lifestyle of children. All of you get your shots before you start school or daycare and you go about your daily life without worrying about when you'll next be sick.
There have been great advances in modern medicine in the last 100yrs. Anyone know the most significant advance in preventing disease, saving lives and increasing our lifespan? (washing your hands and having safe drinking water). It turns out, the best health measures are also the cheapest.
| Note |
|---|---|
| Wilbur Wright, the co-developer of the first plane to fly, died from cholera, after drinking tainted water on a visit to NYC. His death stopped developement of the plane by the Wright bros. | |
The video shows cutting out the v1 globe. The v2 globe, which I'm using now, instead pops out and is done a little differently. With the v1 globe, once the kid's folds were checked out, the kids could tape the globe up in one go, only requiring adults to close the globe. Here's the instructions for the v2 globe.
- You will all take home a globe today.
- the globe starts with a flat sheet of cardboard. you will fold it up and hold it together with sticky tape.
-
start with the stand.
make sure all kids fold tab/flange inside (not poking out).
then tape on the inside with single sided sticky tape.
Note Make sure kids check with an adult before going on! - (Not done anymore: fold globe along black lines on the edge of the table. fold at 60°, NOT 90°, you're making a sphere, not a cube. do all black lines and flanges. have adults check before taping. Some kid always manages to fold the cardboard over 180° and press it down hard with a ruler.)
- Before they start taping, tell them NOT TO CLOSE UP THE GLOBE, when getting to the end of the top of the globe (or the bottom, it doesn't matter which you start with). Many of them close up the globe as the first step. They usually make a cylinder out of it, rather than a sphere. Even if they make a sphere, they won't be able to get their hands into it when they attempt to join the sides. In 2018 quite a few kids closed the globe up making a cylinder. Others closed it early at 4 triangles, rather than 5 triangles. I say "Run along one side, but don't close the globe up when you get to the end. Instead start on the other side. When you get to the end, you'll need adult help to close the globe up." It seems I may as well have not bothered.
-
starting at one end, do ONE taping (single sided tape, on inside),
showing kids how to line up the colours.
Have adults check that the colours are lined up
and the thinnest possible white line of uncoloured cardboard is showing
before allowing the kids to tape on the inside,
or else globe will not close up at the end.
(To get the globe to close up, I have to cut off pieces of the globe.
The result is an assymetric globe.
It's not pretty, but it folds up and it's better than no globe.)
Most globes don't close up,
are because the kid have pushed the tabs in too far.
I used to say "close the tab, till the white just disappears".
They'd just push the tab in the whole way.
In 2018 I tried saying "leave the thinnest slice of white showing".
The ones who did this could close their globe.
Note In 2019 I was determined that the kids all adjust the tabs so that only the thinnest white line was visibleg and that an adult had to check before they taped up the stand. The kids had the tab coming from the inside out, they had the coloured print of the stand facing inwards. Even with two adults checking, only about 2/3 of the class got it right. Then when they did the first taping of the globe, I did the same thing, not letting them tape till an adult checked that they had the thinnest white line showing. Still some kids had the globe folded with the colour facing inwards. On the 2nd check I found all the kids had it right. As a result everyone's globe folded up OK enough. Some weren't great, but they all folded up. I was surprised that you really have to hound the kids on this. Just telling them doesn't work. I've been doing this class for 18yrs now and I'm still finding out what's needed to get it right. - tape (single sided) along that side. when reach the end, don't try to close. Then start on the other side.
- When get to the end of the 2nd side, ask an adult to close it with double sided sticky tape. (We gave up on double sided taps in about 2016 and now only use single sided sticky tape, inside and out. The last 3 flanges are done on the outside. Some kids did the whole globe on the outside. It was fast and it worked. I offered some kids to do the taping on the outside, but they insisted on doing it on the inside. So some are prepared to tackle doing it on the inside.
As I was watching the kids, I noticed their lack of dexterity compared to adults. The other thing I hadn't noticed previously is that their fingers are shorter than adults. An adult's fingers are long enough, that a dexterous adult can put a piece of sticky tape on the back of a tab in one move. A kid just can't do this. Perhaps the next generation of NOAA globes should be smaller. This wouldn't be a neccessary if the tabs were self locking. Then you wouldn't need access to the inside of the globe.
The first time I assembled one of these globes, I allocated an evening to it. These kids are getting about 20mins to do it. It's a lot to ask.
I have an 80 piece and a 240 piece icosahedron (in the video). These show how you can make smoother spheres, still using triangles. The part of the video showing the 80 and 240 sided icosahedron in the video was shot between classes. I've never had time to show them to the kids.
When 1/2 to 3/4 of the kids have taped up their globes, move on to the next section. Have adults finish the globes of the last kids (the slow kids are not going to finish in the time of the class). If not, you won't finish the class and the kids who have finished, with nothing to do, will go crazy.
- 1-D truss - crane jibs, highway signs and bridges
- 2-D truss - roof in large store
- 3-D truss - box kite, also bone has a similar structure
Tell the kids when they've finished their globes, to look at the rubber and drinking straws platonic solids to figure out why some are rigid and some are floppy. They can also roll the polyhedral dice.
In one of my earlier sessions, I had them all try to figure it out together; once the first kid figured it out, they all knew and they could check the answer on the spot. However that way only one kid gets to figure it out. That didn't work.
The next year, when they had an answer, I had them not tell each other and instead asked them to sit down. I assumed they all had the right answer. After a few kids had sat down, I asked the class for answers. To my dismay, I found that most of them had the wrong answer. The kids who were wrong, and now back in their seats, couldn't make another attempt to get the right answer. This didn't work either.
Being stumped, I asked Lyn (the professional educator). The way you do it is
- let the kids come up and try to figure it out all together, but to keep quiet if they think they know.
- when they have an answer, come check with me, but tell me quietly enough that the other kids don't hear their answer.
- if they're right they sit down, or play with the polyhedral dice, but keep quiet about their answer.
- if they're wrong, try again. Most kids are wrong (but are convinced they're right) and need multiple attempts.
- when about half the class is up at the table (i.e. half the kids have finished their globes), get everyone to sit down. Ask the kids who had the right answer to identify themselves by raising their hands, then to call out all together, the single word that is the correct answer (triangles).
Only about half the kids got far enough through their globes to make it to the table. In 2014 I had four classes of 18-19 kids, in which 1,0,2 and then 3 kids found the right answer (i.e. a total of 6 kids out of 74, only half of who made it to the table). This was before I was giving them enough time to get to the answer.
I didn't pay much attention to the wrong answers. Once I realised that the kid hadn't got it, rather than listening to a long winded wrong answer, I just said to try again. (Adults in traffic court give long winded explanations of why they were speeding too. It seems you don't grow out of this. It has to be educated out of you.) One kid was talking about squares and triangles, so I asked which ones were rigid and which were floppy and then they got it. All the other kids who got it just said "triangles" and that was that. Some kids didn't know what "rigid" meant even though I paired it with its opposite "floppy".
Afterwards, recalling the wrong answers, it was clear that the kids had no idea about falsifiability. They said it was due to the structure (well, what is it about the structure?), that the rubber in some of the models was more bendy... Falsifiability is a modern (20th century) concept, and was only arrived at after several centuries of thought. I've had a lifetime of reading examples of falsifiability and the consequences of mistakes. You can't expect kids to rediscover falsifiability on demand, in a matter of seconds, at a table. I was told about the requirement for triangles in rigid structures long before I started thinking about why structures stood up, so I'm asking the kids to do something I hadn't done at their age.
In 2018 I asked them "if you think you have the answer, before you come to me, check that your answer is true for all the rigid structures and false for all the floppy structures" . It didn't make any difference. It's clear that most kids don't know how to think and solve puzzles. They'd come up with answers like "it's the structure". "Well yes, what about the structure?". They would then come up with nonsense that seemed like just a way of keeping my attention on them, rather than finding the answer. I haven't had a chance to ask the kids who got it, how they figured out the answer.
The class is sequenced to follow the section on plate tectonics and mountain building. The questions are designed to reinforce this material. Only obvious (high and low) places on earth shown on the globes, are discussed in the class e.g. Greenland, Antarctica, Himalays, Andes, Colorado Plateau, Hawaiian Is, deepest part of the ocean (it's not in the middle, it's at the edge) - Marianna's trench (deeper than Mt Everest is high), Atacama trench to the west of the Andes (26kfeet deep).
Posters on the wall
- (cloudless) view of the earth from space, showing the white of Greenland and the Himalayan Plateau.
- The Himalayas from the ground.
- floor of the Pacific showing Hawaiian Is, Mariannas trench, and the Atacama trench to west of South America. Also shows the Andes.
- Map of the Alps. There is also a photo of the Matterhorn, showing the glacial carved faces that make the horn. The circular arc of the Alps shows the collision of Italy with Europe. The Matterhorn is originally part of Africa. The horn (point) shape and the two flat sides are from glaciers wearing away at the rock. I have never had time to talk about this.
Questions
- Easy questions to get the kids used to looking at their globes: What are high spots (Antarctica, Himalayan Plateau, Colorado Plateau, Greenland). Is Greenland green? What famous person connected to plate tectonics is buried in Greenland? (Remember, if you're the only person in the world who thinks something, and everyone else tells you you're wrong, it doesn't mean you're wrong.)
- What caused the Himalayan, Andes and Alps mountain ranges to be there? (Except for volcanoes, e.g. Hawaiian Is. all mountains on earth are caused by compression of the earth's crust.)
- Where is the deepest part of the ocean (it's on the edges, although till not so long ago everyone thought the deepest part was the middle, just like it is for a lake). Why are the deepest parts of the ocean on the edges?
- USA has 169 active volcanoes. (http://www.businessinsider.com/americas-most-dangerous-volcanoes-2014-9) Although it's not obvious on the map, the active volcanoes in continental USA are on the west coast. WA; Mt Ranier, Baker, St. Helens. OR; Mt Hood. CA; Mt Lassen, Shasta. AK; about a dozen have erupted in the last century, none of whom have names you know. HI; Kilauea
A problem is that some kids (presumably extroverts) put their hand up, and obviously have no answer, and then start thinking. From there they just guess. Some of them start a long winded spiel, which I courteously listen to, incase it's going somewhere, but it never does. The answer is one word; they either have it or they don't. I would have expected that this behaviour in class would have been squashed long ago. They're just wasting everyone's time and are only after attention. You can't educate kids if they've decided that the best use of their time is wasting everyone else's. There may be kids in the class who want to get on with it and learn. Once when I gave an answer that no-one knew, a kid yelled out "I knew that". I said "it doesn't count". I kept saying "don't put up your hand unless you have an answer", expecting them to do so, but they didn't. I need to come down more heavily on the kids from the very start.
I was a seat mate on one of the CGS geology trips, with a high school earth sciences teacher. He said he had three kids in his class who wanted to learn. All the rest just wanted to beat each other up. He thought being a teacher was hell.
I ask many questions in the class that I think are reasonable for people to know (like the name of the mountain chain on the west coast of South America). I noticed that in all the classes, only about 4 kids, the same four kids, knew answers to any of the questions. The rest sat mute for the whole class. I wonder if any of the ones that sat mute, get the idea that the answers are reasonable things to know and that they should get on with knowing them.
Lyn said it was interesting to see which children answered questions. They were all the children of highly educated people, who presumably pumped the kids with information in their home environment.
Ivan Illich, Deschooling Society, p6, notes that most education occurs outside school. He notes that families provide conversation, vacations (riding horses at the Shaws, staying with the Macks, Mr Walsh and his dogs) social interactions.
The kids have had subduction and should know that India crashed into Asia producing the Tibetan Plateau and the Himalayas. On the wall is a poster of the cloudless world constructed from satellite photos. The snow covered Himalayan range is obvious (if you're looking for it). When I ask for high spots on the earth (the red ones on the NOAA globe), eventually the Tibetan Plateau comes up. I ask why it's high. I'm expecting to hear that India crashed into Asia. I get answers like "because there are mountains there". "Well yes, but why are the mountains there?". The answers are stuck in a loop where they answer "why is the region described as high?", rather than "what caused it to be high?" I suppose it's a reasonable approach if you're not used to finding cause and effect. The same thing happens with the Andes and the Atacama Trench. Here they've forgotten subduction. Next year (2019) I'll try asking "what caused Tibet to rise up and be mountainous?" and "why are there mountains along the west coast of South America?". Maybe the kids don't have enough background to be able to accept this material. Maybe I'm just another reinforcement step in a long chain of reinforcement and this is all I can expect. (After the class) It seemed to work; I got few spurious answers.
At home:
- I have the maps and repair pieces.
- In one of the boxes there is the original DVD of the class. (It's at home, in my pile of DVDs of distros.)
With Lyn, at school in the icosahedron class kit:
- 240 piece jig-saw icosahedron and 80 piece icosahedron (toothpick and hotglue).
- Trusses: 1-D, 2-D, 3-D (two copies) octet trusses, Bailey's bridge (toothpick and hotglue).
- assembled NOAA cardboard globe
- platonic solids: 5 of them (toothpick and hotglue, a few extra toothpicks in ziplock bag)
- toothpick and glue icosahedron, with one face (triangle) outlined with masking tape.
- platonic solids: 5 of them (rubber tubing and drinking straw) disassembled in ziplock bags. two section octet truss (rubber tubing and drinking straw). spare octahedron from Lynn (purple rubber tubing and longer drinking straws).
- 7 piece polyhedral dice set normally used for games. 5 of these dice are the Platonic Solids.
- posters: Eno River bridge (truss), 1-D trusses holding solar panels on ISS, Pentagon, Matterhorn, Plato, Salk, T4 electron micrograph (T4 has icosahedral head), diagram of platonic solids with differently coloured faces.
- maps: Antarctica (including TransAntarctic mountains from the collision of east and west Antarctica), Alps - shows the collision of Italy with Europe producing the arc of the Alps. Tsunami sources.
- poster of Pacific Ocean floor and surrounding countries showing Andes, Hawaiian Is, Atacama trench to west of the Andes, Mariannas trench.
- mercator projection image of cloudless earth from space, showing ice covered Greenland and the dry Tibetan Plateau with the white line of the Himalayas visible along the southern edge.
- posters of Mt Everest and close by mountains. strip showing the length of the Himalayas from Nepal.
- signs placed in front of models: Bailey's Bridge, Hartford Center Space Frame Diagram (2-D octet truss), 1-D Octet Truss: example crane jib, ISS spars holding solar panels; 2-D Octet Truss: example Home Depot or Airport Roof; 3-D Octet Truss: example Box Kite.
- signs placed in front of platonic solids: Tetrahedron, Hexahedron, Octahedron, Dodecahedron, Icosahedron (duplicate sets).
- wikipedia article on Plato: (in case the kids ask me about him, they never have.)
- printouts on articles about icosahedral viruses used to write the class.
With Lyn at school, materials not specific to this class, that have to be located:
- kid safe scissors
- single sided sticky tape
- marker pen (for enscribing your name on the globe and stand).
For the 2017 fall class on the orrery and the spring 2018 class on the icosahedron, I brought the camera and had it running without an operator. Both times I didn't press the button at least once on the camera. The computer, for the audio recording, is near me and I get that right. I don't want to run the wireless mike's batteries down, so I turn them off and I seem to get that right, but I forget to turn the camera back on. I have plenty of storage. I should just flick it off and on between classes to get a new set of files, but I should otherwise just let it run.
Pick a day 4, i.e. first class at 10:30am, two classes in morning, two classes in the afternoon. In 2017, the first class was at 8:30am. I had to put out 18 maps, and with the help of the assistant - 300 pieces of sticky tape, all between 7:30am and 8:30am. We did it, but it wasn't easy.
For 2019 I had an 8:30am start. With Lyn's schedule, I don't have much (any) leeway in choosing a class day/times.
Ask Lyn to get parent help.
2017: I brought my boxes, checked Lyn's boxes (nothing was missing or broken). This didn't take long. I popped out maps for 4 classes; this took a while, maybe an hour.
In 2017, all the posters were rolled up from last year. They had to be multiply taped down to the board to keep them from curling up. It took a bit of work to get them off the board, rather than just lifting them up from the untaped bottoms. In 2017, I rolled them up again.
In 2018, I should unroll them a week ahead. (In 2018, I didn't even think of it. The posters stayed on the wall OK.)
2019 put the posters under some boxes. They were easier to put up on the setup the day before.
| Note |
|---|---|
2014: this took about 5hrs. 2015: after getting organised last year, this took 2hrs. Nothing was broken. 2017: after finding everything a week earlier, I setup: posters on wall and models on table. This took about an hour. 2018: 3.5hrs (no assistants). This included setting up the camera gear, and popping out maps for 4 classes. (a packet of maps has 80 maps) Popping out the maps took about half of the time. Pull down took 1 hr. for 2019: don't put out the drinking straw and rubber two section octet truss. I've never used it. 3.5 hours (no assistants) and popped out maps. Put out tape and maps for first class. 1 hr pull down. | |
- assemble rubber tubing and drinking straw platonic solids.
- put out platonic solids on table in front of class (including polyhedral dice).
- put trusses on back table
- put up posters/pictures
v1: for each pair of kids, a single tray containing: sticky tape (two single sided and a single double sided reel), two kid grade pairs of scissors, marker pen.
v2: marker pen and single sided sticky tape.
- partly pop out the maps (including the stand) (leave stand holding at only one point so the kids can start get onto it quickly, but leave half of the map points attached). On the day, finish popping out the maps in the break before each class.
- adult helpers should have single sided razor blade (or boxcutter) handy, to undo tape on missassembled globes. (When the kids are assembling the icosahedral globes, you need a total of three adults, me and two others, as helpers to get the class done in time.) Usually assistant teachers don't know how the globe is assembled. They need to assemble a globe themselves before the class.
- Write my name on the board. (2015: Demitra has made a sign for this.)