Teaching Computer Programming to High School students: An introductory course using Python as the high level language: Reference Material and Future Classes
Copyright © 2008,2009 Joseph Mack
v20090511, released under GPL-v3.
Table of Contents
- 1. Top Level Down (top down), Bottom Level Up (bottom up) Design
- 2. Prime Numbers: The Sieve of Eratosthenes
- 3. Perfect Numbers
- 4. Cryptography
- 5. Recursion
- 6. Projects
- 7. Examples
- 8. Templates and Useful Info
- 8.1. Documentation
- 8.2. Random Numbers
- 8.3. Global Variables, User Defined variables and Constants
- 8.4. Simple Lists
- 8.5. List of Lists
- 8.6. Arrays
- 8.7. Multidimensional Arrays: Operating on Images
- 8.8. Multidimensional Arrays represented by a 1-D array
- 8.9. Array Operations: converting between index and row,col - index2row_col(), row_col2index()
- 8.10. Image transformations: requirements for rotating a set of pixels
- 8.11. Image transformations: invert top to bottom
- 8.12. Image Transformations: invert left to right
- 8.13. Arrays: Commutative Operators: Inversions and self inverses
- 8.14. Image Transformation: Rotation by multiples of 90°
- 8.15. Commutative Operators: rotations and inversions
- 8.16. Arrays: Turning reals into an list of int or an array of char (string)
- 9. Back to basics: Base 256
- 10. Back to basics: Integer Division
- 11. Some Trigonometry
- 12. Elementary Probability
- 12.1. One Coin Toss
- 12.2. Two Coin Toss
- 13. Joe's Sage Advice
- 13.1. On getting a job
- 13.2. Procedural/OOP programming
- 13.3. Working for Managers
- 13.4. Sitzfleisch
Abstract
Class lessons for a group of 7th graders with no previous exposure to programming (as of Aug 2008, now 8th graders - in the US 7th, 8th grade are called Middle School). The student are doing this after school on their own time and not for credit. My son's school didn't want me to teach the class using any of the school facilities, as they thought it would compete with a class in Java given to advance placement math 12th graders. However I could use the school facilities, if I didn't teach anything which would fullfil a requirement (which I assume meant anything practical). So the class is at my home and is free. Since this is a hobby activity for the kids, I don't ask them to do homework. As they get further into the class and take on projects, I'll be quite happy for them to work on the projects in their own time, but will let them decide whether/when to do this.
 | Note |
|---|---|
Originally all this material was in one webpage, but google stopped indexing it when it got to about 1M of html.
I've now split up the material into several sections in the hopes that google will start indexing it again.
Splitting up the document is a real pain: it's much easier to link to parts of the same document than to targets in other documents.
Here is the split up version
| |
| Note |
|---|---|
The notes here are being written ahead of the classes. I've marked boundaries of delivered classes with "End Lesson X". Each class is about an 90mins, which is about as much as the students and I can take. After a class I revise the material I presented to reflect what I had to say to get the points across, which isn't always what I had in the notes that the students saw. Material below on classes that I've given will be an updated version of what I presented. Material below on classes I haven't given, are not student tested and may be less comprehensible. The big surprise to me is that when you're presenting new material, the students all say "yeah, yeah we got that" and want you to go on. However when you ask them to do a problem, they haven't a clue what to do. So most of my revisions to the early material were to add worked problems. I also spend a bit of time at the start of the class asking the students to do problems from the previous week's class. I've found that when asking the students to write a piece of code that some of them (even after almost a year) can't turn a specification into code. Instead I have to say "initialise these variables, use a loop to do X, in the loop calculate Y and print out these values, at the end print out the result". Usually these steps will be given in a list in the notes here. Once I'd shown the students how to initialise and write loops, I had expected them to be able to parse a problem into these steps without my help. However some of them can't and I changed my teaching to reflect this. The kids bring laptops do to the exercises and they display this page by dhcp'ing and surfing to my router where this page is also stored. Students are using Mac OS, Windows XP and Linux. For WinXP, the initial lessons used notepad and the windows python. For material starting at the Babylonian square root, I changed the WinXP student over to Cygwin (still using notepad). In later sections I started having the kids do a presentation on what they'd learned. The primary purpose of this was to accustom the kids to talking in front of groups of people. They also had to organise the material, revealing how much they'd remembered and understood it. The ??? covered a body of material large enough that it took 2 classes and homework to assemble the presentation. For the next section of work, I'll have them do presentations on smaller sections of the material, and then have them present on the whole section at the end. I've hidden most of the answers to questions in footnotes (so they won't see the answers easily during class). However later, when the students are scanning the text to construct their presentations, that it's hard to find what they're looking for. I don't know what to do about that. | |
Material/images from this webpage may be used, as long as credit is given to the author, and the url of this webpage is included as a reference.
There are two styles of coding, top down and bottom up (see Top Down and Bottom Up Design http://en.wikipedia.org/wiki/Top-down).. These two terms are commonly used in programming. You need to know what they mean, only so you'll know what other people are talking about, not because it's going to affect the way you code. The design method we've been using so far is bottom level up. The characteristics of bottom up coding are
You have a problem to be coded up. You start with the smallest part of the problem that can be coded, and you write fully functional code for it. You do this initially without much of an idea about coding the rest of the problem. Your assumption is that everything can be coded and you'll handle it when you get there, or if it can't be coded up, then that part of the problem will be left unhandled or handled later. Then you tackle another part of the problem, almost certainly a piece of code that interacts with the code you've just written.
In the nim game, your first piece of code would be the announcement of the rules, your next piece of code would record the player's play, the next piece of code would check that the player make a legal play... This process continues till all the code is written. You will very likely modify some or all of your earlier code in light of things you learn on the way.
Top Down coding
You analyse the whole problem and break it into logical blocks. These will become functions, or functions calling other functions. You figure out the information that the blocks need to function; these will become parameters for functions. You figure out the information the blocks will generate; these become return values. How deep you go down the logical tree is up to you: the blocks could be large (a function which calls lots of other functions, which you don't describe) or small (a function with only a few lines of code).
You check that the blocks when working together, do handle problem to be solved, by coding up stubs. A stub is a function that has limited functionality, but looks like a real function to the calling code. The stub for announcing the nim rules would just be the line
You would write the requirements for the function as comments, so that later (possibly months later, when you've long forgotten what the function is supposed to do), you (or someone else) writes the real code. The stub for the player's turn might just be
to indicate that the player picked up 5 counters. The player would always pick up 5 counters, no matter what the state of the game. You'd write the real specifications in comments.
Once you have all the stubs written, you run them as your first attempt at the program to check that the logic is correct and look for obvious design flaws. Then you start coding by turning the stubs into real functions.
Whether you use top level down or bottom level up, is up to you. I program bottom up. It seemed the only way for me, since I started coding with small examples and built up from there. I didn't hear of top down and bottom up programming for my first 30yrs of coding. No matter which style of programming you're most comfortable with, you'll always be doing both aspects. The bottom up programmer has to understand the whole problem enough to break off logical blocks to code. The top down programmer has turn all the stubs into functions.
In big projects with multiple programmers, the first step will be a top down design, after which pieces will be handed off each programmer. The pieces may be quite large and the programmer will then use their own approach (bottom up, top down) to analyse their part of the problem and start coding.
The concept of top down and bottom up is not restricted to programming, although it may have different names in other fields. In large engineering projects (building, freeway, dam, bridge), someone must do a top down design, figuring out the time and costs, put in a bid, get an order from the customer, all before the first brick is moved. Only then will subcontractors be called to handle the individual parts of the project.
One thing that goes wrong with top down, is that stubs written to handle unusual situations are left as stubs. You hear stories of badly behaving code and after much work to reproduce the problem, the maintainer finds a one line stub. This doesn't happen with bottom up coding, as the coder usually handles all the cases at one time, writes the tests and after checking that it all works, submits the code.
While there are no logical problems in top down design, once the design is handed out for implementation, it turns out that the management of large numbers of programmers is famously complex and characterised by catastrophic disasters. The causes of these disasters and the futility of the methods used are well understood The Mythical Man Month (http://en.wikipedia.org/wiki/The_Mythical_Man-Month), but are apparently beyond the grasp of most managers (or at least not amenable to current management methods). Anyone who intends to program for others (or work in teams) should understand the lessons of this book. You may think the book is so trivially obvious that you'll wonder why I even suggest that you read it. If so, I'm very glad, but be aware that you won't be meeting many people like yourself. After one of these expensive and highly visible projects are canned, the well compensated management will look at each other and say in wonderment "we did all the right things and still it didn't work" (there are people who will believe this).
Some programs are run many times. Some programs you only run once. They do a lot of calculations, that you wouldn't want to do by hand, but once you've run it, you don't need to run it again. The perfect_numbers is such a program. So what if the algorithm is slow, you can let it run for a week.
Make a controller for a car. Have subroutines that, speed the car up by 1mph if below a set speed (eg 60mph), slow the car down by 1mph if above a set speed (eg 70mph), do nothing if in an acceptable band (eg 60-70mph). Start the car at a speed, use an infinite while loop to control the car (ctrl C to exit). Add a rocket that boosts the car's speed at random times, and by a random amount if in the steady speed band.
Change the routines to loop until they reach the required speed and then return
Change the routines to recursively call themselves till they reach the required speed and then return.
Nial Ferguson, The Ascent of Money: look at the chapter on insurance. Do an event driven simulation.
Do an event driven simulation of a pair of two lane roads at a set of traffic lights. Do two intersections separated by 100yrds. See if synchronising the lights helps.
Give "." the date of the latest file in the directory, to allow a backup to not to have to search any deeper.
There are $5 3-axis USB accelerometers which can be used to test for movement. Get these to work and make a webpage using rrdtool to monitor the movement of something (eg fridge door).
This section is set pieces of information that I keep referring to. Initially each piece was in a relevant section, but I kept reordering sections, and I'd wind up talking about list[] before I explained how they're used.
Here's a documentation template for a function
""" name: fencepost(d) author: Fred Flintstone (C) 2008 license: GPL v3 parameters: d: int or string; length of fence returns: number of fence posts, int modules: imports math method: assumes a distance of 10 between fence posts. number of fenceposts=(length of fence/10)+1 """ |
Here's a code fragment that generates a random number
>>> import random >>> random.randint(0,10) 0 >>> random.randint(0,10) 6 |
random is a module (code that's not part of the base python code, but can be imported to add extra functionality). In the above example, the randint() function was called twice, generating two different numbers.
| Note |
|---|---|
| Because random is a module, you need an import random statement at the top of the section of code containing randint(): i.e. if randint() is in main(), then the import statement must be at/near the top of main(); if randint() is in a function, then import must be at/near the top of the function. The import random and the randint() call must be in the same scope. If you forget the import random statement, then python will complain about random being undefined. For ease of maintenance, all import statements in any scope should be together. | |
randint() generates a random integer using the same syntax as ???. Being an intelligent and reasonable person, what would you expect the range of random numbers to be from the above code fragment [1] ? The answer python gives is [2] .
I've said that writeable global variables are a bad idea, because some other function, perhaps written later, can modify them, without you realising that it's happening.
I've also used what are generally called "user defined variables" (which are really constants and not variable at all). These are also global variables, which describe fixed numbers for the program (e.g. max number of counters in the game, max/min number of counters you can pick up). You may be able to change some/all of these variables, to get a different sort of game, but you won't change these variables during a run of the program: you'll edit your code instead (you may not be able to change the variable and have a sensible run of the program).
Why are user defined variables OK but global variables not OK? In principle, user defined variables are read-only, and you hope that no-one changes them, but python has no mechanism to enforce this. Other languages (e.g. C++, Ada) enforce the read-only property (e.g. C++ has a keyword const as part of the variable's declaration) and not declaring a variable to be const when it is, is regarded as sloppy programming on a level comparable to driving without seat belts, or not wearing a bicycle helmet (people may refuse to read your code till you've fixed this, because of the likelihood that these variables are being modified).
Other numbers like π will be imported, and yet other numbers (like the "1" in the formula for the number of fenceposts in a 10 section fence) will be in the code, because they are part of the formula and are not variables.
Here's the list of global and user variables that you're likely to find
- global variables: these are writable global variables and should be avoided
- user defined variables: these are global variables, particular to the program, that are designed to be read-only, and you hope that no-one modifies (python has no mechanism for this enforcement, but any language for mission-critical code will have such mechanisms).
- imported constants: these constants (e.g. π, the accelaration due to gravity) are not particular to any one program. You import these and use a variable name, to make the program more readable, and to prevent you accidentally entering the wrong value.
- numbers: in formulae representing physical reality (e.g. the conversion from Centigrade to Fahrenheit: F=(9/5)C+32). These numbers are built directly into the code and hopefully will be recognised by a reader as physical constants.
In python, a data type list[] holds a series of entries, of one type or of mixed type (e.g. all floats; all integers; or a mixture of various types such as strings, integers, floats and objects). (see An Introduction to Python Lists - http://effbot.org/zone/python-list.html).
| Note |
|---|---|
The list data type is not a primitive data type, but is an object data type, in particular a list object. We will learn about objects later, probably not in this course, but for the moment you can regard objects as data types built on primitive data types. A banana object would have price (real), color (string), number of days since picking (int), supplier (string), barcode (object). We could make a submarine object, which would be specified by the length (real), weight (real), name (string e.g. "USS Turtle"), date of commissioning (date object, itself various integers), the number of crew (int) amount of food left (lists of food types) and the number of ice cream makers (int). A navy object would include the number of submarine objects, ship objects, and dingey objects. A naval battle game would need at least two navy objects. For more thoughts on the differences and advantages of procedural and object oriented programming (OOP), two of the major styles of imperative programming, see the section comparison procedural and OOP programming. | |
Typical operations with lists are adding an item, usually called push() (but in python called append()) and removing an item, called pop().
Here are some examples:
list=[1,2,3,4,5] #initialise a list with content for item in list: #retrieve and print entries in a list print item list=range(0,10) #range() creates a list list=[] #initialise an empty list item=1 #find something to put in the list list.append(item) #add item to end of list item=2 list.append(item) list #print list len(list) #number of items in list variable=list.pop() #remove last entry from list and assign it to variable variable #show the value of variable list #show the value of list len(list) list.pop() #remove last entry from list, but don't assign the value to any variable len(list) |
Here's the code in interactive mode
pip:/src/da/python_class/class_code# python Python 2.4.4 (#2, Mar 30 2007, 16:26:42) [GCC 3.4.6] on linux2 Type "help", "copyright", "credits" or "license" for more information. >>> list=range(0,10) >>> list [0, 1, 2, 3, 4, 5, 6, 7, 8, 9] >>> list=[1,2,3,4,5] >>> list [1, 2, 3, 4, 5] >>> list=[] >>> item=1 >>> list.append(item) >>> item=2 >>> list.append(item) >>> list [1, 2] >>> len(list) 2 >>> for item in list: ... print item ... 1 2 >>> variable=list.pop() >>> variable 2 >>> list [1] >>> len(list) 1 >>> list.pop() 1 >>> len(list) 0 |
Try these in interactive mode:
- create an empty list.
- add the following items to the list: 1,5,9, the letter "a".
- show the length of the list
- print out the contents of the list to screen
- remove the last entry in the list and print out the new contents of the list
Here's my code [3]
The entries in a list can be anything, including a list. Let's put a list into a list of lists.
# functionally the same as previous code list_of_lists=[] #initialise list_of_lists[] and list[] list=[] list.append(1) list.append(2) list for item in list: print item #now add this list to a list of lists list_of_lists.append(list) #list_of_lists[] contains a single item, list[] list_of_lists #print list_of_lists, what do you expect for output?C #lets add some more items to list_of_lists[] (the items being themselves a list[]) list=[] #why do I reinitialise list[]? list.append(3) list.append(4) list_of_lists.append(list) #how many items are in list_of_lists[]? #Output the items that are in list_of_lists[] list_of_lists #How do you output the items that are in the lists that are in list_of_lists[]? |
Here's the code run interactively
dennis:# python Python 2.4.3 (#1, Apr 22 2006, 01:50:16) [GCC 2.95.3 20010315 (release)] on linux2 Type "help", "copyright", "credits" or "license" for more information. >>> list=[] >>> list.append(1) >>> list.append(2) >>> list [1, 2] >>> list_of_lists=[] >>> list_of_lists.append(list) >>> list_of_lists [[1, 2]] >>> list=[] >>> list.append(3) >>> list.append(4) >>> list_of_lists.append(list) >>> list_of_lists [[1, 2], [3, 4]] >>> len(list_of_lists) 2 >>> list=[] >>> list.append(5) >>> list.append(6) >>> list_of_lists.append(list) >>> len(list_of_lists) 3 >>> list_of_lists [[1, 2], [3, 4], [5, 6]] >>> for list in list_of_lists: ... print list ... [1, 2] [3, 4] [5, 6] >>> for list in list_of_lists: ... print list ... for item in list: ... print item ... [1, 2] 1 2 [3, 4] 3 4 [5, 6] 5 6 >>> for list in list_of_lists: ... for item in list: ... print item ... 1 2 3 4 5 6 |
Try these examples at the interactive prompt:
- initialise an empty list (list[]) and another list which will be used to hold lists (list_of_lists[]).
- add the empty list to list_of_lists[]
- What's the length of list_of_lists[] and show it's contents. Why isn't len(list_of_lists)==0?
- add an empty list (again) to list_of_lists[]
- make a list with the contents [1,2] and add it to list_of_lists[]
- make a list with the contents [3,4] and add it to list_of_lists[]
- show the contents and length of list_of_lists[]
- Using a loop, write out each entry in list_of_lists[] one at a time. How many times does the loop run? Why doesn't it run 2 times?
- Using a loop, write out the contents of each entry in list_of_lists[] one at a time. How many times does the loop run? Why doesn't it run 6 times?
Here's my code [4]
Arrays are useful data types in computer languages. You can expect all languages to have methods/functions for handling arrays. (Python has lists which are near enough to a 1-D array.) Here is an array of integers holding the temperature of each hour during the day. (In real life, this will be an array of reals rather than integers.)
temperature = [15,16,15,15,18,17,20,20,21,24,25,25,25,26,25,28,30,29,28,25,22,18,17,27] |
You can read/write elements of an array.
>>> temperature = [15,16,15,15,18,17,20,20,21,24,25,25,25,26,25,28,30,29,28,25,22,18,17,27] >>> print temperature[5] 17 |
Why wasn't the answer 18 [5] ? Write code to double the value held in temperature[5], and output it to the screen. Here's my code [6] . What's the max, average and minimum temperature for the day? What is the range of temperatures (difference between lowest and highest)? This code is too long to do at the python prompt; write your code in a file temperature_array.py. Write array_max(), array_min(), array_average() and array_range() as functions taking an array argument and returning an int. (There are already functions in python to do this. For practice, I want you to write your own. To find the min and max of two numbers, you can use the python functions min(),max().)
Here's my code [7] and here's my output.
dennis:# ./temperature_array.py average: 21 min : 15 max : 30 range : 15 |
Computer languages don't have ways of addressing individual digits in numbers - you're only interested in the value of the number, not the digits that represent it in its decimal version.. However in most (all?) languages, strings are represented as an array of char and thus a programmer can individually address chars in a string. Programs dealing with text need to be able to search for substrings, change capitalisation, change word separators (e.g. ,:;), and reorder words.
>>> my_name="Simpson, Homer" >>> print my_name[3] p >>> for c in my_name: ... print c ... S i m p s o n , H o m e r >>> |
Why did this code print 'p' rather than 'm' for my_name[3]?
Using the string code above as a template, output a person's name in the reverse order. Here's my code [8] . Next output all occurrences of 's' (or a letter of your chosing) in a name as uppercase (use: string.upper()). Here's my code [9] .
| Note | |
|---|---|---|
I asked you to output the modified string, rather than modify the string in place and then output the modified string.
In python you can't modify individual char of a string
| ||
A 2-D array could hold the height of ground at 1m intervals in an x,y grid, or the (r,g,b) value for each pixel (an element with a position in x,y) in a photograph. A 3-D array could hold the temperature of 1m cubes of the atmosphere; each element of the array would be indexed by (x,y,h).
Only a few languages (e.g. Fortran) have multidimensional arrays. Since python only has lists (a 1-D array), in python how would you store a 2-D array, e.g. the intensity of a black and white pixel in a photo [10] ?
Let's print the image. Swipe this code to array_image.py and run it.
#! /usr/bin/python # array_image.py # row_len=10 col_len=10 row9 = [0,0,0,0,0,0,0,0,0,0] row8 = [0,1,1,1,1,1,1,0,0,0] row7 = [0,0,1,1,0,0,1,1,0,0] row6 = [0,0,1,1,0,0,1,1,0,0] row5 = [0,0,1,1,1,1,1,0,0,0] row4 = [0,0,1,1,0,0,0,0,0,0] row3 = [0,0,1,1,0,0,0,0,0,0] row2 = [0,0,1,1,0,0,0,0,0,0] row1 = [0,1,1,1,1,0,0,0,0,0] row0 = [0,0,0,0,0,0,0,0,0,0] image = [row0,row1,row2,row3,row4,row5,row6,row7,row8,row9] #from top to bottom #why is the list produced by range() for the y axis in the reverse order to that for the x axis? #why is the 2nd and 3rd parameter for range() -1? for y in range (col_len-1,-1,-1): #have to assemble whole line before printing #otherwise python puts an unrequested <cr> after each char line = "" #from left to right for x in range (0,row_len): if (image[y][x] == 1): line += "M" else: line += "." print line # array_image.py ------------------------------- |
Here's the output
# ./array_image.py .......... .MMMMMM... ..MM..MM.. ..MM..MM.. ..MMMMM... ..MM...... ..MM...... ..MM...... .MMMM..... .......... |
For the loop parameter y
- Why is the loop parameter run in the reverse order to the loop parameter for x (i.e. why is the 3rd parameter of range() -1)? Run the code with for y in range(0,col_len):
- Why is the 2nd parameter of range() -1 [11] ? Change the 2nd parameter to 0 and replace the "." in the output line by " ". Now look at the output. You'll be missing the last column but you can't tell.
- Why do I ouput a "." rather than a " "? [12]
In this code, what does the construct image[y][x] represent? image[] is a list. The elements of a list are addressed by image[y]. The elements are themselves lists (in this case, rows of pixels), so image[y] is a list of pixels. They xth element of image[y] is image[y][x], a pixel.
Much of scientific computing is operations on large arrays. In a multitasking operating system, some other code could be running at the same time, and in the middle of your code allocating memory for the rows, someone else's cookie recipe code could run, putting the recipe in between two of the rows of your image. The memory for the rows of the image will not be contiguous. Access to your image array will be slow as the computer has to figure out where all the rows are each time it runs through the image. Its better to have the image stored as a continuous 1-D array. This requires the program (instead of python) to know where each row starts in the single array. This code is more complicated to write. If you have a small array and you aren't going to process it very often, then you should let python handle the indexing by using a list of lists. If you have a big array and it's accessed 1000's of times/sec as part of a numerical integration, then you bight the bullet and write code which indexes into a 1-D array (this is going to be more confusing than you might have first expected).
Copy array_image.py to array_image_2.py and rewrite the code to store the image in a single 1-D list. As in the previous code, make the bottom left corner of the image (x,y)=(0,0).
- Leave the row lists as they are (in global name space). Initialise the 1-D global variable image[] to the empty list. Keep the two global variables row_len, col_len. For the moment comment out the code that prints the image. You will later rewrite this code for the new format of image[]
-
write list fill_image() which takes no parameters
and returns a 1-D list containing all the elements of the rows.
-
Initialise a 1-D list elements[]
which you'll use to store the 100 elements.
Note It's convenient to name lists with a plural name, and name of each element with the singular e.g. each element of files[] is a file; each element of pixels[] is a pixel; each element of rows[] is a row. (Not everyone uses this convention.) - Start with code to output each element of some row (any row e.g.row3. You iterate for each column in the row from the beginning of the row to the end of the row. What code will you use to generate the loop parameter (call your loop parameter col) [13] ? Note which part of the line is associated with the number of columns and which part of the line of code comes from the length of the row. (You thought the fencepost problem was confusing.) Add the elements of the row to elements[].
- Now you need to repeat this process for all rows. You need a loop parameter that assumes the value of each row (call your loop parameter row). You generate this loop parameter from a list of rows. How would you make a list of rows (called rows[]) (hint if you're stuck) [14] ? Initialise rows[] at the top of fill_image[]. Now iterate over the all the rows, filling elements[].
- To confirm that the function works, inside the function code, print the contents of elements[] to the screen, (it should be a single list of 100 elements) then comment out the print statement.
- In main() call fill_image() and assign the returned list to image[].
-
Initialise a 1-D list elements[]
which you'll use to store the 100 elements.
- Write write_image(list pixels) by modifying the currently commented output code to accept the new (1-D) format of image[]. Check that your output image is the right size (has the right number of columns and rows).
Here's my code [15] .
We're going to write code to do image transformations. Since we're now using a 1-D array, this is going to require translating between the index in the 1-D array, and the 2-D location of the element in row,col pairs. If you're fiendishly clever (in which case you won't be learning to program off a webpage) you can do this without making mistakes. The rest of us get into trouble here and we write a pair of functions to do it for us. With this pair of functions, we can treat a 1-D array as if it were a 2-D array.
| Note |
|---|---|
| When describing points in cartesian space, they are described by the pair x,y. But when describing arrays, they are normally described by row,col (i.e. the reverse order). The people who designed tables weren't the same people who designed the Cartesian coordinate system. Such is life (unfortunately). | |
Copy array_image_2.py to array_image_3.py. Add a function int row_col2index(row,col) which gives the index in the 1-D array for any row,col pair.
| Note |
|---|---|
| code which does simple transformations is often given a name like foo2bar (with the "2"). Though I think it ugly, it's a well accepted idiom (and I use it). | |
Here's my code for row_col2index() [16] .
Include in main() some tests. While right now you can do a test by running print row_col2index(5,5) and confirming by eyeball that you got the right answer, this won't work in 6 months. Instead write array_image_tests() that contains groups of statements like
row = 0 col = 0 result = 0 if (row_col2index(row,col) == result): print "OK" else: print "expected %d, found %d" %(result, row_col2index(row,col)) |
(Since you'll be doing the check many times, make the last 4 lines above into a function test_row_col2index().) Check that the test fails when it's supposed to. Once you've convinced yourself that your code works, comment out the call to array_image_test(). Here's my code to test row_col2index() [17] .
Write the complementary index2row_col(index) which turns an index into a row,col pair. index2row_col() returns two integers, but python (and most languages) can only return one item. What do you do in this case [18] ?
With a pair of names like index2row_col() and row_col2index() you (and anyone reading your code in 6 months) would reasonably expect these two functions to be the inverse of each other (i.e. if you run both of them, you'll be back where you started). However if you run index2row_col(row_col2index(row,col)), you will start with two separate integers and return a single list containing two integers. Anyone later reading your code will not be happy, when they finally figure out that the two functions aren't a pair of inverses. No-one forsees such problems; you just fix your code. What's the fix required to make these functions a pair of inverses [19] ? Fix your code (and the tests). Write a pair of tests to show that the two functions are inverses. Here's my version of the pixel to index position converters and their tests [20] .
Convert write_image() to use the index2row_col(), row_col2index(). There is only one line changed. Here it is [21] . Make sure you understand the nesting of the different types of brackets. [] encloses a list; () encloses the parameters for a function.
You might remember that one of the reasons for using a 1-D array to represent large 2-D arrays was speed. However function calls are slow, and we're going to be using functions each time we index or retreive a pixel at an index. In languages built for speed, these one-line function calls will be in-lined, i.e. the code for the function will be written directly into the code (instead of making the function call) and no function call will be made. This is done with a MACRO or an in-line compiler directive.
Shortly we'll do some transformations on the image: rotations and inversions, but first some theory. Pixels have integer positions. When an image is rotated by a multiple of 90° or inverted, each pixel has only one place to go: there is a one-to-one mapping of source and destination. However if the image is rotated by any other angle (say) 17°, the operations involve real (rather than integer) arithmetic and the location of the target pixel doesn't sit exactly in a pixel location on the integer pixel frame. In the early days of computer graphics, you would put the transformed pixel into the nearest pixel in the target grid. Sometimes two source pixels would land in the same target pixel (the last value entered being the one you'd see), while the adjacent pixel would get nothing and be blank (which might be rendered as black, white, grey or green, depending on the code). If you wanted to rotate the pixel set by 34° and you did 2 consecutive 17° rotations, another set of blank pixels would appear. After a few rotations, the picture would be a mess. Out of this computer graphics coders decided
- When doing multiple transformations; keep track of where you are and do the transformation from the initial orientation, rather than multiple incremental rotations. Thus any image displayed would only have been through one mathematical transformation.
- Rather than calculating the target location from the source location, instead for each target location, find a source location. Normally you'd look at the original pixel and work out where it should go. In graphics you do the inverse; for any target pixel, find the pixel which would produce it. You will still get image degradation; two adjacent pixels in the target will have come from the same source pixel, but rarely will the viewer notice this. This way you won't have any blank (black/white/grey/green) pixels.
We're only going to be doing operations which involve a one-to-one mapping of source and target pixels, so we won't have any of these problems. However since you're doing graphics, we'll code it up the way graphics programmers do it, starting with the target pixel and finding the corresponding source pixel.
Copy array_image_2.py to array_image_3.py. Add code for list invert_top_to_bottom(list pixels), which takes an image[] and returns an image[] flipped top-to-bottom. To do this, inside your function, you're going to have to assign an element (here a pixel) to a new list. Here's two ways of doing it.
-
create an empty list, fill it will anything, assign values to each element in any order.
inverted_pixels = []				#create the (empty, ie zero length) target list
for i in range (0,row_len*col_len):
	inverted_pixels[i]= -1			#fill the list with an invalid pixel value,
						#allowing later checking for pixels
						#that haven't been assigned.
						#list now has row_len*col_len elements

#fill list with pixels (in any order)
pixel_index=5					#pixel location
pixel_value=1					#pixel value
inverted_pixel(pixel_index) = pixel_value	#assign pixel element.
-
create an empty list, fill from start to end of list by appending elements to list
(requires you to fill the output list in order).
inverted_pixels = []				#create the (empty, ie zero length) target list

#fill list with pixel in order, from index=0 to index=last_member
for i in range(0,col_len*row_len):
	inverted_pixel.append(pixel_value)	#append pixel to end of list
						#requires doing operations in the order
						#of the index for the target list.
						#length of list grows by 1 for each append
Either of these two methods can be used for your code. My code will use the first method as it's simpler to be able to add elements in any order.
Now that you've added -1 as the value for an unassigned pixel, modify write_image() to output a char that you'll recognise as an error (e.g. "x") whenever it encounters an uninitialised pixel. Test that it works by running write_image() on the newly generated image containing only unassigned pixels.
Here's how it's done in a language with arrays. Elements can be assigned to the array in any order.
int inverted_pixels[row_len*col_len] #create a list of correct size, #filled with random garbage #(whatever was in the memory #when it was allocated to the array) #fill list with pixels (in any order) pixel_index=5 #pixel location pixel_value=1 #pixel value inverted_pixel(pixel_index) = pixel_value #assign pixel element. |
If a pixel is in row y in the original image, and you're inverting the image top-to-bottom, what row in the output image, will the pixel wind up in?
output_row_number = (col_len -1 -input_row_number) |
How about for columns?
output_col_number = input_col_number |
The columns are the same.
If you were looping over the input rows you'd do this
for input_row in range(0,col_len): #do something with input row for input_column in range(0,row_len): #the arguments for row_col2index() are known, #they're the loop counters input_row and input_column value=input_list[row_col2index([input_row,input_col])] #We don't know the output [row,col] yet output_row = col_len -1 -input_row output_col = input_col output_list[row_col2index([output_row,output_col])] = value |
input_row will loop 0->9 and as a result output_row will loop from 9->0.
However we're doing graphics, so we have to loop over the output rows to make sure we fill them all. How would you rewrite the code if instead you were looping over the output rows [22] ? This may seem a lot of complicated book work, when many people could write this code without functions like row_col2index() and could write the code without explicit formulae for converting the input row to the output row, but no-one will be able to read your code, not even you, in 6 months.
Output the inverted image in main() using write_image(). Here's my invert_top_to_bottom() [23] and here's my output showing the original and the flipped image.
pip# ./array_image_3.py .......... .MMMMMM... ..MM..MM.. ..MM..MM.. ..MMMMM... ..MM...... ..MM...... ..MM...... .MMMM..... .......... .......... .MMMM..... ..MM...... ..MM...... ..MM...... ..MMMMM... ..MM..MM.. ..MM..MM.. .MMMMMM... .......... |
Unless you're writing this sort of code all day, you can't write the compact form in one go. You'll start with the easy to read code, until it works, then you'll rewrite it to the compact form. (You could be nice to the next person and comment out, rather than delete, the easy to read version of the code.)
Let's try another transformation. Copy array_image_3.py to array_image_4.py. Add list invert_left_to_right(list pixels) which flips pixels left to right, and code in main() to show the flipped image. Here's my function [24] and here's my code in main() [25] .
When you multiply numbers, it doesn't matter which order you multiply the numbers, you get the same result.
3*2=2*3=6 |
In mathematical terms, 2 and 3 commute under the operation of multiplication. In conversation you say "multiplication is a commutative operator".
Do the two image inversions invert_top_to_bottom(), invert_left_to_right() commute (i.e. does it matter what order you do them)? (You should be able to get the answer in your head.) Look at the output image after applying both operations in different order. If you wanted the computer to do the test (rather than you looking the two images), how would you get the computer to check whether the outputs were the same? Here's my code [26] .
We conclude that the two inverting operations commute. (We'll see some that don't commute below.)
The two inverting operators each are their own inverse. If you flip top to bottom twice you restore the original image. What number is its own inverse under the operation of multiplication?
let A be self inverse under multiplication let z be any real number z = A*A*z A^2 = 1 A = +/- 1 |
The numbers 1 and -1 are self inverses under multiplication. What number(s) are self inverses under addition [27] ? Operations which are self inverse are relatively uncommon. In our day-to-day world, some light switches are their own inverse: each time you press them, the light changes state (on/off). If you press it twice, the light returns to its original state.
In the Cartesian coordinate system, the direction of +ve rotation is anticlockwise. Thus a vector from the origin (0,0) along the +ve x-axis, if rotated 90° would point along the +ve y-axis. The cartesian system divides the plane into 4 quadrants (see Fig 3 on the wiki page). A square image like ours, with lower left corner=(0,0) and upper right corner=(9,9) sits in the first quadrant. If it were rotated by +90° it would sit in the 2nd quadrant; if rotated by +(or -)180° it would sit in the 3rd quadrant; if rotated by 270° or -90°, it would sit in the 4th quadrant.
There are only 4 different rotations by multiples of 90°: 0,90,180 and 270°. Adding or subtracting 360° does not change the rotation (540°==180°). Any other +ve or -ve rotation can be shifted by multiples of 360° to one of these 4 angles (we're only going to do rotations of multiples of 90°). If we're given a rotation of -270°, how could we change it to what I'm calling normal form [28] ? If we're given a rotation of 540°, how could we reduce it to normal form [29] ? What happens if you modulo a +ve number, a -ve number (try -540° 450°)?
Copy array_image_4.py to array_image_5.py. Add int normalise_angle(int) to change an arbitary angle to normal form and give an error message if it isn't a multiple of 90° Here's my code [30] , here's my test code in main() [31] and here's my output [32] . Normally on an error, you want the program to exit or to return an invalid number. Since valid answers are +ve, on an error, I have the function return -1, which the calling code can detect and handle (we're not going to handle it). Since we aren't handling errors, make sure your code only sends inputs which are multiples of 90°
To array_image_5.py add list rotate(list pixels, int angle). Parse the rotation angle and determine the number of 90° rotations (it will be 0,1,2 or 3). Setup the loop which does these rotations. For the rotation code use the line print. Check that you get the expected number of blank lines output to the screen (how many rotations are you going to do for rotate(0)?).
Now we want the operation that rotates a set of pixels by 90° about the center of the image. We do this in two steps
-
First we'll rotate the pixel (actually the vector from the origin to the pixel) about the origin
(putting the pixel into the 2nd quadrant, where the column indices will all be -ve).
Note "rotating a pixel" means rotating the line joining it to the origin, about the origin; not rotating the pixel about its center. - we translate the pixel horizontally back into the first quadrant (i.e. we translate the center of the pixel).
We rotate the pixel by the following operation
x_new = cos(A)*x_orig - sin(A)*y_orig y_new = sin(A)*x_orig + cos(A)*y_orig |
| Note |
|---|---|
| The angle argument in python (and in calculus and in most math) is in radians, not degrees. For info on python's trig functions and using radians, see trigonometry | |
This formula is normally written as a (see Rotation matrix)
|x_new| |cos(A) -sin(A)| |x_orig| | | = | |*| | |y_new| |sin(A) cos(A) | |y_orig| |
(the "*" is usually omitted.)
If you want to rotate your image by an angle which is not a multiple of 90°, you'd use these functions. For A=90° the formula reduces to
x_new = -y_orig y_new = x_orig |
Confirm that this formula works for points on a circle with center (0,0), radius 1, which lie on the x and y axes (these points are at (1,0), (0,1), (-1,0), (0,-1)).
After rotation, our pixel now is in the 2nd quadrant. Move it back to the 1st quadrant. Here's how you do it [33]
Add code to array_image_5.py to rotate the image by 90°. Test it from main with a 90° rotation (don't write the code to loop multiple times just yet). From main() feed the resulting image back to rotate() to get rotations of 180° etc. When that works add the loop code to rotate() to handle multiple rotations of 90°. Then try rotate() with an argument from main() say of 180°. This is a fairly complicated piece of code. See how far you get without my help. If you're stuck here's how I did it [34] , here's my code [35] , here's my main() [36] and here's my output [37] .
In my implementation of rotate(list), to rotate by 270° I rotate 3 times by 90°. Obviously this is slower than rotating once by -90°. Why is speed not important here, when I'm going to all the trouble, of emulating a 2-D array with a 1-D array, to get a speed advantage?
- If this was final production code and speed was important, you would have 3 different pieces of code for +90°, +180° and +270° rotations.
- I can get the functionality I want with one piece of code and have it running in shorter time from the start of programming.
- You would leave it this way if maintenance was your most important goal. An important design goal is to minimise the number of paths through your code. If the logical flow can go in two directions, depending on the case being analysed, and if you find a bug in one branch, it's possible that the same bug will be in the other branch. It's also likely that when doing maintenance, you'll forget to update the other branch(es), or you mightn't know the other branch exists (it may be in another module). Having only one function to do the rotation means that any updates will occur to all three functionalities at the same time.
- I'm taking advantage of new situations to show different aspects of writing code (i.e. I'm doing it for teaching purposes).
When/if you split the 3 functionalities into 3 pieces of code, it would be best to leave all 3 functionalites in one function, so there's more chance they will all be updated at once. You would have code up the top of the function, which branched according to the argument to rotate().
An exercise for the student: rotate the image by an arbitary angle. Figure out how to convert between radians and degrees (it's elsewhere in the class notes), figure out which location pixel should be used, when the rotation will give a real for [row,col]. You'll be throwing away pixels that don't fit in a circle of diameter=10 pixels.
The two operations, flip left-right and top-bottom, commute. We're so used to real numbers commuting under multiplication and addition, that it's a bit of a surprise, to some of us, to find that most operations do not commute. Real numbers do not commute under subtraction
3 - 2 != 2 - 3 |
The operations of putting on your socks and putting on your shoes do not commute. If you do these operations in the reverse order, you get a different result.
If you want to invert the operation of a pair of non-commuting operators, you have to perform the inversions in the reverse order as well. If the operation of putting on your socks is called SOCK, and the inverse (taking off your socks) is called SOCK^-1, and the operation of putting on your socks and shoes is SHOE*SOCK (you put the socks on first, so it's the rightmost operator; the event would be described as dressed_person=SHOE*SOCK*undressed_person, but we're only interested in the operators, so we leave the person out), then what operation is the inverse of putting on your socks and shoes?
X = (SHOE*SOCK)^-1 X = SOCK^-1*SHOE^-1 |
Let's see whether rotation and inversion commute. Add code to main() of array_image_5.py to test whether a 90° rotation and flipping top_to_bottom commute (output images and have the computer check whether the results are the same). Do this in your head first. Here's my code in main()
#main()
image = fill_image()

image_rotated_90_then_flipped_vertically = invert_top_to_bottom(rotate(image,90))
write_image(image_rotated_90_then_flipped_vertically)
print
image_flipped_vertically_then_rotated_90 = rotate(invert_top_to_bottom(image),90)
write_image(image_flipped_vertically_then_rotated_90)
print

if (image_rotated_90_then_flipped_vertically == image_flipped_vertically_then_rotated_90):
        print "they're the same"
else:
        print "they're different"
|
and here's my output
dennis:/src/da/python_class/class_code# ./array_image_5.py .......... .M......M. .MMMMMMMM. .MMMMMMMM. .M..M...M. .M..M..... .MMMM..... ..MM...... .......... .......... .......... .......... ......MM.. .....MMMM. .....M..M. .M...M..M. .MMMMMMMM. .MMMMMMMM. .M......M. .......... they're different |
Pick one of the pairs of operations and invert it (i.e. restore the image in its original orientation). What is the inverse of rotate(image,90) of invert_top_to_bottom(image) Here's my code in main() [38] and here's my output [39] . If rotate(image,90) is represented by R(90) and invert_top_to_bottom(image) is represented by I, then (I*R(90))^-1 = R(-90)*I. Note that to invert non-commuting operations, you have to apply the inverse operations in reverse order.
Let's look at the mathematical notation for the operation of inverting the original two operations.
first two operations = I*R(90) result of inverting them = R(-90)*I*I*R(90) but I is its own inverse so I*I = 1 then result of inverting them = R(-90)*R(90) but R(-90) and R(90) are inverses then result of inverting them = 1 |
We're back to our original image.
Assume the computer is doing something like a Rubic's Cube. Are there different ways to get to the same result, with one inversion and one rotation i.e. is there another path, not using the same two operations, to get the image which is first rotated by 90° then flipped top-to-bottom? Do it in your head and then confirm your choice with the computer. Here's my result (using the abbreviations T = invert_top_to_bottom(), L = invert_left_to_right()) [40] . Why is this so? In the general case, we can't stack operators on the right hand side, only the left (where we operate on an image).
To prove: T*R(90) = L*R(-90) operate on both sides by L. L*T*R(90) = L*L*R(-90) we know that L*L = 1 and by inspection L*T = R(180) thus R(180)*R(90) = R(-90) R(270) = R(-90) R(270) = R(270) QED |
Say we have (3.14157, 3.14161) as the (lower,upper) bounds for π. To get a value for π we compare the digits one by one, till we get a mismatch giving the result π=3.141. Since strings are arrays, and there are functions to look at each char in a string, the simplest way of matching digits in a number, is to convert the number to a string and then march through the string retrieving each char, and test for a match to the corresponding digit in the other number.
But first we'll look at a few ways of finding matching digits in two numbers giving you practice with arrays.
Let's retrieve each digit as an interger.
Given the number 3.14157, what operator (and operation) would retrieve the digit 3 [41] ? Note: we want the value of the digit in a variable; the code print "%1d" %digit only shows that we're on track. Note: what if (number-remainder) returned 2.99999999? I couldn't find what the python function int() does in this case, but assuming it's like C, then the real will be truncated, giving 2 as the answer. Here's a fix (assumes we're only going to retreive the first digit each time, so any number slightly greater than 1.0 will do).
>>> digit = (number - remainder)*1.001 >>> print digit 3.003 >>> int_digit = int(digit) >>> print int_digit 3 |
Here's another way of doing it.
>>> number=3.15147 >>> int_number=int(number) >>> print int_number 3 >>> digits_in_lower_bounds = [] >>> digits_in_lower_bounds.append(int_number) >>> print digits_in_lower_bounds [3] |
How do we get the next digit? We put this code into a loop. Do we use a while or for loop? Whichever you choose, how do you terminate the loop? Write code, called turning_reals_into_digits.py that does the following.
-
initialises
- number which holds the real (give it some value typical of lower_bounds)
- number_of_digits the number of digits of number to extract (assume a 64 bit real). This is used to terminate the for loop. Could you use a while loop [42] ?
- digits_of_number[] a list to hold the digits in number.
- finds the first digit (stored in int_digit), using the above code and puts the value into digits_of_number[]. Output the contents of digits_of_number[] to the screen.
-
Next subtract int_digit from number
and shift all the digits in number one place to the left,
to give a value of number
from which you'll extract the next int_digit.
Note This shifting has the same problem with representation of reals as does the previous method. Each time you shift in the loop, you'll add rounding errors and errors due to the inability to exactly represent reals on a computer. (and in this case you can't multiply by 1.001.) Your only option to get a reasonable answer is to use a real with a sufficient number of bits to represent the number accurately enough for your purposes. - Put this code into a loop and extract all the digits from number, and output the contents of the list to the screen.
Here's my code [43] and here's the output.
pip:/src/da/python_class/class_code# ./turning_reals_into_digits.py 3.14157 3 1.4157 1 4.157 4 1.57 1 5.7 5 7.00000000002 7 1.95683469428e-10 0 1.95683469428e-09 0 1.95683469428e-08 0 1.95683469428e-07 0 1.95683469428e-06 0 1.95683469428e-05 0 0.000195683469428 0 0.00195683469428 0 0.0195683469428 0 0.195683469428 0 [3, 1, 4, 1, 5, 7, 0, 0, 0, 0, 0, 0, 0, 0, 0, 0] |
The trailing digits are 0's, because I used a truncated value for lower_bounds. The number could have rounded down, in which case the trailing digits would be all 9's.
Here's a better method to find the digits in a number, by turning the number into a string (an array of char). There are no rounding errors caused by multiplication by 10.
Here's a lower bound as a string.
>>> number = 3.14157 >>> str_number = str(number) >>> for c in str_number: ... print c ... 3 . 1 4 1 5 7 |
The function len() returns the length of a string. Use the result of the len() function to setup a loop which walks through a string (in this case the string representation of a number), outputting each char (in this case a decimal digit). Here's my code [44] .
Is there a fencepost problem in the number of times you iterate through the loop? How many times will the loop execute if it uses range(0,len(string_1)): to generate the loop parameter? (i.e. will the loop fall off the end of the string; will the code stop one place too soon?) [45]
| Note |
|---|---|
| some of this material comes from how to obscure a URL (http://www.pc-help.org/obscure.htm). | |
The maximum ibase for bc is 16; the maximum obase is 256. Since we don't have an agreed upon ordered set of 256 symbols, bc outputs base 256 numbers in decimal, separated by spaces.
echo "obase=256; ibase=2; 10000000" | bc 128 echo "obase=256; ibase=2; 11111111" | bc 255 echo "obase=256; ibase=2; 100000000" | bc 001 000 echo "obase=256; ibase=10; 256" | bc 001 000 echo "obase=256; ibase=10; 256*16" | bc 016 000 echo "obase=256; ibase=10; 256*256" | bc 001 000 000 echo "obase=256; ibase=16; 100" | bc 001 000 echo "obase=256; ibase=16; 400" | bc 004 000 echo "obase=256; ibase=16; 1000" | bc 016 000 echo "obase=256; ibase=16; F000" | bc 240 000 echo "obase=256; ibase=16; FFFF" | bc 255 255 echo "obase=256; ibase=16; 10000" | bc 001 000 000 |
Computers linked by a network are identified by a unique unsigned 32 bit number (called an IP). The IP on your machine can be seen in base 256 by running the command ifconfig (unix, cygwin) (or possibly /sbin/ifconfig) or ipconfig (windows). The IP for the machine I use to write these class notes (in base 256 notation) is 192.168.1.3. The notation is called "dotted quad" (4 numbers separated by dots).
dennis:~# ifconfig eth0 Link encap:Ethernet HWaddr 00:A0:CC:56:9B:6A inet addr:192.168.1.3 Bcast:192.168.1.255 Mask:255.255.255.0 UP BROADCAST RUNNING ALLMULTI MULTICAST MTU:1500 Metric:1 RX packets:21532458 errors:1 dropped:0 overruns:0 frame:0 TX packets:15254713 errors:4 dropped:0 overruns:0 carrier:4 collisions:0 txqueuelen:1000 RX bytes:3417783082 (3259.4 Mb) TX bytes:3357752091 (3202.2 Mb) Interrupt:11 Base address:0xdc00 |
The base 256 notation is easier for humans to use than a 32-bit number particularly since on any network the first 3 base 256 numbers don't change (in this example 192.168.1, only the last number is different for each computer). What is the decimal value for this IP (192.168.1.3) [46] ?
The IP for a fixed machine will be assigned by a sysadmin from free addresses on the network. Machines that connect only now and again and at different places (e.g. laptops) are given a temporary IP from a small pool by a machine already on the network (called a dhcp server). In dhcp language, the laptop is "leasing" the IP. Since the dhcp server doesn't know when the laptop will disconnect, the laptop is given the lease for only a short time (5-30mins) and has to renew its lease by the end of the lease period or loose its connection to the network. Users are not and need not be aware of any of this. Users just connect the ethernet cable to their ethernet card, or plug in their wifi card and programs already installed on the laptop handle everything else.
Find the IP on your machine. Then remove your wifi card (on windows you'll have to tell the machine that you're about to pull the card) and see that you loose that IP. Plug the wifi card back in and see that you get an IP back (probably the same one).
The notes for this class are being served by a machine with IP=192.168.2.254. You surf to this IP by using a name rather than a base 256 number (easier for humans). In this case the name is router.masp.net, a name that's only known privately on my network. The translation between names and IP numbers is done by the computer equivalent of a phone book (called DNS). Check that you can get to the class notes at http://router.masp.net/python_class/ and http://192.168.2.254/python_class/
What's the decimal equivalent of the base 256 number 192.168.2.254 [47] ?
Hexadecimal will require twice as many digits as base 256. What's the hexadecimal equivalent of the base 256 number 192.168.2.254 [48] ?
In earlier times, web browsers were quite happy to surf to http://3232236286/, but most don't allow it anymore to stop phishing (IEv5 did it). Still the decimal number is a valid IP. Try ping'ing the IP using some different formats for the IP.
ping router.masp.net PING router.masp.net (192.168.2.254): 56 octets data 64 octets from 192.168.2.254: icmp_seq=0 ttl=64 time=2.1 ms ping 192.168.2.254 PING 192.168.2.254 (192.168.2.254): 56 octets data 64 octets from 192.168.2.254: icmp_seq=0 ttl=64 time=2.2 ms ping 3232236286 PING 3232236286 (192.168.2.254): 56 octets data 64 octets from 192.168.2.254: icmp_seq=0 ttl=64 time=2.4 ms |
Not everything is as you might expect. Here's the IP in hexadecimal
echo "obase=16; ibase=10; 192*256*256*256 + 168*256*256 + 2*256 +254" | bc C0A802FE |
Seeing that the decimal version works, a reasonable person might expect that some of these would work.
ping C0A802FE ping: unknown host C0A802FE ping 0xC0A802FE ping: unknown host 0xC0A802FE ping 0xC0.0xA8.0x02.0xFE ping: unknown host 0xC0.0xA8.0x02.0xFE |
These might have worked some time in the past, but it seems that code writers have trapped any attempts to use addresses that are more than 32 bits. You might think that the numbers beyond 32 bits would overflow and the remainder be used as the real address, but the numbers are all recognised as being invalid.
#ping an address more than 32 bits ping 1.192.168.2.254 ping: unknown host 1.192.168.2.254 #calculate an address that's 1 base 256 digit more than a known IP address #since hex adddresses don't work for ping, you wouldn't expect much success echo "obase=16; ibase=10; 1*256*256*256*256+ 192*256*256*256 + 168*256*256 + 2*256 +254" | bc 1C0A802FE ping 1C0A802FE ping: unknown host 1C0A802FE #try it in decimal; this at least works for a valid IP. echo "obase=10; ibase=10; 1*256*256*256*256+ 192*256*256*256 + 168*256*256 + 2*256 +254" | bc 7527203582 ping 7527203582 ping: unknown host 7527203582 |
Find the IP of your machine, ping that IP (in dotted quad format), then ping the IP in decimal format. Convert the decimal IP back to dotted quad format [49]
| Note |
|---|---|
| We will not be doing real division. Apart from the changes in representation of floating point numbers, the same principles are used in integer and real division. | |
Division on a computer is by long division, the way you'd do it by hand. It's slow (O(n)) and computers have special hardware (math coprocesssor) to speed up the operations.
In both binary and decimal, dividing by 10,100... removes 0's from the right end of the number. This is called right shifting and is a quick operation in computers. If the higher level language (e.g. python) detects that the divisor is a power of 2, it will substitute a right shift for the divide.
1100/10 =110 1100/100 = 11 1100/1000= 1 #note loss of a digit by underflow |
What is 1010/10 [50] ?
Here's long division in decimal. The algorithm (approximately): while there are more numbers in the dividend, loop through
move the divisor along the dividend. Place a 0 in the quotient where the divisor is greater than the dividend.
if the divisor is less, multiply the divisor by increasing single digits to find the biggest multiplier which gives a number smaller than the dividend. Record this number in the quotient.
Subtract this largest number from the dividend to give the new dividend.
      063
   -------
89 ) 5682
     534
     ---
      342
      267
      ---
       75

result 5682/89=63 with 75 remainder
|
Long division in binary is simpler. The divisor is either bigger than the dividend, in which case you place a 0 in the quotient, or is smaller, in which case you place a 1 in the quotient.
You can do subtraction by complement (this is what the computer will do). It's probably faster to do regular substraction. Here's the subtraction table (it may be easier to figure out subtraction in your head.)
   A-B       carry
      B          B
  -| 0 1    -| 0 1
  ------    ------
  0| 0 1    0| 0 1
A 1| 1 0    1| 0 0
|
	010101
    ----------
 101) 01101011
       101
       ---
       0011
       00110
	 101
	 ---
	   111
	   101
	   ---
	    10

01101011<subscript>2</subscript>/101<subscript>2</subscript>=10101<subscript>2</subscript>
with 10<subscript>2</subscript> remainder (decimal 107/5=21 with 2 remainder)
|
what is 100111102/1102 using the complement to do subtraction [51] ?
It's not often that you do a lot of division, but if you do, since division is slow and multiplication is fast, you should combine divisions e.g.
original problem (you're dividing twice) A=B/C D=A/E or D=B/(C*E) instead multiply once and divide once divisor=C*E D=B/divisor |
Say you're dividing a whole lot of numbers by the same number (e.g. you're rescaling a set of numbers) A division might take 64 clocks, while a multiplication might take 4 clocks. Rescaling 100 numbers by division will take 6400 clocks, whereas doing it by a single division followed by 100 multiplications will take (64+4*100=464) clocks, a speed up of 14.
instead of a/x, b/x, c/x.... do X=1/x (one division) then a*X, b*X, c*X... |
Hardware that does a lot of division (supercomputers, graphics cards) will have a hardware reciprocal operation (divides the number into 1). (Graphics cards have lot of code that takes reciprocals of reciprocals.) This uses Newton's method, is mostly multiplies and is quite fast. You won't know that the machine is doing a reciprocal - the compiler will handle that for you. The reciprocal hardware is too expensive to justify adding to regular desktop machines.
There are 3 basic trig functions; sin(), cos() and tan() (see Trigonometric Functions http://en.wikipedia.org/wiki/Cosine). These functions describe the ratios of the sides of a right triangle. Here's a right triangle with an angle of 30° (this would be the side view of a cone with angle of repose of 30°).
	    t .|
	 o .   |
      p .      | opposite (height)
   y .         |
h .  30)       |
 --------------
   adjacent (radius)
|
The definition of these 3 trig functions is based on a right triangle, and is
sin() = opposite/hypoteneuse cos() = adjacent/hypoteneuse tan() = opposite/adjacent |
The tan() is commonly known as the slope (in this case of the hypoteneuse). In a right triangle, once you've chosen two of the sides, the other side is determined (by Pythagorus), so once you know the value for any of these functions for any angle, the value for the other functions is determined.
Probably the best known trig function is the sin() (see the red and green graphs in the section Unit circle definitions http://en.wikipedia.org/wiki/Cosine#Unit-circle_definitions, labelled "sin and cos in the Cartesian plane"), also see Sine wave http://en.wikipedia.org/wiki/Sine_wave). The sine wave describes oscillatory phenomena and the projection of an object moving in a circle, e.g. the position of a pendulum, the pressure in a sound wave, the electric field in an electromagnetic wave (e.g. radio, light), the position of the tip of a propellor.
What is sin() for the triangle below with an angle of 30°, which will have the dimensions as shown 90° [52] ?
	    t .|
length=2 o .   |
      p .      | opposite, length=1
   y .         |
h .  30)       |
 --------------
   adjacent
|
What is the length of the adjacent side [53] ?
Now that you know the lengths of all of the sides of this triangle, what is cos(30), tan(30) [54] ?
By drawing the appropriate triangle, find tan(45) [55] ?
What is sin() for the triangle below as the angle approaches 0°, 90° [56] ?
	    t .|
	 o .   |
      p .      | opposite (height)
   y .         |
h .  angle)    |
 --------------
   adjacent (radius)
|
While sin(),cos() vary continuously, tan() reaches ∞ at 90°.
Any math calculator will have these functions. The argument (i.e. the angle) that the functions take, can be in degrees (the everyday unit) or in radians (the mathematician's unit). You can flip from one measure to the other: a circle has 360° or 2π radians.
Radian measure is convenient for many functions involving trig. The "2π" come about because a circle has a circumference C=2πr. A semi-circle has a circumference of πr. This allows us to define an angle as the ratio of the arc of the circumference divided by the radius. With a circle having 2π radians, then a quadrant of a circle (90°) subtends an angle at the centre of π/2 (pronounced "π on 2").
     .
    |   .
    |     .
    |      .
    |pi/2   .
    --------
|
A mathematician cutting up a pie for desert, will ask the other mathematicians what they want. They'll reply "I'd like π on 2" or if they're not particularly hungry "I'd like π on 3 please". Any non-mathematician at the dinner, not understanding the difference between pie and π might be alarmed at hearing several requests for "π on 2", thinking there will be no pie left.
Python's default unit for angles is radians
igloo:# python Python 2.4.4 (#3, Mar 30 2007, 19:33:13) [GCC 3.4.6] on linux2 Type "help", "copyright", "credits" or "license" for more information. >>> from math import * >>> radians(45) 0.78539816339744828 >>> tan(radians(45)) 0.99999999999999989 |
Using python, find sin(30), cos(60), sin(0), cos(0) [57] .
The discovery, through calculus, of quickly converging series to calculate sin(),cos() and tan(), were a great aid to surveyors, who changed the social structure of Europe by dividing it into owned plots of land. The US president George Washington was a surveyor by trade.
The distance from the earth to the sun is 146Mm. The diameter of the sun is 1.38Mm. What is the apparent diameter of the sun in degrees? Assume the size of the sun is the length of the opposite side, while the distance to the sun is the adjacent side. First find the tan() of the apparent diameter of the sun. Here's what the calculation looks like in python
dennis:/src/da/python_class# python Python 2.4.3 (#1, Apr 22 2006, 01:50:16) [GCC 2.95.3 20010315 (release)] on linux2 Type "help", "copyright", "credits" or "license" for more information. >>> from math import * >>> 1.38/146 0.009452054794520548 #tan() of the angular diameter of the sun >>> atan(1.38/146) 0.0094517733231954185 #the angle (in radians) of the diameter of the sun >>> degrees(atan(1.38/146)) 0.54154672033343809 #the diameter of the sun in degrees >>> 60*degrees(atan(1.38/146)) 32.492803220006287 #the diameter of the sun in minutes diameter of sun=32.49min |
Doing it this way, the triangle isn't quite a right triangle (the angle is 89.75°, which is close enough for what we're doing). If the angle wasn't so small we'd do it this way.
	          .|
	      .    | d
	  .        | i
      .            | a
oo)----------------  m
      .dist to sun |
	  .        | s
	       .   | u
	          .| n
|
The diagram shows a viewer looking at the sun, with the line to the center of the sun and the diameter making a right triangle. You first calculate the radius of the sun (half the diameter) and calculate the angle subtended by half the sun. You double this to get angle subtended by the sun.
>>> 1.38/(146*2) 0.004726027397260274 #tan of half the diameter of the sun >>> atan(1.38/(146*2)) 0.0047259922119301497 #angular size of half of the sun, radians >>> degrees(atan(1.38/(146*2))) 0.27077940775529408 #angular size of half of the sun, degrees >>> 2*degrees(atan(1.38/(146*2))) 0.54155881551058815 #angular size of the whole sun, degrees >>> 60*2*degrees(atan(1.38/(146*2))) 32.493528930635293 #angular size of the sun, minutes diameter of sun=32.49min |
For small angles, the sloppy and the exact result are the same.
A handy reference for locating stars, planets and constellations in the sky, or the distance between mountains or ships on the horizon, is the distance across the knuckles of your hand when your arm is extended. This angular distance doesn't change much as the body grows and changes size. Measure the distance from your shoulder to your knuckles, then the distance across your knuckles. Find the (approximate) angle between your knuckles as viewed by your eye [58] .
I have relatively small hands. The usual figure quoted is 8°. The distance between pairs of knuckles is 2°. How many sun widths can you fit between a pair of knuckles [59] ? You can fit 12-16 sun diameters across your outstretched knuckles.
Example: you're standing on with a clear view of the horizon and see the sun in the west about two hand (i.e. across the knuckles) widths above the horizon. Actually you need to measure the distance along the line of the ecliptic, which being inclined to the vertical, will be a bit longer than the vertical, but lets ignore this detail for this exercise. How long is it till sunset [60] ? It's mid september. What time is it [61] ?
Example: The diameter of the moon is 3474km and its distance from the earth varies from 363,104km (apogee) to 405,696km (perigee) (see Moon http://en.wikipedia.org/wiki/Moon). What is the range of the angular size of the moon (in minutes) [62] ?
The moon varies about 10% in diameter during its orbit about the earth (you won't notice this variation by casual observation). The moon rotates at constant angular velocity about its own axis, but because of the elliptical orbit, the speed at which the moon moves through the sky varies through the month. and the moon appears to oscillate from side to side about its axis, called libration, presenting more than half the moon's surface to viewers on the earth (we can see about 4/7 of the surface of the moon over a month). For an animation of libration see Libration (http://en.wikipedia.org/wiki/Libration) (note the prominent crater Tycho, http://en.wikipedia.org/wiki/Tycho_(crater) in the southern highlands). For view of the moon's differing size in the same orientation, see shots of the moon taken over a period of 2 years Libration: 2 years in 2 seconds (http://pixheaven.net/voir_us.php?taille=grand&mon=0505-0704).
By a fantastic coincidence, the moon is 400 times closer than the sun and is 400 times smaller than the sun. This means that the moon can exactly eclipse the sun. Because of the ellipticity of the moon's orbit, a viewer on the earth's surface can see a total lunar eclipse or an annular lunar eclipse. A total lunar eclipse occurs when the moon covers the face of the sun. An annular lunar eclipse occurs when the moon doesn't quite cover the face of the sun and a ring of the sun is seen around the moon. Because of the angular size of the moon and sun are so close, the sun's annulus only shows between the mountains of the moon, leading to a series of bright points around the moon, known as Baily's Beads (http://en.wikipedia.org/wiki/Baily's_beads). Here's the angular size of the sun and the moon at apogee/perigee
diameter of sun 32.49min diameter of moon at apogee 29.44min diameter of moon at perigee 32.99min |
Is it possible to have a total lunar eclipse, an annual lunar eclipse at apogee, perigee [63] ? Note how at perigee the moon is only just big enough to fully cover the sun's face. Most total eclipses are annular.
You'll be lucky to see a total solar eclipse once in your life. The path is only a couple of 100m wide, so you have to be exactly at the right spot to see Bailey's Beads (offer your assistance to a bunch of astronomers - they'll know where to go). The eclipse I saw was on 30 May 1984. We followed the weather forecast from a wet and cloudy Maryland, phoning a friend at NOAA in Colorado every couple of hours for updates - as to how far south we'd have to go (this is before the internet and before weather.com). We had to go about 2 states further south than we'd expected, to set up our telescopes in a large empty parking lot outside a church under a brilliant clear sky, in Georgia (we'd phoned ahead for permission). We set up a line of about 8 telescopes equipped with TV cameras, at about 10m intervals (to make sure at least one of them saw Bailey's Beads), transverse to the path and let the cameras roll. To synchronise the time (again before the internet), we used radios tuned to the time signal at WWV, and let the TV camera microphone pick up the time signals. The leader of the party set up in the middle of the line, to get the best view of Baily's beads, but his calculations were off by about 10m and the next telescope in the line got the best view.
The next total solar eclipse in NA Solar Eclipse 21 Aug 2017 (http://eclipse.gsfc.nasa.gov/SEanimate/SEanimate2001/SE2017Aug21T.GIF). passes right over our heads here in NC. It will be a long eclipse (by eclipse standards) - 2min:43sec (the peak for this eclipse is 2:45 just a bit west of us). All your friends will be coming to see it. People you'd forgot were your friends will be arriving to see you. Don't miss it! (Let's hope it's a clear day.)
Let's find a few angles in the Pyramid of Khufu. Here's an ascii art diagram of the pyramid from above (the plan view http://en.wikipedia.org/wiki/Plan_view) and from the side (the elevation view http://en.wikipedia.org/wiki/Elevation_(view)) looking up one of the edges of the pyramid.
b a ----------- x | . .| /|\ ^ | . . | / | \ | | x |l=h*pi/2 / | \ h | . . | / | \ | |. .| / A) | \ v ----------- ----------- a b a b a |
"A" is the angle between an edge and the base. We know that the (total length of the sides/height)=2π. This gives the length of each side. What is angle that each edge makes with the base (labelled "A" in the right hand diagram)? Hint - first determine tan(A). More hints [64] Here's the answer [65] .
The limestone casing stones were moved to the face of the pyramid as rectangular blocks, and the cut and polished in place. The builders used a jig to determine the angle of the face. Here's how it would have been done The Tura stone quarries (http://www.cheops-pyramide.ch/khufu-pyramid/stone-quarries.html#tura)
Now let's calculate the angle between the faces and the base. Once the angle between the edge and the base is determined, is angle between the base and the face fixed? (Can you make different pyramids all with the same angle between the edge and the base [66] ? Can you prove this [67] ?)
Here's the diagram of the pyramid again, this time with the elevation view rotated by 45°. "A" is the angle between a face and the base.
----------- x | . .| / \ ^ | . . | / \ | | x |l=h*pi/2 / \ h | . . | / \ | |. .| / A) \ v ----------- ----------- a b a b |
As well as the length of the side and the height of the pyramid, we now also know the length of the diagonal across the base. How do we determine tan(A) (Hint: [68] )? Here's the diagram with the hint added [69] . Here's a much too complicated way of finding the length of the adjacent side (this was my first method, only read this if you have lots of time) [70] , but here's a much simpler way of doing it [71] . Here's the answer [72] .
The Egyptians didn't measure the slope (the tan() of the angle that the surface makes), but the inverse of the slope (which in English is sometimes called the inclination, a term that has many meanings, one of which is the angle of departure from the vertical). Instead of measuring the rise in height with a fixed distance (the slope), Egyptians measured the distance required to raise the height by a fixed amount. This is the same as the slope of a rod which is normal to the face. This the Egyptians called the seked (pronounced seqt; see Ancient Egytpian units of measurement http://en.wikipedia.org/wiki/Ancient_Egyptian_weights_and_measures).
| Note |
|---|---|
| Also called the "seqt". See Thales (http://en.wikipedia.org/wiki/Thales) where Thales measures the height of the pyramids by measuring the length of the shadow at a time when his shadow was the same as his height. In this URL see a worked problem on the slope of the sides of a pyramid. | |
In current terminology the seked is cot()=1/tan()=tan(co-angle=90°-angle). A seked of 5 (a horizontal distance of 5 palms, per cubit of rise) is 54.46°, 5&1/4 seked (5 palms and 1 digit) is 53.13°, and 5&1/2 seked (5 palms and 2 digits) is 51.84°. It would seem that the face of the Great Pyramid has a seked of 5&1/2.
Ralph Greenberg explains in Pi and the Great Pyramid (http://www.math.washington.edu/~greenber/PiPyr.html) that just by good luck π≅22/7 and that a choice of inclination of 5&1/2 seked gives a slope of 28/22. Greenberg says that the origin of dividing cubits into 7 intervals is lost in the past, at least back to 150yrs earlier than the Great Pyramid to the era of Imhotep (http://en.wikipedia.org/wiki/Imhotep) who is considered to be the first engineer known by name.
Here we see that the ratio of 22/7 to π is out by 0.04%, the same error as the ratio (distance around the base)/height.
dennis:# echo "(22/7)/(4*a(1))" | bc -l #(22/7)/pi 1.00040249943477068197 |
It's a little disappointing to find that with the precision of the other measurements of the Great Pyramid, that the Egyptians were using 22/7 for their calculations and not π.
What is the relationship between the angle base-to-edge and the angle base-to-face? Assume that the length of one side of the base is l rather than h*π/2. Find the formulae for the two angles. Here's my answer [73] .
If tan(edge-to-base)=x, then tan(face-to-base)=x*sqrt(2) (the sqrt(2) is the ratio of the length of the hypoteneuse to the sides in a 45° right triangle). Since the two angles are different, for what angle(s) are they most different? With a flat pyramid, both angles will be nearly the same. With a very high pyramid, both angles will also be nearly the same. We can guess that the two angles will have the greatest difference somewhere in between (say with the angles about 45°). I decided to find this out for fun; It's not designed to illuminate any computing or trigonometric principle. Here's a graph with edge-to-base angle on the x-axis and face-to-base on the y-axis (code is here [74] ).
Figure 1. graph of the angles in a pyramid: red line x-axis: angle edge to base. y-axis: angle face-to-base. grey line - reference line where both angles are equal.
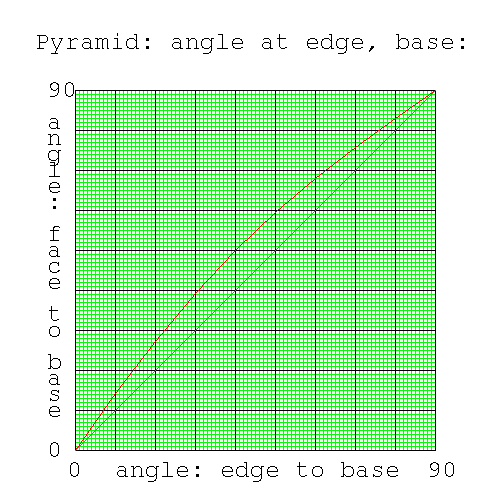 |
The maximum difference can be found in a couple of equivalent ways
- The greatest height difference between the red and grey line. This occurs (approx) with (x,y)=(40°40°) and (x,y)=(40°,50°), the difference being 10°.
- The greatest horizontal difference between the red and grey line. This occurs (approx) with (x,y)=(40°50°) and (x,y)=(50°,50°), the difference again being 10° (we would hope that the difference is the same no matter which direction you measure it in).
- Measure the greatest distance between the two lines, in the direction normal to the grey line, which has slope=1. This occurs between (x,y)=(45°,45°) on the grey line and (x,y)=(50°,50°) on the red line. This gives the maximum difference occuring for base-to-face angle=50°.
The ratio of the tan() should be sqrt(2).
pip:~# python Python 2.4.4 (#2, Mar 30 2007, 16:26:42) [GCC 3.4.6] on linux2 Type "help", "copyright", "credits" or "license" for more information. >>> sqrt(2) 1.4142135623730951 #what we want >>> tan(radians(40)) 0.83909963117727993 >>> tan(radians(50)) 1.19175359259421 >>> tan(radians(50))/tan(radians(40)) 1.4202766254612063 #not quite correct . #several trials . >>> tan(radians(49.94))/tan(radians(40.06)) 1.4142495433444027 #close enough |
It would seem that the maximum difference occurs somewhere close to (x,y)=(40.06°,49.94°)
Its dimensions of the Transamerica Pyramid (from http://ecow.engr.wisc.edu/cgi-bin/get/cee/340/bank/11studentpro/transamericabuilding-2.doc) are 174'*174'*853'. The bottom 5 stories have vertical walls; presumably the pyramid starts at the 6th floor. Let's assume it's a pyramid. What is the angle edge-to-base, and face-to-base [75] ?
If you flip a coin many times, it will be heads half the time and tails half the time. The probability (==chance) of heads for any flip is 0.5 (pH=0.5), while the probability of tails for any flip is 0.5 (pT=0.5).
| Note |
|---|---|
| pH+pT=1.0, i.e. you've accounted for all possible outcomes. | |
If you flip two separate coins (or equivalently the same coin twice), and observe the outcomes you'll find the following.
Table 2. Two coin toss, results for 2nd toss
| Result for 1st coin | Result for 2nd coin |
|---|---|
| heads | pH=0.5, pT=0.5 |
| tails | pH=0.5, pT=0.5 |
This result should be so obvious that you wonder why it's mentioned. The results demonstrate the outcomes of independant events (here coin tosses). The fact that the results of each coin toss are independant, allows us to construct this table.
Table 3. Outcomes from two coin toss
| Result for 1st coin | Result for 2nd coin | Result for 2nd coin | Result for 2nd coin |
|---|---|---|---|
| heads | pH=0.5, pT=0.5 | pH=0.5, pT=0.5 | pH=0.5, pT=0.5 |
| tails | pH=0.5, pT=0.5 | pH=0.5, pT=0.5 | pH=0.5, pT=0.5 |
http://developers.slashdot.org/developers/08/03/30/1155216.shtml
If you want speed do C or assembler.
If you want OO do Eiffel or Smalltalk
If you want a job do C# or Java
Don't do C++.
| Note |
|---|---|
| This is semi-humourous and a reflection of the knowledge of those that hire people. Every programmer should know C++. | |
The style of programming you're learning here is called procedural programming and was the dominant style of programming till the 1980-90s, when object oriented programming (OOP) became commonplace. Once everyone agreed that OOP was really great stuff, people started to teach introductory programming using OOP. In the absence of any real information, this was probably a reasonable thing to try. The problem was that it didn't work - students learned nothing and the programming world figured out that you need to be able to walk before you run. Now it is generally accepted that computer programmers need a strong basis in procedural programming before attempting OOP.
As to whether OOP has taken over from procedural programming: it seems unlikely - both have their niches
OOP is slow: there's a lot computer bookkeeping involved in keeping track of an object.
The kernel (the piece of code that runs a computer) has to be fast. Kernel's are written in procedural languages, the best known of which is C. Computer Scientists and regular scientists are interested in speed and write in C (or Fortran). A scientist modelling the weather doesn't have a large number of objects, they only have numbers (describing the temperature, humidity, windspeed and air pressure). They don't need objects, but they do need speed. Computer Scientists looking to do new things in a kernel on the same computer, must have speed. They write in procedural languages.
Procedural programming can't keep track of a large number of different types of objects. If you want to simulate a large system (a Navy down to the nut and bolt), then you'll have to use OOP.
Business is interested in a large range of different objects (not neccessarily the large array of products, all of which can be handled by entries in a database, but concepts related to running a business). The predominant business programming language is the object oriented language Java. Sun, the main vendor for Java has successfully targetted business as the main user of Java and all managers have accepted that Java is the greatest language ever. Java has good features for business: it's accountable and auditable, it's correct and there are a large number of libraries to do exactly what businesses want. It's the 1990's replacement for COBOL. Noone in business cares that code written in Java is slow - you just buy a bigger computer. Businesses do care that the output is provably correct. Java is not well regarded by computer programmers - it doesn't do anything they can't already do with other languages and it's mainly loved by people who can't program. These people, incredibly, wind up in charge of programmers. All the object oriented features of Java are hidden from the programmer, so that it looks like a procedural language. As one programmer said to me "Java is for morons". However since the people hiring you don't know anything about computing, you can't get a computer job without knowing Java, and you should definitely learn Java. Once you've started work, you'll use another language to get anything done. However don't learn Java as your first OOP language: learn a language like C++, where all the OOP is exposed (you can learn Java later in your spare time).
Unfortunately the graphics languages available are poor. Due to the X window version of the Unix Wars (http://en.wikipedia.org/wiki/Unix_wars), the X graphics language was deliberately hobbled by computer manufacturers. All manufacturers used the basic code from MIT, but instead of extending it together, all produced incompatible extensions, to lock in customers. As a result no new code was added to X for about 20 years, till the opensource/GPL movement took over development, leaving the big computer manufacturers in the dust. Another technically good graphics language NeWS (http://en.wikipedia.org/wiki/NeWS) was produced by Sun, but unfortunately was not a success in the market place, for many reasons, one of which was the lack of libraries to support NeWS and another was widespread dominance of the not particularly functional X. Today it's not clear where X is going and X is not dominant as a graphics developement environment. On unix systems, X is used as a lower layer to implement other graphics languages such as OpenGL or Java. In the windows world, the graphics languages are Direct X or Java. Sun learned from the failure of NeWS when it produced Java, which has thousands of libraries to do almost anything you can imagine and more are released by the day. It turns out that if you want to write cross platform graphics, you have to program in Java: this isn't easy - don't expect to enjoy it.
Python is both interpreted (rather than compiled) and is object oriented. Being object oriented, everything in python is an object, even the primitive data types. So an integer is represented as an object, which inside has a piece of data (an integer) than must stored as a primitive data type. The extra bookkeeping slows python down. The reason for everything in python being an object is for uniformity of commmands: both objects and what would in any other language be a basic data type, can be acted on by functions designed to work on objects. I'm not sure whether this gets you anything, but some people think having everything an object is just the bee's knees.
As a test of the usefullness of using only objects in python, you might ponder how differently you would view the world if I'd told you from the start, that in python, an integer wasn't really a primitive data type, but an integer object which has inside it a integer primitive data type.
If you're a student and have not worked in the working world, you will probably have the idea that people in charge (e.g.parents, teachers, adults in general) know what they're doing. In general this is true: your main interaction with adults is learning from them, the adult knows something about the material being taught, at least more than you do, and the adult has a vested interest in you learning the material being taught. Everyone is accountable: the student will be examined, or be tested in a game (if it's a sport) and will be expected to get better and better. The teacher will be assessed for how well the students do. Just as it should be.
In the working world, the situation the same: someone (a manager) is in charge of you, you are accountable to the manager for doing something, and the manager has to be able to tell that you've done what was required. You will be assessed for your work, and the manager will be assessed for the work of his team. Your work will be expected to get better and better as you learn more. Looks the same right? This is intentional: it's supposed to look the same and you're supposed to play as if the rules haven't changed.
Although there are work places where this happens, what's usually going on is
- the manager is shipped in from HQ (or "Managers-R-Us") and hasn't a clue about the technical aspects of the project, doesn't care and knows he will be promoted to some other project before the effects of his incompetence are manifest.
- the manager doesn't want to take any risks. He's retiring in 15yrs and doesn't want anything to go wrong on his watch and the only way to do that is to make sure nothing happens at all. This is quite easy, since the manager's managers are doing the same thing.
- The manager doesn't want you to take over his job. In the soccer situation, no matter how good the kid becomes, his skill isn't a threat to the adult. In the work situation, the managed person may be better at the manager's job than the manager. If the manager's job requires no skills, then you can't take over his job. If there are technical aspects to his job, then he'll be sure that you don't get any better.
- If you were seen to be good, he would have to give you more pay
- The manager is not interested in the success of his section: he's more interested in his stock options, and getting promoted.
I've worked for a couple of good managers. What a good manager does
- battles the bureaucracy to make sure you have whatever you need to get your work done uninterrupted
- leaves you alone so you can do your work
- is happy to see you whenever you come into his office
- regards problems as a normal part of work (after all, if it was easy, then everyone would have already done it by now) and is prepared to dive in and fix whatever he can. If it's a problem you're having that you're supposed to handle, he's glad to be kept informed, and has confidence that you'll figure it out some way or other.
Did I say that your manager has to know what you're doing? No. The best I've had is someone straightening me out when I was stuck and setting me on the right path, but other than that, I've always known more about what I was doing than the manager. This is how is should be: you should be the best person for your job, not your manager. One would like a manager that knows enough about your work, that he can't be snowed by anyone on the material. However one guy I worked for seemed to have spent his college years playing billiards and drinking. He was very good with people, and he never pretended to know anything about what I was doing. But he could tell if I'd done what I said I'd done and he rewarded me for it.
Do you think that the management of GM and Ford know what they're doing? They still haven't realised what was obvious to the rest of the world 35yrs ago. In the early 1970's everyone realised that the price of oil was going through the roof. The Japanese built small, fuel efficient, high quality, reliable cars and 35yrs later is outselling the Detroit car manufacturers.
Education is not valued in USA. How many people know the difference between a Shiite and a Sunni, between socialised health and socialised health insurance? Most people in USA think that the best way to show the world the strength of democracy is to revoke the rights of democracy for its citizens.
Not only do your managers have no clue about what you're doing, your customers don't have a clue what they're buying.
If your customer is a consumer, they've accepted that what they want is something that makes loud noises and has flashing lights. If you buy a piece of computer equipment, it's almost impossible to find its specifications: the advertisements will only tell instead how much happier you'll be.
If your customer is a member of congress/senate (funding for govt projects), then they only want to be re-elected. Look what the government did with the Hubble Telescope (never worked properly) and the Shuttle/Space Station (burns money and kills astronauts). Do you think that the people who vote for money for an interplanetary probe have any idea what it does or whether you can deliver it? They only want to be re-elected.
In the work place as it is in most places, you have to get money for your work. You might think that you've brought your skills with you and that the business knows how to turn your work into money, which will be used to pay you. They don't and if accidently they do make money from your work, it's unlikely that you'll see much of the money. No matter where you go you have to
- fight to get a job
- fight to get money for your work you do in your job
Part of this is selling yourself. You can't spend your life working for a manager whose job it is to know nothing. Even if your direct manager is a good one, they'll be working for someone who isn't and your manager will move on (or be fired).
Sitzfleisch is German for "sitting meat". It translates approximately to "stick-with-it ness" or endurance, and is an important enough concept to Germans to require its own word. In almost any endeavour, including learning to code, or sitting down to write the code, some of which will be difficult, boring or just plain hard work, you'll need sitzfleisch. In books and movies, it's simplest for the author to tell the story as if the hero receives a flash of inspiration, thus saving the day. It's difficult to make an exciting story about the sitzfleisch needed to implement it.
The Manhattan Project (http://en.wikipedia.org/wiki/Manhattan_Project), which built the first A-bombs, was staffed by the most brilliant physicists available. There were plenty of flashes of enlightenment, but each one was followed by years of sitzfleisch to get the idea to work. The scientific leader of the project, Robert Oppenheimer (http://en.wikipedia.org/wiki/Robert_Oppenheimer) was one of the most brilliant, but he never received a Nobel Prize for his work. The explanation I read when I was younger was that the work Oppenheimer did which should have earned him a Nobel Prize (his work on black holes) was not confirmed for 30-40yrs, by which time politics had moved Oppenheimer out of the forefront of physics. The lesson to be learned is that to get a Nobel Prize, you should only be 10yrs ahead of your peers, and not 40yrs. Oppenheimer was too far ahead of his time. (Einstein's Nobel Prize was given not for Relativity, but for the comparitively pedestrian photo-electric effect. Everyone realised that Einstein deserved a Nobel Prize, but no-one understood Relativity enough to be sure that it was right.) However the book "American Prometheus" (Kai Bird and Martin J. Sherwin, Pub Knopf 2005, ISBN 0-375-41202-6) suggests that the problem was Oppenheimer's lack of sitzfleisch. His life was filled with brilliant flashes, which he left to others to puzzle out. Oppenheimer rarely tackled the long and difficult calculations himself.
While on a long time scale (months), you do need sitzfleisch, in the short time scale (hours) you also need to stop when you aren't getting anywhere, because keeping going will likely get you to the wrong place. I find when I'm working on a piece of code and it's not doing what I want, and I'm thinking of fantastic schemes to get it to work, that the best thing is to go for a walk for an hour (I'm a physiokinetic learner, your method for taking a break may be different). I usually see the problem within 10mins (and I get 50mins of exercise afterwards for free) and I see that I was completely off track and I was digging myself deeper into a hole. Taking a break when you aren't getting anywhere seems to apply more to coding than any other activity I've ever been involved with.
Other people's thoughts about sitzfleisch: playing poker (http://www.twoplustwo.com/reber1.html) where the author (Arthur S Reber) points out that winning doesn't come from the big hand, but by being 1% ahead of your opponents for hours at a time and not ever flubbing a play (where you'll go down the tubes); cycling (http://www.windsofchange.net/archives/theyre_hurting_too.php); in chess, there's the concept of the long think (http://zhurnaly.com/cgi-bin/wiki/LongThink).
[1]
0..9
If you had this answer, you would be wrong.[3]
>>> list=[]
>>> list.append(1)
>>> list.append(5)
>>> list.append(9)
>>> list.append("a")
>>> len(list)
4
>>> list
[1, 5, 9, 'a']
>>> list.pop()
'a'
>>> list
[1, 5, 9]
>>>
|
[4]
>>> list_of_lists=[] >>> list=[] >>> list_of_lists.append(list) >>> len(list_of_lists) 1 >>> list_of_lists [[]] >>> list_of_lists.append(list) >>> list=[1,2] >>> list_of_lists.append(list) >>> list=[3,4] >>> list_of_lists.append(list) >>> len(list_of_lists) 4 >>> list_of_lists [[], [], [1, 2], [3, 4]] >>> for item in list_of_lists: ... print item ... [] [] [1, 2] [3, 4] >>> for item in list_of_lists: ... for entry in item: ... print entry ... 1 2 3 4 |
[5]
In computers, indices start at 0, i.e. the 0th (initial) element of my_name is 'S'. The first element is the char 'i'. Talking about the first element, when the starting index is 0, can be confusing (the initial element, the first element, the second element...). It's better to say "array element (or member) 1".
[6]
>>> temperature = [15,16,15,15,18,17,20,20,21,24,25,25,25,26,25,28,30,29,28,25,22,18,17,27] >>> temperature[5] *= 2 >>> print temperature[5] 34 |
[7]
#! /usr/bin/python # temperature_array.py # # (C) Greg Fischel 2009, released under GPL def array_average(my_array): #initialise variables result = 0 length_array = len(my_array) for i in range (0,length_array -1): result += my_array[i] result /= length_array #is this an int or real? Is it the average? return (result) # array_average()----------------------- def array_min(my_array): #initialise variables result = my_array[0] length_array = len(my_array) for i in range (1,length_array -1): result = min(result, my_array[i]) return (result) # array_min()--------------------------- def array_max(my_array): #initialise variables result = my_array[0] length_array = len(my_array) for i in range (1,length_array -1): result = max(result, my_array[i]) return (result) # array_max()--------------------------- def array_range(my_array): result = array_max(my_array) - array_min(my_array) return (result) # array_range()--------------------------- #main() temperature = [15,16,15,15,18,17,20,20,21,24,25,25,25,26,25,28,30,29,28,25,22,18,17,27] print "average:", array_average(temperature) print "min :", array_min(temperature) print "max :", array_max(temperature) print "range :", array_range(temperature) # temperature_array.py------------------------- |
[8]
>>> my_name = "Simpson, Homer" >>> for i in range(0,len(my_name)): ... print my_name[len(my_name) -1 -i] ... r e m o H , n o s p m i S >>> |
[9]
>>> my_name = "Simpson, Homer" >>> for i in range(0,len(my_name)): ... if (my_name[i] == "s"): ... print my_name[i].upper() ... else: ... print my_name[i] ... S i m p S o n , H o m e r >>> |
[10]
You'd have a list of lists. You could cut up the photo row or column-wise. As an example, here's a small image whose pixels can only have value 0,1
0 0 0 0 0 0 0 0 0 0 0 1 1 1 1 1 1 0 0 0 0 0 1 1 0 0 1 1 0 0 0 0 1 1 0 0 1 1 0 0 0 0 1 1 1 1 1 0 0 0 0 0 1 1 0 0 0 0 0 0 0 0 1 1 0 0 0 0 0 0 0 0 1 1 0 0 0 0 0 0 0 1 1 1 1 0 0 0 0 0 0 0 0 0 0 0 0 0 0 0 |
Here are the row-wise lists, followed by the image list
row9 = [0,0,0,0,0,0,0,0,0,0] row8 = [0,1,1,1,1,1,1,0,0,0] row7 = [0,0,1,1,0,0,1,1,0,0] row6 = [0,0,1,1,0,0,1,1,0,0] row5 = [0,0,1,1,1,1,1,0,0,0] row4 = [0,0,1,1,0,0,0,0,0,0] row3 = [0,0,1,1,0,0,0,0,0,0] row2 = [0,0,1,1,0,0,0,0,0,0] row1 = [0,1,1,1,1,0,0,0,0,0] row0 = [0,0,0,0,0,0,0,0,0,0] image = [row0,row1,row2,row3,row4,row5,row6,row7,row8,row9] |
[11]
Because range() is weird. The 2nd parameter needs to be one value further beyond the end of the loop. The function which generates loop parameters in all other languages has the last value here.
[12]
As a check that I've got the right number of pixels (10*10, rather than 10*9) and no missing pixels (there's isn't a pixel with value -1 in the original data). When I'm happy with my code, I can output a blank.
[13]
for col in range(0, row_len): |
[14]
rows = [row0,row1,row2,row3,row4,row5,row6,row7,row8,row9] for row in rows: |
[15]
#! /usr/bin/python # array_image_2.py # (C) Piet Mondrian 2009, released under GPL v3 # # initialise global variables row_len = 10 col_len = 10 row9 = [0,0,0,0,0,0,0,0,0,0] row8 = [0,1,1,1,1,1,1,0,0,0] row7 = [0,0,1,1,0,0,1,1,0,0] row6 = [0,0,1,1,0,0,1,1,0,0] row5 = [0,0,1,1,1,1,1,0,0,0] row4 = [0,0,1,1,0,0,0,0,0,0] row3 = [0,0,1,1,0,0,0,0,0,0] row2 = [0,0,1,1,0,0,0,0,0,0] row1 = [0,1,1,1,1,0,0,0,0,0] row0 = [0,0,0,0,0,0,0,0,0,0] image = [] # a 1-D array #------------------------------- def fill_image(): #takes a list of rows #extracts each element from the rows #puts each element into elements[] rows = [row0,row1,row2,row3,row4,row5,row6,row7,row8,row9] elements = [] # a 1-D array for row in rows: for col in range (0, row_len): #less compact, but easier to read # # element = row[col] # print element # elements.append(element) # #more compact, but harder to read #if you write in the easier to read style, #you can always rewrite it like this. #(but too much compactness leads to train wreck code). # elements.append(row[col]) return (elements) # fill_image()--------------------------------- def write_image(pixels): for row in range (col_len-1,-1,-1): #have to assemble whole line before printing #otherwise python puts an unrequested <cr> after each char line = "" #from left to right for col in range (0,row_len): if (pixels[row * row_len + col] == 1): line += "M" else: line += "." print line # write_image()-------------------------------- #main() image = fill_image() write_image(image) # array_image_2.py ------------------------------- |
[16]
def row_col2index(my_row,my_col): #an array(col_len,row_len) is stored as a 1-D list #with (row,col)=(0,0) having index 0 #(row,col)=(0,9) having index 9 #(row,col)=(9,9) having index 99 #(note that x is the column, y is the row) #returns the index for an element at pixels(col, row) result = my_row * row_len + my_col return (result) # row_col2index()------------- |
[17]
#------------------------------- def test_row_col2index(my_row,my_col,my_result): print "test_row_col2index" if (row_col2index(my_row,my_col) == my_result): print "OK" else: print "expected = %d , found = %d" %(my_result, row_col2index(my_row,my_col)) #------------------------------- def array_image_test(): print "array_image_test" row = 0 col = 0 result = 0 test_row_col2index(row,col,result) row = 0 col = 9 result = 9 test_row_col2index(row,col,result) row = 1 col = 0 result = 10 test_row_col2index(row,col,result) row = 9 col = 9 result = 99 test_row_col2index(row,col,result) row = 9 col = 9 result = 95 print "should fail" test_row_col2index(row,col,result) # array_image_test()------------ |
[18]
You return a list of two items. The function then is list index2row_col(index).
[19]
row_col2index() has to take a single list as its parameter. The declaration then is int row_col2index([row, column]) rather than int row_col2index(row, column).
[20]
def test_row_col2index(my_elements,my_result):

	print "test_row_col2index"

	if (row_col2index(my_elements) == my_result):
		print "OK"
	else:
		print "expected = %d , found = %d" %(my_result, row_col2index(my_elements))

# test_row_col2index()----------

def test_index2row_col(my_index,my_result):

	print "test_index2row_col"

	if (index2row_col(my_index) == my_result):
		print "OK"
	else:
		#could find how to format output of a list
		#print "expected = %l , found = %l" %(my_result, index2row_col(my_index))
		print "expected = ", my_result, " found = ", index2row_col(my_index)

# test_index2row_col()----------

def array_image_test():

	print "array_image_test"

	row = 0
	col = 0
	points = [row,col]
	result = 0
	test_row_col2index(points,result)

	row = 0
	col = 9
	points = [row,col]
	result = 9
	test_row_col2index(points,result)

	row = 1
	col = 0
	points = [row,col]
	result = 10
	test_row_col2index(points,result)

	row = 9
	col = 9
	points = [row,col]
	result = 99
	test_row_col2index(points,result)

	row = 9
	col = 9
	points = [row,col]
	result = 95
	print "should fail"
	test_row_col2index(points,result)

	index = 0
	result = [0,0]
	test_index2row_col(index,result)

	index = 9
	result = [0,9]
	test_index2row_col(index,result)

	index = 10
	result = [1, 0]
	test_index2row_col(index,result)

	index = 99
	result = [9,9]
	test_index2row_col(index,result)

	index = 95
	result = [9,9]
	print "should fail"
	test_index2row_col(index,result)

        #show two functions are inverses
        index = 99
        points = [9,9]
        if (index == row_col2index(index2row_col(index))):
                print "inverse OK"

        if (points == index2row_col(row_col2index(points))):
                print "inverse OK"

# array_image_test()------------

def row_col2index(element_list):

	#an array(col_len,row_len) is stored as a 1-D list
	#with (row,col)=(0,0) having index 0
	#(row,col)=(0,9) having index 9
	#(row,col)=(9,9) having index 99
	#(note that x is the column, y is the row)
	#returns the index for an element at pixels(col, row)
	my_row = element_list[0]
	my_col = element_list[1]

	result = my_row * row_len + my_col

	return (result)

# row_col2index()-------------

def index2row_col(my_index):

	#an array(col_len,row_len) is stored as a 1-D list
	#with (row,col)=(0,0) having index 0
	#(row,col)=(0,9) having index 9
	#(row,col)=(9,9) having index 99
	#(note that x is the column, y is the row)
	#returns the row,col for an element at index
	#python can only return 1 value.
	#you have to return two numbers. What do you return?

	result = [my_index/row_len, my_index%row_len] #note integer arithmetic for row

	return (result)

# index2row_col(my_index)---------

#main()

array_image_test()

# -------------------------------
|
[21]
- if (pixels[row * row_len + col] == 1): + if (pixels[row_col2index([row,col])] == 1): |
[22]
Here's our formula from above.
output_row_number = (col_len -1 -input_row_number) |
Rearranging we get
input_row_number = (col_len -1 -output_row_number) |
We now loop over the output rows, finding the input row
for out_row in range(0,col_len): #do something with output row for output_column in range(0,row_len): #we don't have the input [row,col] yet #so we can't fetch the input pixel. #calculate the input [row,col] which maps to this output pixel #using the output [row,col] provided by the loop parameters input_row = col_len -1 -output_row input_col = output_col #get the pixel value from the corresponding input pixel value=input_list[row_col2index([input_row,input_col])] #we know the output [row,col] from the loop parameters output_list[row_col2index([output_row,output_col])] = value |
output_row will loop 0->9 and as a result input_row will loop from 9->0.
[23]
def invert_top_to_bottom(pixels):

        #input row y becomes output row (col_len -1 -y)
        #ie row 9 becomes row 0
        #row 8 becomes row 1
        #col is unchanged
        #This being graphics, we loop over the output pixels.
        #We need the input [row,col] for any output [row,col]
        #input_row = row_len -1 -output_row
        #input_col = output_col

        #initialise output array
        inverted_pixels = []
        for i in range(0,row_len*col_len):
                inverted_pixels.append(-1)

        for output_row in range (0, col_len):
                for output_col in range(0,row_len):
			#calculate the input [row,col] which maps to this output pixel
                        input_row = row_len -1 -output_row
                        input_col = output_col

			#get the pixel value from the corresponding input pixel
                        #easy to read
                        #input_index = row_col2index([input_row,input_col])
                        #pixel = pixels[input_index]
                        #more compact; you should be able to read this
                        pixel = pixels[row_col2index([input_row,input_col])]
                        #find index of output pixel
                        #output_index = row_col2index([output_row,output_col])
                        #insert pixel there
                        #inverted_pixels[output_index] = pixel
                        #more compact; you should be able to read this
                        inverted_pixels[row_col2index([output_row,output_col])] = pixel

                        #compact form, you should be able to read this
                        #inverted_pixels[row_col2index([output_row,output_col])] = pixels[row_col2index([input_row,input_col])]

        return (inverted_pixels)

# invert_top_to_bottom()-----------------------
|
[24]
def invert_left_to_right(pixels):

        #This being graphics, we loop over the output pixels.
        #We need the input [row,col] for any output [row,col]

        #pixels are only moved within a row, so the row value does not change
        #output_row = input_row
        #rearranging
        #input_row = output_row

        #column 9->0 becomes column 0->9
        #a pixel at input_col = x, is moved to output_col = row_len -1 -x
        #output_col=row_len -1 -input_col
        #rearranging
        #input_col = row_len -1 -output_col

        #initialise output array
        inverted_pixels = []
        for i in range(0,row_len*col_len):
                inverted_pixels.append(-1)

        for output_col in range (0, row_len):
                for output_row in range(0,col_len):
                        #calculate the input [row,col] which maps to this output pixel
                        input_row = output_row
                        input_col = col_len -1 -output_col

                        #Here we copy the pixel from the source pixel to the output pixel
                        #This is the same code as for invert_top_to_bottom()
                        inverted_pixels[row_col2index([output_row,output_col])] = pixels[row_col2index([input
_row,input_col])]

        return (inverted_pixels)

# invert_left_to_right()-----------------------
|
[25]
#main() image = fill_image() write_image(image) print write_image(invert_left_to_right(image)) |
[26]
if (invert_top_to_bottom(invert_left_to_right(image)) == invert_left_to_right(invert_top_to_bottom(image))):
        print "they're the same"
else:
        print "they're different"
|
[27]
z = A + A + z 2A = 0 A = 0 # also -0 |
We agree to call -0 and +0 the same number, so there's only one result.
[28]
You add 360° to the angle, till it becomes +ve.
[29]
You subtract 360° from the angle, till it becomes <360° or you do this angle%360.
[30]
def normalise_angle(angle):

        #returns an angle 0<=angle<360
        #if angle not a multiple of 90deg, displays an error message

        angle = angle%360
        if (angle%90 == 0):
                return (angle)
        else:
                print "angle %d is not a multiple of 90deg ", angle
                return -1

# normalise_angle()---------------------------
|
[31]
print normalise_angle (90) print normalise_angle (-540) print normalise_angle (1) |
[32]
pip:# ./array_image_5.py 90 180 angle %d is not a multiple of 90deg 1 -1 |
[33]
x_new = -y_orig + (row_len -1) y_new = x_orig |
When written using row,col this becomes
output_col = -input_row + (row_len -1) output_row = input_col |
[34]
- In the other transformations, you're copying the input image to an output image without changing the input image. Here you're looping multiple times. You're going to have to copy the output image back to an image which can be re-processed by the loop. If you use the name of the original image as the target of the copy, you will change the original image sent from main(). While this is not a problem, it's best not to change original data unless the specs call for it. The code so far has alway generated a new image and left the original image unchanged. In a graphics situation you don't want the original image messed with, in case you want to go back and start over. In this case, before you start the loop in rotate(), make a copy of the image and mess with that.
- You'll need an output image array. You'll have to initialise this array each time you go through the loop. Do you need to initialise it before or after you rotate the pixels?
- After the first rotation, if you're going back for another rotation, you'll have to reinitialise your array that holds the input image, and copy into it the result of the just completed rotate().
[35]
def rotate(pixels, angle): #pixels is the row_len*col_len image #angle is a multiple of 90deg #return the rotated image image_before_rotation = [] #initialise array for input image for i in range(0,row_len*col_len): image_before_rotation.append(-1) image_before_rotation = pixels #mess with a copy of the original image angle = normalise_angle(angle) number_rotations = angle/90 #note integer arithmetic for i in range (0,number_rotations): image_after_rotation = [] #initialise output image for i in range(0,row_len*col_len): image_after_rotation.append(-1) #iterate through output pixels for output_col in range (0, row_len): for output_row in range(0, col_len): #calculate the input [row,col] which maps to this output pixel input_row = (row_len) -1 - output_col input_col = output_row #Here we copy the pixel from the source pixel to the output pixel #This is the same code as for invert_top_to_bottom() image_after_rotation[row_col2index([output_row,output_col])] = image_before_r otation[row_col2index([input_row,input_col])] image_before_rotation = [] #initialise output image for i in range(0,row_len*col_len): image_before_rotation.append(-1) image_before_rotation = image_after_rotation return (image_before_rotation) # rotate()------------------------------------ |
[36]
image = fill_image() write_image(image) print write_image(rotate(image, 0)) print write_image(rotate(image, 90)) print write_image(rotate(image, 180)) print write_image(rotate(image, 270)) print |
[37]
.......... .MMMMMM... ..MM..MM.. ..MM..MM.. ..MMMMM... ..MM...... ..MM...... ..MM...... .MMMM..... .......... main .......... .MMMMMM... ..MM..MM.. ..MM..MM.. ..MMMMM... ..MM...... ..MM...... ..MM...... .MMMM..... .......... .......... .......... ..MM...... .MMMM..... .M..M..... .M..M...M. .MMMMMMMM. .MMMMMMMM. .M......M. .......... .......... .....MMMM. ......MM.. ......MM.. ......MM.. ...MMMMM.. ..MM..MM.. ..MM..MM.. ...MMMMMM. .......... .......... .M......M. .MMMMMMMM. .MMMMMMMM. .M...M..M. .....M..M. .....MMMM. ......MM.. .......... .......... |
[38]
image = fill_image()
write_image(image)
print

image_rotated_90_then_flipped_vertically = invert_top_to_bottom(rotate(image,90))
#inverting the operation of rotating 90deg, then inverting top to bottom
image_restored = rotate(invert_top_to_bottom(image_rotated_90_then_flipped_vertically),-90)
write_image(image_restored)
print

if (image == image_restored):
        print "they're the same"
else:
        print "they're different"
|
[39]
dennis:# ./array_image_5.py .......... .MMMMMM... ..MM..MM.. ..MM..MM.. ..MMMMM... ..MM...... ..MM...... ..MM...... .MMMM..... .......... .......... .MMMMMM... ..MM..MM.. ..MM..MM.. ..MMMMM... ..MM...... ..MM...... ..MM...... .MMMM..... .......... they're the same |
[40]
T*R(90) = L*R(-90) |
[41]
Use the % operator.
>>> number=3.15147 >>> remainder=number%1 >>> print remainder 0.15147 >>> digit = number - remainder >>> print digit 3.0 >>> print "%1d" %digit 3 >>> print int(digit) 3 >>> int_digit = int(digit) >>> print int_digit 3 >>> digits_in_lower_bounds = [] >>> digits_in_lower_bounds.append(int_digit) >>> print digits_in_lower_bounds [3] |
[42]
This code only looks at one number. If you changed the code to look at both numbers, you could compare the two numbers and exit when there's no match.
[43]
#! /usr/bin/python # turning_reals_into_digits.py # converts a real to a list of digits # (C) Homer Simpson 2009, released under GPL v3 #initialise variables number = 3.14157 #in this case lower bounds digits_of_number = []; #list to hold digits number_of_digits = 16; #assume 64 bit real for i in range(0,number_of_digits): print number; int_number=int(number); print int_number; digits_of_number.append(int_number); number -= int_number; #prepare for next iteration of loop number *= 10; print digits_of_number; # turning_reals_into_digits.py----------------------------- |
[44]
>>> string_1 = "3.14157" >>> for i in range(0,len(string_1)): ... print i, string_1[i] ... 0 3 1 . 2 1 3 4 4 1 5 5 6 7 >>> |
[45]
No. Sometimes you don't have the fencepost problem, but you should check for it everytime you go through the members of a list.
[46] root@routera:/scratch# echo "obase=10; ibase=10; 192*256*256*256 + 168*256*256 + 1*256 +3" | bc 3232235779
[47]
echo "obase=10; ibase=10; 192*256*256*256 + 168*256*256 + 2*256 +254" | bc 3232236286 |
[48]
echo "obase=16; ibase=10; 192*256*256*256 + 168*256*256 + 2*256 +254" | bc C0A802FE |
[49] If your IP is 10.1.2.7
echo "obase=10; ibase=10; 10*256*256*256 + 1*256*256 + 2*256 +7" | bc 167838215 ping 10.1.2.7 ping 167838215 echo "obase=256; ibase=10; 167838215" | bc 010 001 002 007 |
[50] 101
[51]
      011010
   ---------
110)10011110
     010 complement of divisor
     ---
      111
      010 complement of divisor
      ---
      0011
      00111
	010 complement of divisor
	---
	0010

10011110/110=110 with 10 remainder

158/6=26 with 2 remainder
|
[52]
sin(30)=0.5,
[53]
By pythagorus; adjacent^2+opposite^2=hypoteneuse^2 adjacent^2=2^2-1^2 adjacent = sqrt(3) = 1.7321 |
[55]
	t .|
      o .  |
    p .    | opposite
  y .      |
h .  45)   |
 -----------
   adjacent
|
If the angle is 45°, then the other angle is also 45°. The opposite and adjacent are the same length, giving tan(45)=1.0.
[56]
sin(0)=0.0, sin(90)=1.0
[57]
. . >>> sin(radians(30)) 0.49999999999999994 >>> cos(radians(60)) 0.50000000000000011 >>> sin(radians(0)) 0.0 >>> cos(radians(0)) 1.0 |
[58]
distance to knuckles = 65cm distance across knuckles = 7cm #measured from the peak of the 2nd digit to the peak of the 5th digit angle = atan(7/65) >>> degrees(atan(7.0/65)) 6.14662565964667 |
[59]
About 4
[60]
The earth rotates about it's axis 360° in 24hrs, or 15°/hr. Your hands show that the sun is about 12° above the horizon. It's just a little less than an hour before sunset.
[61]
The solstices, when the amount of day and night are equal (12hrs each), are in March and September. At the solstices, the sun rises and sets at 6am, 6pm. The time then is about 5pm.
[62]
Python 2.4.4 (#2, Mar 30 2007, 16:26:42) [GCC 3.4.6] on linux2 Type "help", "copyright", "credits" or "license" for more information. >>> from math import * #needed for trig functions >>> 3474.0/363104 #sin of moon's diameter at perigee 0.009567506829999118 >>> atan(3474.0/363104) 0.0095672149184776508 #moon's diameter at perigee in radians >>> degrees(atan(3474.0/363104)) 0.54816103652336734 #moon's diameter at perigee in degrees >>> degrees(atan(3474.0/363104))*60 32.889662191402039 #moon's diameter at perigee in minutes >>> 3474.0/405696 0.0085630619971604361 #sin of moon's diameter at apogee >>> atan(3474.0/405696) 0.0085628527079190126 #moon's diameter at apogee in radians >>> degrees(atan(3474.0/405696)) 0.49061532075592762 #moon's diameter at apogee in degrees >>> degrees(atan(3474.0/405696))*60 29.436919245355657 #moon's diameter at apogee in minutes Apogee 29.44min Perigee 32.89min |
[63]
Table 1. Total/Annular Lunar Eclipse at apogee/perigee
| moon's position | eclipse |
|---|---|
| apogee | annular |
| perigee | total |
[64]
The base of the diagram on the right corresponds to what unknown dimension in the diagram on the left? You can determine the unknown dimension from Pythagorus.
[65]
The length of the diagonal on the base (by pythagorus)
diagonal=sqrt(2)*side =sqrt(2)*h*pi/2 =sqrt(0.5)*h*pi half_diagonal =sqrt(0.5)*h*pi/2 |
This allows us to calculate tan(A)
tan(A)=h/half_diagonal
      =h/(sqrt(0.5)*h*pi/2)
      =1/(sqrt(0.5)*pi/2)
      =2*sqrt(2)/pi


pip:# python
from math import *
Python 2.4.4 (#2, Mar 30 2007, 16:26:42)
[GCC 3.4.6] on linux2
Type "help", "copyright", "credits" or "license" for more information.
>>> from math import *
>>> 2*sqrt(2)/pi
0.90031631615710617
>>> atan(2*sqrt(2)/pi)
0.73298983460979572
>>> degrees(atan(2*sqrt(2)/pi))
41.997223949133534	#the angle the edge of the Great Pyramid makes with its base
|
[66]
Yes. There is only one pyramid possible.
[67]
Informal proof: If the angle between the edge and the base is fixed, then the height at the peak of the pyramid is determined. This fixes the triangle that makes the face of the pyramid.
[68]
You will have to draw in the right triangle that includes the angle "A". You know the length of the opposite side. What is the length of the adjacent side?
[69]
Right triangle added to elevation diagram. What is the length of the adjacent side?
----------- x | . .| /|\ ^ | . . | / | \ | | x |l=h*pi/2 / | \ h | . . | / | \ | |. .| / A) | \ v ----------- ----------- a b a b |
[70]
| .
|   .
|    x
|  . | .
|.   |   .
-----------
a         b

length half diagonal = sqrt(0.5)*h*pi/2
all angles are 90 or 45 deg
height a-b to x is same as half a-b

by Pythagorus
2*(height a-b to x)^2 = (sqrt(0.5)*h*pi/2)^2
height a-b to x = sqrt(0.5)*h*pi/(2*sqrt(2))
height a-b to x = h*pi/4
|
[71]
The adjacent side is half the length of the side of the pyramid, i.e. adjacent=h*pi/4.
[72]
tan(A)=h/(h*pi/4)
      =4/pi
.
.
>>> degrees(atan(4/pi))
51.853974012777449	#angle between face and base
|
[73]
angle edge-to-base:
diagonal=sqrt(2)*side
	=sqrt(2)*l
half_diagonal
	=sqrt(2)*l/2
	=sqrt(0.5)*l

tan(edge-to-base)=h/half_diagonal
      =h/(sqrt(0.5)*l)
      =sqrt(2)*h/l

angle face-to-base:
tan(face-to-base)=h/(l/2)
	      =2*h/l

tan(face-to-base)/tan(edge-to-base) = sqrt(2)
|
[74]
#! /usr/bin/python
#
# graph_pyramid_angles.py
#
# Imhotep (C) 2008, imhotep (at) Saqqara (dot) net. Released under GPL v3
# generates graph of angles at edge of pyramid, against angle of face.
# uses PIL library.

#from math import sqrt
from math import *
import os, sys
from PIL import Image, ImageDraw, ImageFont, ImageOps

#fix coordinate system
#
#origin of diagram is at top left
#there appears to be no translate function ;-\
#strings are right (not center) justified
#axes origin is at 50,450 (bottom left)
#x_origin=50
#y_origin=450
x_origin=75
y_origin=450
#unit=400	#400 pixels = 1 in cartesian coords, suitable for box dimension 1x1
unit=4		#4 pixels = 100 in cartesian coords, suitable for box dimension 100x100

#change coordinate system.
#cartesian to pil coords
def x2pil(x):
	result=x_origin +x*unit
	return result

def y2pil(y):
	result=y_origin -y*unit
	return result

def draw_axes():
	#axes
	axes_origin=(x2pil(xmin), y2pil(ymin))

	x_axes=(axes_origin,x2pil(xmax),y2pil(ymin))
	draw.line(x_axes,fill="black")
	y_axes=(axes_origin,x2pil(ymin),y2pil(ymax))
	draw.line(y_axes,fill="black")

	#axes: numerical label
	#x_axes
	color="#000000"
	x_axes_label_position_0=(x2pil(xmin-2), y2pil(ymin-2))
	draw.text(x_axes_label_position_0, str(xmin), font=label_font, fill=color)
	x_axes_label_position_1=(x2pil(xmax-2), y2pil(ymin-2))
	draw.text(x_axes_label_position_1, str(xmax), font=label_font, fill=color)

	#y_axes
	y_ayes_label_position_0=(x2pil(xmin-7), y2pil(ymin+3))
	draw.text(y_ayes_label_position_0, str(ymin), font=label_font, fill=color)
	y_ayes_label_position_1=(x2pil(xmin-7), y2pil(ymax+3))
	draw.text(y_ayes_label_position_1, str(ymax), font=label_font, fill=color)

def label_graph():
	color="#000000"
	#graph label
	label_position=(x2pil(xmin-10), y2pil(ymax+15))
	label="Pyramid: angle at edge, base:"
	draw.text(label_position, label, font=label_font, fill=color)

	#x_axes label
	label_position=(x2pil(xmin+10), y2pil(ymin-2))
	label="angle: edge to base"
	draw.text(label_position, label, font=label_font, fill=color)

	#rotated text
	#from http://mail.python.org/pipermail/image-sig/2008-August/005145.html
	#x=-10
	#y=ymax+5
	x=-7
	y=ymax-5
	for c in "angle: face to base":
		draw.text ((x2pil(x),y2pil(y)), c, font=label_font, fill=color)
		#y -= 5
		y -= 4


def draw_fine_grid():
	#draw fine grid, spacing = 1 degree
	start=xmin
	end=xmax
	step=1	#in user units
	color="#00ff00"
	for x in xrange(start,end+1,step):
		h = ymax
		#vertical line
		line=(x2pil(x),y2pil(ymin),x2pil(x),y2pil(ymax))
		draw.line(line,fill=color)
		#horizontal line
		line=(x2pil(xmin),y2pil(x),x2pil(xmax),y2pil(x))
		draw.line(line,fill=color)

def draw_coarse_grid():
	#draw coarse grid, spacing = 10deg
	start=xmin
	end=xmax
	step=10	#user units
	color="#000000"
	for x in xrange(start,end+1,step):
		h = ymax
		#vertical line
		line=(x2pil(x),y2pil(ymin),x2pil(x),y2pil(ymax))
		draw.line(line,fill=color)
		#horizontal line
		line=(x2pil(xmin),y2pil(x),x2pil(xmax),y2pil(x))
		draw.line(line,fill=color)

def draw_line():
	step=10	#in user units
	#color="#0000FF"
	color="#FF0000"
	for x in xrange(xmin,xmax,step):
		#need atan(sqrt(2)*tan(x)
		y0 = degrees(atan(sqrt(2)*tan(radians(x))))
		y1 = degrees(atan(sqrt(2)*tan(radians(x+step))))
		line=(x2pil(x),y2pil(y0),x2pil(x+step),y2pil(y1))
		draw.line(line,fill=color)
	#draw reference line
	line=(x2pil(xmin),y2pil(ymin),x2pil(xmax),y2pil(ymax))
	draw.line(line,fill="#777777")
#---------------------
size=(500,500)
mode="RGBA"
xmin=0
ymin=0
xmax=90
ymax=90

#fonts
#print sys.path
label_font = ImageFont.load("/usr/lib/python2.4/site-packages/PIL/courR18.pil")
#label_font = ImageFont.load("PIL/courR18.pil")

im=Image.new (mode,size,"white")
draw=ImageDraw.Draw(im)

draw_axes()

label_graph()

draw_fine_grid()

draw_coarse_grid()

draw_line()

im.show()
im.save("graph_pyramid_angles.png")

# graph_pyramid_angles---------------------------
|
[75]
pyramid formulae

edge-to-base:
tan(edge-to-base)=h/half_diagonal
      =h/(sqrt(0.5)*l)
      =sqrt(2)*h/l

angle face-to-base:
tan(face-to-base)=h/(l/2)
	=2*h/l

Calculations for the Transamerica Pyramid:

edge-to-base:

pip:/src/da/python_class# python
Python 2.4.4 (#2, Mar 30 2007, 16:26:42)
[GCC 3.4.6] on linux2
Type "help", "copyright", "credits" or "license" for more information.
>>> from math import *
>>> sqrt(2)*853/174	#tan(edge-to-base)
6.9328975212887949
>>> atan(sqrt(2)*853/174)
1.4275444962018089	#angle edge-to-base in radians
>>> degrees(atan(sqrt(2)*853/174))
81.792274699493021	#angle edge-to-base in degrees

face-to-base:
>>> 2*853/174  		#substituting value of 2 for sqrt(2) in edge-to-base formula)
9
.
.
>>> degrees(atan(2*853/174))
83.659808254090095	#angle face-to-base in degrees
>>>
|