Copyright © 2004 Joseph Mack
v1.0, Aug 2004, released under GPL
Abstract
The PENR-525U2F case is an external case with both USB and firewire ports. It is designed to take an internal 5.25" EIDE CDROM drive. It has an internal power supply for 120/240V. This article shows the mechanical modifications required to install a regular EIDE harddrive in the case to give a portable harddisk with both USB and firewire ports.
Initial testing showed problems with file corruption which may be due to the PENR hardware. I suggest caution on using this device until the real cause can be determined.
Table of Contents
- 1. Introduction
- 2. Modifying the PENR-525U2F case
- 3. Fitting it all together
- 4. Putting it to use
- 4.1. Reliability
- 4.2. mounting/umounting, fsck
- 4.3. Partitioning the disk
- 4.4. Speed
- 4.5. Recognising the external disk
- 4.6. pciutils, PCI Ids
- 4.7. usbtools
- 4.8. Rescanning the scsi bus
- 4.9. USB port
- 4.10. Firewire Port
I needed a device for multi-GB file transfers, with maximal flexibility (currently this means both USB and firewire), with people who did not have root access on the target machines. It needed to work on my laptop machines, at home and work, and for other people without a set of instructions. A friend has tried an external USB external disks, which worked fine, worked, but some people had firewire (but not USB). The external USB disks were about twice the price of the disk inside, which seemed expensive for just a port and a case. I assumed a commercial solution with both a USB and firewire port (if I could find one) would be even more expensive. As well, the cases were sealed and when the disk died (which they always do), you couldn't just pop open the case and replace the disk.
The case I found by chance while looking on the internet for something else. It had an internal dual voltage (120/240V) power supply (no wall-wart to tangle in and burn out some other box with) and both a USB and a firewire port. It was designed for a 5.25" EIDE CDROM and it seemed reasonable to put a 3.5" hard disk into the slot with an adapter tray. The top and bottom of the case fitted together with 6 sets of latch jaws: slots in the bottom of the case would allow me to pry open the jaws when I needed to replace the disk.
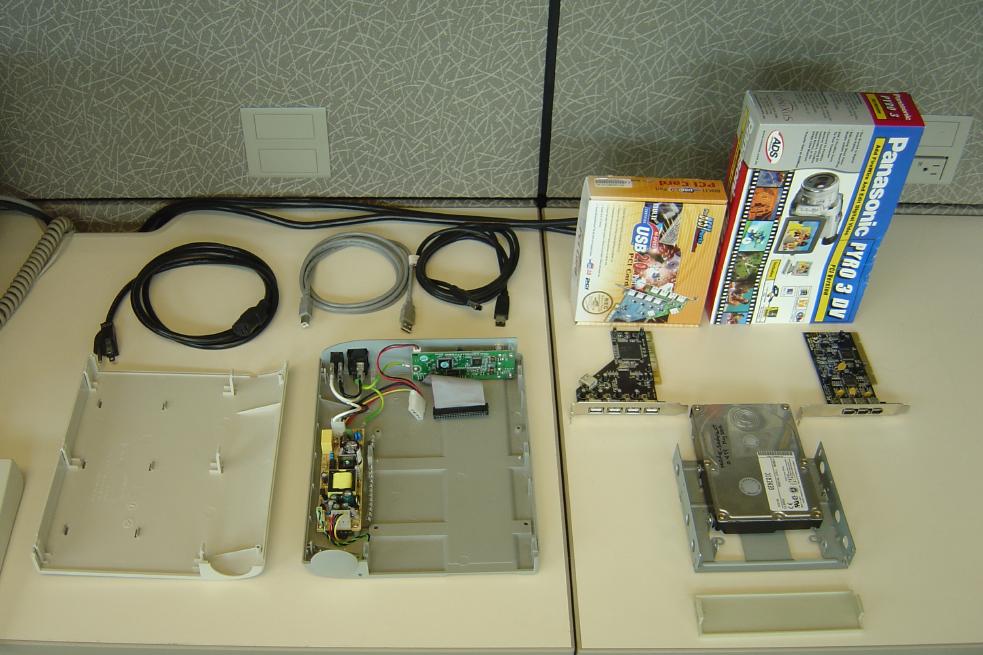
Left hand side: PENR-525U2F opened up
- back row power cord, usb cable, firewire cable
- front row
unit lid with underside facing up.

Note 3 half latches on left hand edge and 3 half latches about 3/4 across, for joining lid to bottom. These mate with identical half latches on the bottom unit (which are hard to see in this photo). unit bottom, with power suppply on left, power plug and switch on back left, usb/firewire port PC board back centre and right, EIDE cable and 12V/5V connector in back centre.
Note the EIDE cable is soldered into the PC board; you cannot replace it with a longer cable. The bottom has two pins which locate the adapter tray (the pins must be standard for CDROMs and they fitted the adapter tray I bought).
The bottom has four recessed holes for screws to hold the drive down. Surprisingly only 2 screws are supplied for 4 holes (the screws are metric, 3mm thread, 0.5mm pitch). The recessed holes are too narrow for standard disk drive screws.
You can locate the drive tray with the two pins (backward/forward) and two screws (up/down).
The case appears to have been designed for a specific 5.25" CDROM drive, rather than as a generalised case for holding an EIDE drive. I can only imagine why this case is available at all; maybe the contract to join the case and CDROM drive fell through and the cases are being dumped on the market. After initial testing, where the drive doesn't work well, it seems possible that the hardware just isn't good enough for use at all. If the case was a generalised external case for EIDE drives then the EIDE cable would join into a standard male connector on the PC board and the power supply would support two drives (which can easily fit into the case).
Right hand side: user supplied parts
back (and the very back) row PCI cards and boxes (left USB, right firewire). These are standard commodity cards that work with Linux, packaged for many suppliers (i.e. you don't need to look for the same cardboard box, instead look for cards with Linux compatible chipsets).
If you're starting from scratch and you need to buy usb/firewire cards, it might be useful to buy ones with internal ports. The external ports face the back of the PC, where many of the advantages of hotplugging are negated by trying to plug cables with two possible orientations into difficult to reach and poorly illuminated sockets with no insertion guides. It's possible to extend the internal ports through cables into the front panel of the PC in an empty half-height tray and hotplug through the front of the PC.
The USB card (4 external ports, 1 internal port) is about US$25. Here's my rc.usb file.
myhost# lspci
00:14.2 USB Controller: NEC Corporation USB 2.0 (rev 04)
The firewire card has 3 external ports and cost me about US$12 (a while ago). Here's my rc.firewire file.
myhost# lspci | grep 1394
FireWire (IEEE 1394): Texas Instruments TSB12LV26 IEEE-1394 Controller (Link)
The firewire host adapters at Pricewatch, (Aug 2004) are listed by chipset, rather than the manufacturer (usually generic). Most seem to be using the VIA chipset (I didn't see any with the TI chipset). A list of Linux compatible firewire host adapters is at Linux 1394 (http://www/linux1394.org/) - (see the hardware compatibility list). The cards there are listed by manufacturer, rather than chipset, (i.e. the reverse direction to the listing in Pricewatch), so you have to click on each entry to find the chipset.
middle row EIDE disk (a retired disk, or a new one) and adapter tray. I used a current technology EIDE, a Samsung 120GByte SP1203N.
The bottom of the external case doesn't have recessed holes to fit a standard 3.5" EIDE drive. You have to use an adapter tray to fit a 3.5" drive to the holes for a 5.25" drive.
The adapter tray here is a metal adapter tray designed for a floppy disk. I bought it because it had predrilled holes which fitted the pins on the bottom half of the PENR-535U2F case. As it turns out (see below) I used the adapter tray facing in the reverse direction (as shown here).
front row faceplate.
I had a spare faceplate from a tower case. You can leave the front of the case open if you like. With no face plate (i.e. the front open) and there being no fan, the disk gets quite warm.
The EIDE cable is short.
if the EIDE disk has the EIDE connector in the middle of the back, i.e. between the power connector and the sense jumpers
then
the EIDE cable can reach to the EIDE disk and you can fit the EIDE disk into the adapter tray in the normal way i.e. as if it were holding a floppy disk drive.
elif the EIDE disk has the EIDE connector on one side i.e. with the sense jumpers in the middle
then
The EIDE cable won't reach to the connector on the EIDE disk.
My solution was to reverse the adapter (the front of the adapter tray is now facing the rear of the drive case). This requires some surgery on the adapter
- drill holes in the adapter tray to fit the pins in the case.
- drill holes in the adapter tray to allow screws to hold the tray down. I used longer 3mm-x-0.5mm screws with nyloc (aero) nuts. These fit tightly into the recessed holes (the head can't rotate). The screw head is inside the drive case; the nyloc nuts are on the outside of the case.
I bought the metal tray expecting that it would fit into the case in the normal direction i.e. with no modifications required. In this case the pins on the drive case would fit into the adapter tray, and the threaded holes on the adapter tray would line up with the recessed holes on the adapter tray, allowing you to use the 2 supplied screws.
As it turns out I had to drill the adapter tray and make up a new arrangement to screw down the adapter tray. Drilling of metal produces swarf (metal shavings); it's difficult to keep all the swarf out of the electronics and you risk frying your drive. If I was doing it again, I'd chose a plastic adapter. The plastic one I had available didn't have any holes in it - I didn't buy it, thinking I'd have to drill it.
With the adapter tray facing backwards, the fittings on the front of the tray, which take the flanges on faceplate, are now facing backwards. It's not simple to fit the faceplate into the external case. I didn't bother and left the front open. Presumably you could cut the flanges off the faceplate and glue it into the external case.
When I first looked at the plastic case of the external drive, I thought, after pushing the latching jaws together, it would be simple to pop them open again when I wanted to replace the drive. With the adapter tray (or a 5.25" CDROM drive) in the case, the latching jaws fit tightly against the support trays and you can no longer get a screw driver in from the bottom to pop the case open again. I didn't realise this change till after I'd pushed the two halves of the case together. Presumably I'll be able to get in front the front opening (where the faceplate would sit) and pry the latch jaws apart with a long enough screwdriver, but I won't be surprised if I have to do something irreversible to get the two halves apart.
One solution would be to file down the right angle of the jaws till the two halves can just be pulled apart. I'm not going to pull mine apart till I need to; presumably other people trying to assemble the two halves will get better ideas.
If you know how to get USB and firewire disks to work, then read no further.
Accessing the external disk through either the usb or the firewire port hasn't been as reliable as directly connecting through the EIDE bus. My first tests, just sitting the drive in the open case connected to the IDE connector seemed encouraging and I went ahead with the mechanical modifications to use it permanently. However multi-GB copies or mounting/umounting result in corruption of the filesystem.
I've had multi-GB tar-to-untar copies to the disk end with errors of not being able to create files. On inspection, the filesystem is (ro) and requires an extensive fsck (which includes deleting the ext3 journal as a first step). You need to run fsck -C -p -y, unless you want to hold down the 'y' key for the better part of a day (and you get a progress report so you don't loose heart on the way). You wind up with a lot of stuff in lost+found. A subsequent 60GB cp -u -r finished without errors.
I've had the same corruption as a result of just mounting (rw -noatime) and umounting a clean partition with 60GB of files, in a loop and running fsck after 23 mounts (can reliably repeat this). The fsck (v1.32) requires deletion of the ext3 journal and then loops through the disk fixing 1000's of errors, for several days, without ever exiting. After a ^C, the file system is not recognised by mount.
I get the same result if I mount/umount in a loop with a newly formatted empty filesystem. If I did mount (ro)/umount in a loop the filesystem is clean to fsck but won't mount (back superblock etc) anymore. Rerunning fsck fixes the ext3 journal superblock and allows mounting of the disk. Since the first problem found with fsck is in the ext journal, I repeated the loop with mount -t ext2/umount and still got an extensively corrupt filesystem.
I then included a fsck step before each mount in the loop. With each iteration fsck found a clean filesystem and then on the 22nd loop fsck did a forced run, finding a bad magic number in the superblock and exited. A manual fsck showed a highly corrupt filesystem again.
Long disk operations (e.g. fsck or mke2fs -cc -v -j both of which can take several days), often hang the host machine. Presumably the usb/firewire kernel drivers should be able to handle any problems with the external disk, but they don't.
smarctl v5.26 (from smartmontools) fails with "Terminate command early due to bad response to IEC mode page". This failure normally happens when you query a RAID disk device (where the individual disks are not addressable). I tried v5.32, which is supposed to fix this problem, but got the same result. I don't know yet whether smartmontools fails for hotpluggable disks or this indicates a problem with the PENR hardware.
I've not had the same problems with an external usb zip disk, but then a 100MB copy to a slow zip disk in not as difficult test as a multi-GB copy to a faster EIDE disk. I've also had no problems with a 120GB external Western Digital USB v2.0 disk.
The problems occur, for all methods I have of accessing the external disk, through a USB v1.0 laptop, through a USB v2.0 PCI card, or through a Firewire PCI card. I assume that the problem is with the PENR hardware.
A clean fsck on a laptop with a USB v1.0 bus, takes about 2hrs for a 120Gbyte disk. You should find a mount method that minimises the amount of fsck'ing of your external disk.
For my initial attempts to use the disk as backup storage (for my edit/compile cycles), I automounted the disk, with a short timeout, in case I forgot to umount the external disk at the end of the session, (which would later force a fsck). It didn't take too long before the external disk had been mounted 23 times and took a forced fsck on the next mount, putting my work on hold for the rest of the evening.
Zip disks are partitioned with the whole file system in the 4th partition. Since machines are often setup so that users can mount a zip disk (with an entry in /etc/fstab), I partitioned the disk the same way. (You can partition the disk on an EIDE bus, before putting it into the external case if you like.)
I don't have accurate estimates for this, but watching a mke2fs -cc -v -j, it seems about 4 times slower than connecting directly to the EIDE bus.
The harddisk spins up when recognised by the host usb||firewire hotplug system. On removing the usb||firewire drivers, the harddisk spins down. When the disk is recognised, you will see messages (in the logfiles or in the output of dmesg) indicating a new scsi drive (e.g. /dev/sda). You will be able to fdisk /dev/sda and see the partitions, and fsck /dev/sda4.
The PCI adapter cards are indentified on the PCI bus by numerical IDs. Translation into manufacturer name and card type/function requires pciutils and the text file pci.ids.
pci.ids is at Linux PCI ID Repository (http://pciids.sf.net/).
The pciutils are at The PCI Utilities (http://atrey.karlin.mff.cuni.cz/~mj/pciutils.shtml).
The two adapter cards I use (Aug 2004) have been around for a while and are in pci.ids. If you get a message on loading the drivers, correctly identifying the chip set, but saying that the card type is unknown, then you need to update your pci.ids (and possibly your pciutils).
| Note |
|---|---|
| pciutils has its own scheme for installing files, which is different to the earlier versions and may not be what you want (e.g. executables are in /usr/local and pci.ids is in left field). | |
 | Warning |
|---|---|
| Installation of pciutils will overwrite a newer pci.ids with its own version giving you the wrong version of pci.ids. Here's my pciutils Makefile which fixes these problems. To check, run make -n install before you install. | |
| Note |
|---|---|
| The pci.ids and pciutils have to version match or you will get garbage output. pciutils doesn't detect the version of pci.ids and won't give a diagnostic message if there's a missmatch. | |
A place to start looking for USB files is Linux USB (http://www.linux-usb.org).
usbutils is at USB Project (http://wwwbode.cs.tum.edu/Par/arch/usb/) - look for "download". You also need usb.ids (http://www.linux-usb.org/usb.ids) (I couldn't find the link to this file from the main page). This usb.ids is newer than the file that comes with usbutils.
The usbutils tarball also has different ideas about the locations of files than I do. Here's my configure line
../configure --prefix=/usr --sbindir=/sbin --datadir=/etc |
| Warning | |
|---|---|---|
make install overwrites a newer version of
usb.ids with its own version and
touch'es the file, so that you may think
you have a new file.
So afterwards, remember to copy over the new usb.ids.
However the lastest usb.ids isn't compatible
with the latest usbutils - I get lots of
errors of "Unknown line at line $linenumber", where $linenumber
is each line in usb.ids. You have to do something like
| ||
With the firewire drivers, the external disk is seen, but not assigned as a scsi device (e.g. /dev/sda /dev/sr0). To do this you need to run rescan-scsi-bus.sh (thanks to Ben Collins for pointing me to this file). This file parses /proc/scsi/scsi and needs the module scsi-mod loaded. You need to be root to execute this file. I wasn't able to use my firewire card for about 2 yrs till I heard about this file. I'd assumed that there was a problem with the drivers for the TI chipset.
If you can't find the external disk on the USB bus, you can check with this file too to make sure. However if you don't see the hotplug in the logs, rescan-scsi-bus.sh won't see it either.
My Slackware machines recognise the external disk when it's hotplugged.
My RedHat machines (one new hardware, one a 5yr old laptop), although they recognise a USB zip disk, don't detect the external harddisk being hotplugged. I eventually got the external disk recognised with the monkey-typewriter-sonnet method, by a combination of unloading and reloading the drivers, turning the disk off/on, and rebooting the system (you need the sysadmin, or root access, to do this). It's hard to debug the problem: messages in the logfiles should map back to strings in the rc files, but they don't - the strings are coming from somewhere else, making the logs useless for debugging. The shortest path on the kbd typing metric I've found is loading the drivers, plugging in the USB cable to the external drive, and then turning on the power to the external disk, when the disk comes up as /dev/sda. If you hear the disk spinning up, you know it's been recognised (well usually, this procedure doesn't work all the time - if it doesn't a few reboots seems to do it, eventually).
If another disk has been on the scsi bus (e.g. an external usb zip disk - as /dev/sda), and has since been removed, the external disk will come up as /dev/sdb, which won't be in /etc/fstab. I haven't figured out how to deal with this yet. Sometimes waiting for the tired electrons to fall out of the machine seems to do it, otherwise you have to find a person with root access and restart the usb bus or mount the disk on /dev/sdb.
After the external device is recognised, it must be assigned a scsi device by rescan-scsi-bus.sh. This doesn't need to be done for usb devices. Presumably the usb drivers handle assigning the device a number on the scsi bus.